Previous Page |
 Next Page | |
 | ||
Previous Page |
Next Page | |
| ||
Lesson 3: Creating a Newsletter to Learn More about Microsoft Word
To learn about more of the many available features in Microsoft Word, we are going to create a newsletter. Let's imagine that we were asked to type up and print this newsletter for people living with HIV/AIDS. As we perform the various tasks in creating the newsletter, we will learn about many Word features.
It is suggested that you do the Practice by following along with this lesson. Specific instructions to help you create your own newsletter will follow the word "Practice" in each section. If you need to quit in the middle of the lesson, save your work before you close the Word application. When you are ready to resume the lesson, open your newsletter document and continue where you left off. Do not skip any steps!
We will use these steps to create our newsletter:
| 1. | Open Microsoft Word. |
| 2. | Save the document initially and then save often as you work on it.. |
| 3. | Change the page setup. |
| 4. | Add a text box and change the background color. |
| 5. | Move, resize and delete a text box. |
| 6. | Change the font style/size/color and align the text. |
| 7. | Format the text box: text wrapping layout. |
| 8. | Create columns. |
| 9. | Create a headline. |
| 10. | Copy & paste text. |
| 11. | Add bullets to lists. |
| 12. | Insert a column, section or page break. |
| 13. | Insert a picture or Clip Art. |
| 14. | Enter more text. |
| 15. | Align text: justification. |
| 16. | Create Drop Caps. |
| 17. | Create a page border. |
| 18. | Spell check the newsletter. |
| 19. | Use zoom/magnify tools. |
| 20. | Use Print Preview. |
| 21. | Print the newsletter. |
| 22. | Save and close the document and Word. |
The first step is to open Word: Open the Start Menu, go to the Programs submenu (All Programs on Windows XP), and select Microsoft Word. If Microsoft Word is not listed, look for a Microsoft Office submenu and see if Word is listed there. If Word still cannot be found, either ask your teacher or perform a search using the Windows Search feature (located on the Start Menu).
Open a Pre-Existing Document:
To open a pre-existing document from inside the Word application, first open Word. Next, open the File menu and select Open. Navigate to the document's location (use the "Look In" drop-down box and double-click on folders to open them as needed, then click on the document name) and then click the Open button.
Open More than One Document:
You can have more than one Word document open at the same time. From within the Microsoft Word application, open the File menu and select Open. Navigate to the document's location (use the "Look In" drop-down box and double-click on folders to open them as needed, then click on the document name) and then click the Open button. Repeat these steps as needed to open additional documents.
Switch Between Open Documents:
When you have more than one Word document open at the same time, each document will probably have its own button on the taskbar. Click on each document's button on the taskbar to switch to that document. If there are multiple documents open but only one Microsoft Word button on the taskbar, there is an alternative method to switching between open documents: Open the Window menu and select the name of the document you wish to switch to.
Create a New Document:
To create a new document from within Microsoft Word, open the File menu and select New. Select Blank Document from the dialog box (older versions of Word) or click on the Blank document link in the task pane (Word 2003) for a new, empty document. To use a template document, select a template from the dialog box (older versions of Word) or click on the On my computer... link on the task pane under Templates and then select a template (Word 2003).
NOTE: You will need to be in the Print Layout view for this lesson. Click the Print Layout view button at the bottom of the document (see Lesson 1, "Microsoft Word: Document Windows and Document Views," for more information).
Practice: Follow the above instructions to open Microsoft Word and switch to the Print Layout view.
Step 2: Save the document initially and then save often as you work on it.
It is very important to save your work. If there is a power loss, any work that has not been saved will be LOST! Any unsaved work would have to be re-done after a power loss, so it's important to get into the habit of saving often.
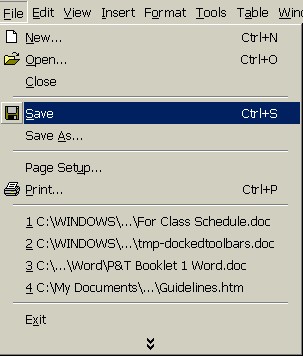
There are two ways to save a Word document. The first way is through the File menu and the second is with the Save toolbar button.
To save using the File menu, simply open the File menu and select Save. (You can also select Save As if you want to; they perform the same task when you save a document for the first time.)
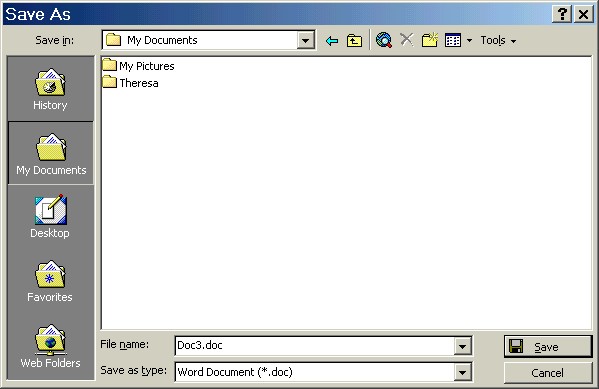
This will open the Save As dialog box. Simply navigate to the location on the computer where you want to save the newsletter (click on the arrow next to the selection in the "Save In" drop-down box), give the newsletter a name (in the "File Name" text box), and then click the Save button.
To save using the toolbar button, just click once on it:

Again, the Save As dialog box will appear. Navigate to the location on the computer where you want to save the file, give the document a name, and click the Save button.
After you have saved a document for the first time, you only need to click on the Save toolbar button (or open the File menu and select Save - not Save As) to continue saving as you work. Click on the Save toolbar button every few minutes as you work on the document. If you want to save the document under a different name, open the File menu and select Save As. Again, navigate to the location on the computer where you want to save the document then give it a new name and click the Save button.
Practice: Open the File menu and select Save. Change the location of the file to Desktop and type My Newsletter as the name of the document. Click on the Save button.
NOTE: Word documents are saved with the .doc file name extension. (For more information on file name extensions, see the Definitions in this program and/or "I Can Teach Myself! Learning the Computer" Intermediate lesson number 3, "File Name Extensions.")
 Previous Page |
Next Page |