ROOF CONSTRUCTION - Part II
Log Home Construction by the Homeowners:
Ron and Susan Colbow & Families


HOME

1. BEFORE THE KIT ARRIVES - Part I
2. BEFORE THE KIT ARRIVES - Part II
3. THE KIT IS DELIVERED
4. LOG WALL CONSTRUCTION - Part I
5. LOG WALL CONSTRUCTION - Part II
6. ROOF CONSTRUCTION - Part I
7. ROOF CONSTRUCTION - Part II

8. WALK OUT BASEMENT WALL SIDING
9. SHINGLING THE ROOF
10. SEPTIC SYSTEM INSTALLATION
11. OUTSIDE TRIM
12. INSIDE WORK - Part I
13. INSIDE WORK - Part II


log home construction, great room roof construction

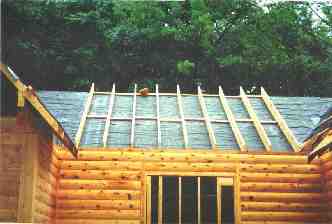
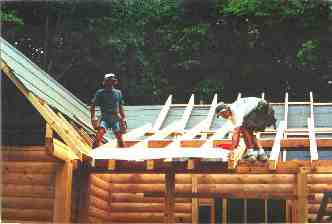
This photo shows the great room roof system under construction. The 4"x 6" exposed rafters and, 1"x 6" T&G paneling are out of view, under the visible black paper. The visible rafters are 2"x 12" rafters centered on top of the 4"x 6" rafters exposed to the great room. When complete, R-30 insulation will be placed between the 2x12's; 1/2" plywood sheathing, black paper & shingles nailed on top of the 2x12's. The completed roof will be vented at the soffits & ridge.

Top of Page

Here the porch posts and plates are going up in preparation for construction of the porch roof.

Top of Page

The porch roof under construction.

Top of Page

<<< Pervious Page  

Next Page >>>

This site is sponsored by:

B & H CEDAR LOG HOMES, L.L.C.
"Life-Styles in Solid Cedar"
65 Nottingham Dr. - Fredericksburg, Virginia 22406
------------
Phone: 540-752-4106 - E-Mail: [email protected]

Copyright 2000, 2001, 2002 © B & H Cedar Log Homes, L.L.C. All rights reserved.
Send mail to [email protected] with questions or comments about this web site.
Last updated:01/09/2002


privacy

Hosted by www.Geocities.ws

1