ROOF CONSTRUCTION - Part I
Log Home Construction by the Homeowners:
Ron and Susan Colbow & Families


HOME

1. BEFORE THE KIT ARRIVES - Part I
2. BEFORE THE KIT ARRIVES - Part II
3. THE KIT IS DELIVERED
4. LOG WALL CONSTRUCTION - Part I
5. LOG WALL CONSTRUCTION - Part II
6. ROOF CONSTRUCTION - Part I
7. ROOF CONSTRUCTION - Part II

8. WALK OUT BASEMENT WALL SIDING
9. SHINGLING THE ROOF
10. SEPTIC SYSTEM INSTALLATION
11. OUTSIDE TRIM
12. INSIDE WORK - Part I
13. INSIDE WORK - Part II


log home construction, roof truss installation

The first truss is set with the help of a crane on June 18,1999. The "ladder" attached to the truss allows the roof to overhang the gable and  is constructed on the ground before the crane arrives.

Top of Page

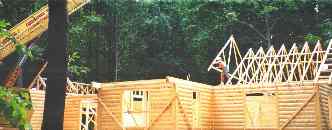
The job moves quickly, thanks to the crane.

Top of Page

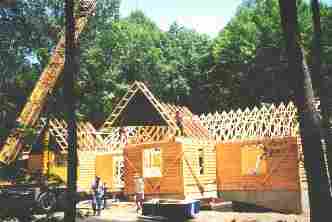
The last truss is positioned four hours after the crane arrives on the job. $300 is a typical charge for the crane service.  Note that plywood sheathing and black paper, in addition to the ladder, was attached to the gable truss before the crane arrived. Obviously, it is easier and faster to do this work on the ground, as opposed to  waiting until the truss is on the log wall.

Top of Page

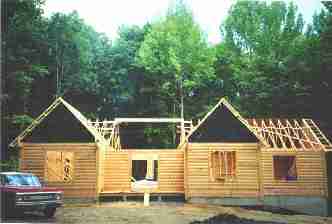
This photo shows the ridge beam in place over the great room. This engineered beam will carry the load of the great room roof system (see next page). To size and price this beam, take your plans to your local lumber yard.  The yard will send the plans to the beam manufacturer who will size the beam at no cost.

Top of Page

<<< Pervious Page  

Next Page >>>

This site is sponsored by:

B & H CEDAR LOG HOMES, L.L.C.
"Life-Styles in Solid Cedar"
65 Nottingham Dr. - Fredericksburg, Virginia 22406
------------
Phone: 540-752-4106 - E-Mail: [email protected]

Copyright 2000, 2001, 2002 © B & H Cedar Log Homes, L.L.C. All rights reserved.
Send mail to [email protected] with questions or comments about this web site.
Last updated:01/09/2002


privacy

Hosted by www.Geocities.ws

1