|
Quick Kills
Part 2
The previous example shows that ignoring opening principles and particular nuances of an opening can lead to an aggressive attack. Sometimes, more subtle mistakes lead to bigger ones, like in this next game.
Lucarz (1844) - bscastro (1851) [B01]
ICC 15 0 Internet Chess Club, 09.08.2003
[Castro]
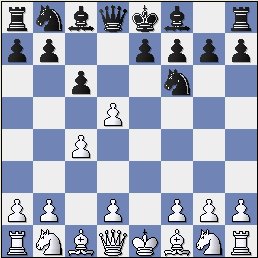
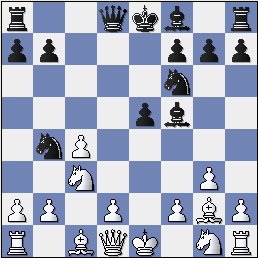
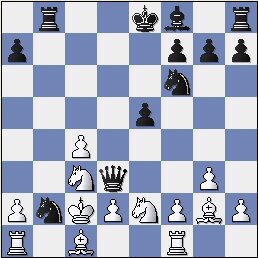
1.e4 d5 2.exd5 Nf6 3.c4 c6 Diagram Known as the Scandinavian Gambit, this variation gives Black some compensation for the pawn in the form of quick development and saddles White with a backward d3 pawn.4.dxc6 Nxc6 5.g3?! White's move demonstrates that he does not understand the opening. Even though he may not know the theory, he may see that the weakening of the light squares e2 and d3 with White's intended fianchetto of the bishop may cause problems which it does. [ 5.d3 is the book move here. This move controls e4, reinforces the c4 pawn as well as opening lines for White's dark-square bishop. 5...e5 6.Nc3 Bf5 7.Nf3 is a typical line in this opening, where we see that Black has some compensation for the pawn in the form of speedy development.] 5...e5 6.Bg2 Things don't look so bad and they aren't terrible, but Black is now able to prevent White's d2-d3 push, which will cramp his development. [ 6.d3 could still be played here, but then it tends to make White's previous move look silly. However, this is perhaps the best move still.] 6...Bf5 7.Nc3?! [ 7.Bxc6+ bxc6 is possible and give White an even game, but I suppose I was willing to weaken my structure slightly in addition to the pawn sacrifice because of owning the two bishops and my lead in development.] 7...Nb4! Diagram Despite being up a pawn, Black has the initiative and full compensation for the pawn. White is not lost yet, but he is not playing with an awareness of the possible dangers, thus missing the best replies.8.Nge2? Trying to keep the threat on the b7 pawn as well as getting the king to safety, White neglects the queen's safety. [ 8.Qa4+ Bd7 9.Qb3 Bc6 10.Bxc6+ bxc6 and Black's pieces are much more active, giving him the advantage.] 8...Bc2! White can resign here, but he continues for a few moves. 9.Bxb7 Bxd1 10.Kxd1 [ 10.Bxa8 Bxe2 11.Kxe2 Qd3+ 12.Kd1 Ng4 and Black will most likely mate the White king in a few moves.] 10...Rb8 Notice how Black did not really care about the b7 pawn, because by taking it, White has just opened the b-file for the Black rook. 11.Bg2 Nd3 Threatening a fork on f2. This is the best way to play (when possible), by using threats to move pieces into ideal positions. Also note how White's omission of d3 has affected him as all of his pieces are paralyzed. 12.Rf1 [ With such a material advantage already, Black does not fear any one-move threats by White. 12.Bc6+ Ke7 Simply moving out of the way.] 12...Nxb2+ 13.Kc2? White could have struggled along further, but his move allows a pretty checkmate. [ 13.Bxb2 Rxb2 and mate is threatened on d2. 14.Bc6+ Ke7 White's moves only delay the inevitable. Black can trade down pieces leisurely, when his material advantage will be evident.] 13...Qd3# Diagram White checkmated 0-1
For the conclusion of this article, check out Part 3.
If you haven't read it yet, you can also read Part 1
| |