![]()
projects
home page - about us
- join us - contact
details - events - photos
- publications - library - projects
- local suppliers - buy/sell - faq - what's new - links

Project 2 - Front fairing
Design and article by Richard Janssen
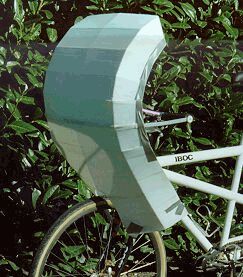
I have built two HPV fairings from coroplast/corefluplastics - a material normally used for real estate signs. The most successful one is for an upright bicycle and has been used on two different bikes in varying circumstances. I have found the plastic very easy to work with and a successful fairing can be built within 2 hours.
Materials: Corrugated plastic 3 mm thick, steel or aluminium strip 12mm wide, duct tape, TyRaps (plastic zip-lock ties).
Tools: Straight edge, hot glue gun, sharp knife and a tape measure.
Construction
Cutting
Cut out a rectangle 900 X 600mm from the main sheet. This will produce a wide and deep fairing that provides wind protection for the knees and sits high enough to provide shelter for a tall rider. The long side has the end grain showing on it.
Folding
Measure in 100-200mm from the end grain and score at right angles to the grain with a blunt point on the full length of the sheet on the left and right sides, but not the front and back - or the sheet will be weakened. Scoring controls where the sheet will fold, just as with cardboard.
Cut with the grain from the score line to the outside edge every 100mm apart on the left and right sides of the sheet. Score with the grain from the cut on one side to the other.
Gluing
Using the glue gun to hold the tabs in place, overlap them by 20mm approximately and hold onto them while the glue sets. By varying the overlap, the fairing's curvature can be altered. Less here, more there.
This technique produces a compound curve that is very strong and presents a reasonable aerodynamic profile. The fairing that I have made has 100mm tabs which left 400mm of flat area in the front - it looks a bit boxy. By having longer tabs the frontal curve would be more gentle.
Having used the first fairing for a while, I think I can do better. I will try using tabs of varying length to produce a shape that fits my bicycle and me better.
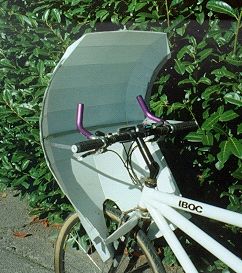
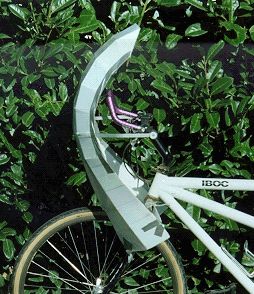
Trim the top corners off at 45 degrees to clear your arms and cut out an arc where the wheel goes. Use the duct tape to finish the edges, as the material can be quite sharp if you rub against it. Check clearance and operation of the brakes!! This fairing is very deep and goes about 150mm down the forks.
Mounting the fairing
Use your highly accurate eyeball to judge where the fairing should be positioned. The steel strip is used now. About 1000mm should be long enough. Remember to file off any sharp edges. It is attached to the ends of straight bars by the use of tube plugs. Drill a small hole in both ends of the strip and thread the plugs through the holes.
Bend the strip to match the curve of the fairing and hold it out away from the handlebars. Handlebar end plugs of the sort that expand a rubber block are best. Mount the strip on the bars so that it sits horizontally. Position the fairing at the desired height. Now punch small holes for two or more TyRaps to go around the steel strip which are sufficient.
The lower mount can be tricky if you have suspension forks. I tried taping the lower edge to the sliders but that let go on a particularly wet, cold and muddy ride. (Fortunately some cord carried for emergencies came in handy).
An expanding plug that goes into the steerer tube and a bracket that goes around the back of the crown and then forward to clear the slider/brakes would work better.
Rigid forks are an easier option. I just use the duct tape to secure the lower edge to the fork blade. Again a bracket from the fork crown to the fairing would be better. The lower outside edges were taped so that they were pulled together and supported by a strip of plastic. This reduced frontal area and stabilised the lower section.
In practice
How does it ride you ask? Very well is the answer. The current fairing has been ridden in cross, side and tail winds and it does not interfere with normal, safe handling. People stare at you on the main road because it is big, white and different.
Head winds are easier to ride into and the fairing works like a sail in tail winds. High speeds are easily attained when descending, good brakes are essential on curved downhills. On a straight hill with high pressure city slicks fitted to our MTB tandem, the fairing allowed the bike to roll to 86.2 km/h. The same roll down was done on another tandem without a fairing, but with the same riders, achieving 77km/h.
At those speeds the air resistance is becoming very high and to achieve a difference that big without pedalling indicates the efficiency gain of the fairing. During that high speed run the bike remained extremely stable with no hint whatsoever of wobbling and the top edge of the fairing was deflected only 25mm (1").
It has also been used off-road and has survived gorse bushes, dry willow branches and being thrown into and dragged out of blackberry bushes. (Don't ask about that ride. The stoker and I were pulling out gorse thorns from our shins for a week). A minor slide into the undergrowth at the side of a gravel road was less damaging than expected due to the fact that I was able to tuck behind the fairing while sliding into the brush.
Single track is interesting but with the right set up it causes no problems. I have clearance that allows me to stand up on steep hills and throw the bike around on rough tracks.
The second fairing
I built this for a LWB recumbent of my own design, fitted with above-seat steering. The fairing was easy to make. A simple long flat sheet was TyRapped to the big ape hanger bars and the front edge was pulled into a curve. The curve was held in place by using a former made from plastic sheet and 25mm polystyrene in a sandwich construction.
I made a rear fairing that clipped onto the seat frame and smoothed out the airflow from the back of the seat. It was held in place by tape and by cutting a circle near the edge of the sheet and slotting it. This allowed the panel to clip onto the tubular frame.
This has only been ridden up and down the street so there is no road test to report on (yet).
![]()
home page - about
us - join us
- contact details - events - photos - publications - library
- projects - local suppliers - buy/sell - faq - what's new - links
© Kiwi HPV Inc 2004