|
Base Knots
The knots described here are called base knots because they form
the basis of most other knots. The constriction hitch, invented
this century by Clifford Ashley, is ideal if a line parts and
you need the frayed end straight away or if you have to do a
splice and need it straight away.
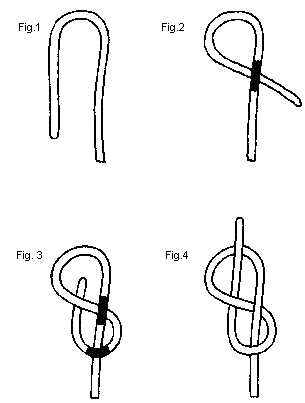
Overhand
Knot
Also called a thumb knot, a half
knot and a stopper knot, the overhand knot is very useful. It
has one chief function: to serve as a basis for other knots. It
is sometimes used as a stopper knot to prevent a rope from
running out of a block or any other hole, but it is not the best
knot for this purpose, as it jams and is difficult to untie.
An overhand knot left tied fight in a rope also halves the
breaking strain when the rope is in use.
-
To tie the overhand knot, hold the standing part in your left
hand and the working part in the right. Form an eye by laying
the end over the standing part, as in Fig. 1.
-
Then pass the end around the standing part, as in Fig. 2.
-
Finally, pass the end up through the
loop, as in Fig. 3.
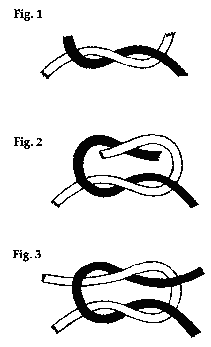
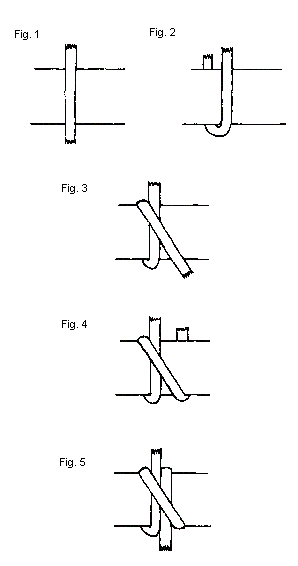
Reef
Knot
A reef knot is also known as a
square knot. Both are tied in the same way, except that a reef
knot is tied in a single cord and a square knot is tied using
two cords.
This knot has a lot of history and
has been used more than any other knot. Once called the knot of
Hercules, it is generally the most useful way to join pieces of
cordage. However, it has two serious disadvantages: it will NOT
hold cords of different sizes and, it seems to jam under great
pressure.
-
To tie the reef knot, first tie each end around
the other, as in Fig. 1 (the same as for an overhand).
-
Then form two bights by crossing the ends over
each other, as in Fig. 2.
-
Now thread the ends through their opposite
bights, as in Fig. 3.
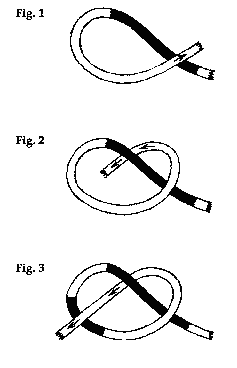
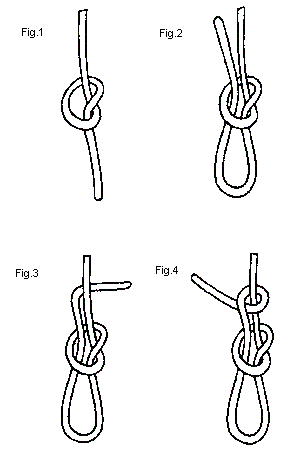
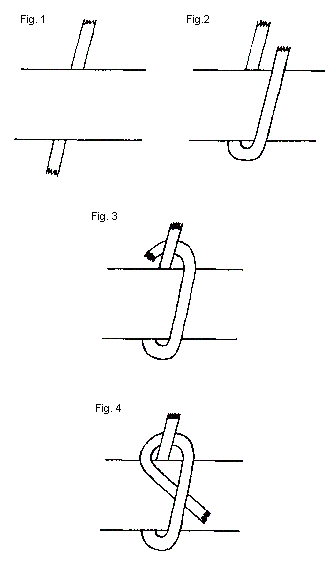
Bowline
A bowline is sometimes called the
king of knots, and is the most useful way to form a loop in the
end of a rope. Though simple in construction, it never slips or
jams; and, even after high tension has been applied to it, a
simple push of the fingers will loosen it enough to untie. The
bowline is really a sheet bend tied with one cord, and a loop.
-
To tie, take
the standing part in your left hand and form a loop, as in
Fig. 1.
-
Then pass the
working end up through the loop, as in Fig. 2.
-
Take the
working end around the standing part, as in Fig. 3.
-
Bring the
working end around and back to the loop, as in Fig. 4.
-
Pass the end
of the loop through the loop and alongside itself, as in Fig.
5.
Then, holding the working parts
together in your right hand and the standing part in the left,
pull tight.
The
following scenario might help you remember how to tie this knot:
Form a rabbit hole on the standing part and, using the working
end as a rabbit, let the rabbit come up out of his hole and run
behind a tree. The rabbit sees a fox and heads around the tree
and back down his hole.
Single
Sheet Bend
This knot also has other names, such
as becket bend, swab hitch, common bend and simple bend. It was
once used as a means of bending a sheet to the clue of a sail.
It is also used for joining ropes of different sizes and
fishermen use it to mend their nets. It holds better than a reef
knot in most cases.
-
To tie, form a bight, as in Fig. 1.
-
Then, using the end of the other rope as
the working end, pass it up through the bight, as in Figs 2
and 3.
-
Pass the end around the ends of the bight,
as in Figs 4 and 5.
-
Pass the end of the working part under
itself and over the eye of the bight, as in Fig. 6.
Finally, pull
taut and tighten.
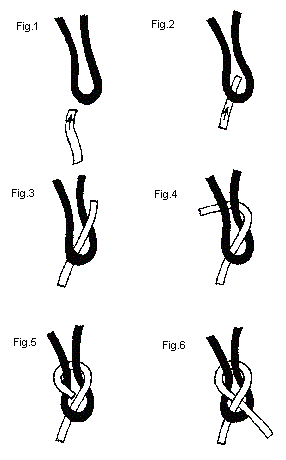
Figure Eight
The figure eight knot, or the figure
of eight knot, is also called the Flemish knot. The knot is the
sailor's common single strand stopper knot and is tied in the
ends of tackle, falls and running rigging. It is used on ships
wherever a temporary stopper knot is required. The figure eight
knot is strong and secure and is easier to untie than the
overhand as it does not have a tendency to jam and therefore
injure the rope fibre.
-
To tie the
figure eight knot, form a bight then a loop as shown in Figs 1
and 2.
-
Then take the
working end of the rope over the standing part and under the
loop, as in Fig. 3.
-
To finish,
bring the working end up through the eye, as in Fig. 4.
Eskimo Bowstring
This is the same as the knot weavers
use for loom adjustment and it is also used by anglers. When
practiced, the Eskimo bowstring knot can be tied with one hand.
It is very useful because the length of the loop can be easily
altered even after the knot has been tied.
-
To tie the
Eskimo bowstring knot, form a loose overhand knot, as shown in
Fig. 1.
-
Thread the end
through the overhand knot as in Fig. 2.
-
Then take the
end behind the standing part, as in Fig. 3.
-
Finally, form
a half hitch, as in Fig. 4.
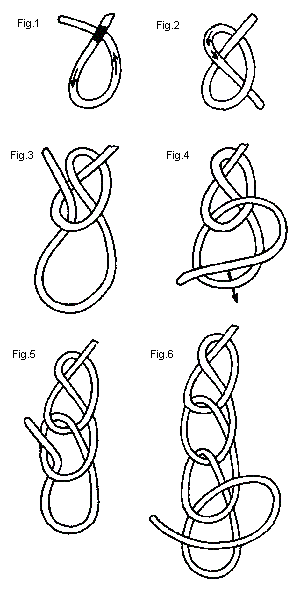
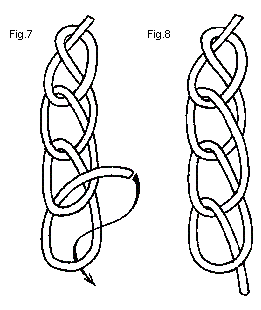
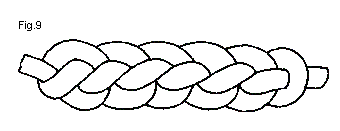
Monkey Chain
The monkey chain is also known as
chain sennit, monkey braid, single bugle cord, chain stitch,
crochet stitch and chain braid. Monkey chaining has many uses
including cord for blinds, electric light pulls, belts and
decoration on uniforms. Monkey chaining is a series of single,
uniform loops that are built up and completed by drawing the
working end through the final loop to prevent unraveling.
-
Start with a
slip overhand knot, as in Fig. 1, 2 and 3.
-
Bring the
working part over the loop, as in Fig. 4.
-
Pull the
working part through the first loop to make a second loop, as
in Figs 5 and 6.
-
Repeat this
step until you achieve the required length. Remember to take
out the slack in each loop by tightening each loop on its
intersecting loop.
-
To finish
off, take the end through the loop, as in Figs 7 and 8. Fig. 9
shows a finished chain.
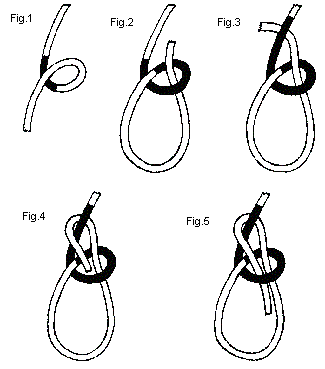
Half Hitch
The half hitch is a basic element in
the formation of many important knots. It is also used alone, as
a quick way to secure a trailing pendant or a line to a spar. It
will hold taut only if tension is kept on the standing part, and
it tends to slip if tension is not kept on the working end as
well.
-
Holding the standing part, place the
working end around the object to which it is to be tied, as in
Figs 1 and 2.
-
Keeping the tension on the standing end,
wrap the working end around the standing part and tuck it
under itself, as in Figs 3 and 4.
-
Pull taut, and keep the tension on the
working part.
Clove Hitch
Also called a ratline hitch, this
knot has a number of functions. In sailing, it is frequently
used to secure lanyards and halyards to stanchions and spars,
and to fasten ratlines to the shroud. This knot is quite secure
when tied to a spar.
-
To tie, take a turn around the spar as in
Figs 1 and 2.
-
Bring the working end over the standing
part as in Fig. 3.
-
Take the working end around the spar as in
Fig. 4.
- Then pass the end
under itself as in Fig. 5.
- Finally pull tight.

|