|
Staying Found Simply
Why do people get lost? For many
reasons, and the majority are completely avoidable. The most
common mistake is not packing a map and compass because you're
"just going out for a quick hike on a clearly marked trail." All
you have to do is be daydreaming or chatting with your partners
to walk off one trail and onto another, completely unaware.
Another mistake is lack of preparation. You can imagine the
routine the trip is on so you grab a map, toss the compass in
the pack, and go, with no forethought or map homework. We must
always study the maps before we go out, which is why we probably
have an easier time staying on course. Yet another reason for
getting lost is trusting your partner, who may be just as
hopelessly lost as you are. Everyone who wants to safely enjoy
the great outdoors should master basic navigational skills and
be able to use them.
Having been a member of several search and rescue teams and also
a professional mountain guide, I am continually amazed by the
number of people I encounter who dutifully carry a map and shiny
new compass, yet have absolutely no idea where they are, where
they are heading, or where they came from. Sure, packing along a
topographic map and a compass fulfill the "be prepared" mandate,
but what good are they if you don't know how to use them? Not
much! You may as well bring a world atlas or road map they'll be
as much help as a topographic map in the backcountry if you
don't have map and compass skills.
The art to staying found involves using one's head, remaining
observant, and applying map and compass skills properly.

Compass
At a minimum, a compass should feature the following:
1. Rotating bezel or azimuth ring with a 360 degree dial in 2
degree graduations
2. A clear base plate with inch and millimeter scales
3. A direction of travel arrow engraved into the base plate
4. A rotating magnetic needle mounted in a clear capsule
filled with liquid to reduce shake and movement.
5. Orienting lines engraved or printed onto the bottom of the
rotating capsule
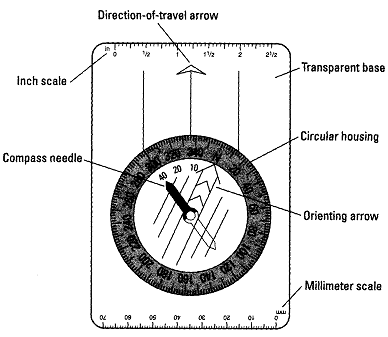
Picture below shows basic compass features. Additional features,
such as a sighting mirror (called a prismatic compass), built in
adjustable declination, clinometers, and a magnifying glass add
to the cost of the compass but are very useful if you plan to
become serious about your navigational skills.


Understanding compass
parts
Besides a needle and a big "N," how complicated can a compass
be? Oh, not very complicated, but there are some parts to talk
about, including features that come into play every time you
take a bearing and set a course.
Azimuth ring (housing): The circular housing with textured edges
on the compass, often liquid filled, that rotates within the
compass base for taking or setting bearings. Degree markings,
from 0 to 360, are typically etched into its surface, making up
the azimuth ring or graduated dial.
Gun type sights: Most often found on prismatic (sighting)
compasses, they are used like the sights on a gun for sighting
and taking bearings with maximum accuracy.
Index line: The mark on the front of the sight or compass base
plate where you will read the indicated bearing.
Line of travel or direction of travel: A line or arrow engraved
on the base plate of your compass that points you in the
direction you need to go to get to your desired destination.
Liquid damping: Liquid damping
allows the needle to come to rest rapidly and helps to hold the
needle steady, allowing for faster and more accurate readings.
Compasses that do not have liquid damping leave the user waiting
for what seems a lifetime for the needle to stop spinning and
squinting to determine which point the bouncy needle is actually
pointing to. The better compasses use a kerosene based fluid or
some other additive to ensure the liquid does not freeze or boil
from minus 40 degrees F to plus 120 degrees F.
Mirror: Incorporated into a hard case lid that folds down over
the top of the compass housing, the mirror is used to make
prismatic in line sight the most accurate method of using a
handheld compass. A prismatic compass allows you to hold the
compass at eye level, sighting both the distant object through
the gun sight and the compass face at the same time.
Orienting arrow: This is the outlined arrow engraved into the
base of your compass housing and often lined with red paint. The
arrow is made to exactly outline the outside of the magnetic
needle. By centering or "boxing" the magnetic needle within the
orienting arrow outline, both pointing in the same direction
(unless back sighting), you are able to determine your bearing
or direction of travel.
Protractor: Some models have this feature that allows you to
more easily plot a bearing on a map.
Sighting line: This is the line you sight along on a handheld
compass to take a bearing.

Finding yourself on the
map
To find where you are on a map, you must first orient the map so
that it represents a two dimensional image that comes as close
to exactly paralleling the three dimensional world you are
standing in as possible. You can do that with or without a
compass.
Orienting a map without a compass
The quickest way to orient a map is by using easily identifiable
landmarks. If you can identify a nearby peak, for example, or a
rock outcropping, lake, or point where two trails intersect, or
a point that is unique enough to have a map symbol or
designation, then placing yourself on the map is easy.
After you know your exact position on the map, just spin the map
until other points of reference on the map line up with the same
points of reference that you see on the surrounding landscape.
Good navigators should keep their maps in constant orientation
to the surrounding landscape as they travel.
Orienting a map with a compass
No matter how good you are, eyeballing your map to the lay of
the land Is only roughly accurate. For complete accuracy you
need to use your compass to correctly orient your map to the
surroundings. Because the map is printed with the edges lined up
with true north, and because the compass needle always points
toward magnetic north, you have to account for declination to
correctly align your map. Here's how:
1. Correctly set your compass declination adjustment.
2. Place the edge of the compass base plate along the printed
edge of the map.
3. Carefully rotate the map until the red end of the magnetic
needle Is centered (boxed) in the orienting arrow.
Your map is now oriented to magnetic north and the surrounding
landscape.

Establishing a
bearing in the field
Imagine that you are hiking toward a distant landmark that you
can see from where you are now but will soon disappear when you
enter the woods or descend into a valley. How can you be sure
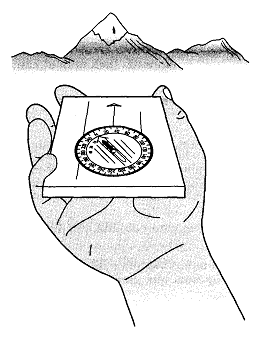
you will stay on course? Figure 11 6 shows how you hold the
compass as you follow these steps:
1. Hold your compass level at waist height and point the
direction of arrow at the landmark. If It's a prismatic compass,
you need to hold it at eye level, sight through the gun sight,
and view the housing in the mirror.
2. Rotate the compass housing until
the red end of the magnetic compass needle is centered (boxed)
within the orienting arrow.
3. Read your hearing in degrees at the center index point where
the compass housing meets the direction of travel. arrow on the
compass base plate.
4. To follow the hearing you get from Step 3, pick the first
significant point of reference In line with the direction of
travel arrow a rock or a large tree, for example one that you
will not lose sight of until you reach it. Also, look over your
shoulder and select a major landmark (say, a rocky outcrop)
directly behind you again, one you Will not lose sight of.
5. Do not touch that compass dial Walk directly toward the point
of reference and don't worry that you can no longer see the
original landmark you are hiking to because your compass reading
has already been set at the Index.
6. When you reach the reference point, hold the compass level
once again, turn your body until the north end of the compass
needle centers itself exactly inside the orienting arrow, and
find another point of reference in line with the direction of
travel arrow.


I
can see the landmark, but where is it on the map?
You can see that distant summit, and you know where you are on
the map, but you have no idea which summit on the map is the one
you are looking at in the field.
1. Orient your map.
2. Hold your compass level at waist height and point the
direction of arrow at the mountain's summit. For a prismatic
compass, you hold the compass at eye level, sight through the
gun sight, and view the housing in the mirror.
3. Rotate the compass housing until the red end of the magnetic
compass needle Is centered (boxed) within the orienting arrow.
Your bearing may be read in degrees at the center index point
where the compass housing meets the direction of travel arrow on
the compass base plate.
4. Taking care not to move the map, place one edge of the
compass base plate directly on your current location on the map.
5. Now, without moving the compass housing or moving the map in
any way, pivot the compass around your known location point
until the red end of the magnetic compass needle Is centered
(boxed) within the orienting arrow.
6. Draw a line,
either in pencil or an imaginary one, along the edge of the base
plate toward the summits Indicated on the map.
The summit you are looking at in the field is the one
intersected by the line drawn from your location.

Working your way around
obstacles
What happens if
you come to a natural obstacle you hadn't counted on, an
obstacle that stands directly in your path and established
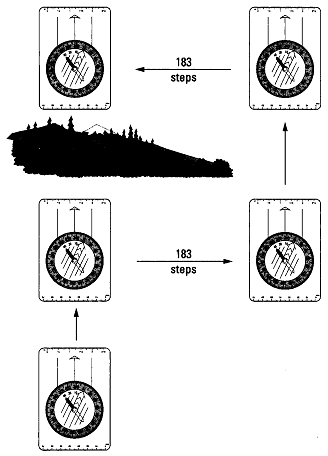
compass bearing? No problem! (See picture below)

1. Take as close to
a 90 degree bearing (hard right or left turn) as possi and begin
walking beside the obstacle, counting your steps.
2. After you reach a point where you can resume hiking In the
direction of your original compass bearing, stop counting and
remember how many steps you took.
3. Turn 90 degrees back so that you are walking on the same
heading you were on when you encountered the obstacle, and walk
until you are clear of the obstacle again.
4. Turn 90 degrees In the opposite direction you originally took
In Step I and retrace your steps, counting until you walk the
exact number of paces you noted In Step 2.
You are now back on your original course, this time on the other
side of the obstacle you encountered.

 |