 Timing
Timing
Basic Instructions and Info at the Yarker Memorial site. Look under S.P.T.S.
Software by Bryan Brown and Art McEwen
Hardware is a Compudyne 486/66 running DOS/Windows 3.1
Photo Electric Cells from Radio Shack (5 to a pack)
Accent Strip Light 10' long cut down and built into my gantry.
Timing and scoring has added an entirely new dimension to my track. When I looked at what's available on the web I only had one major requirement. I wanted a program that displayed lap times in a LARGE format. The software provided by Bryan and Art does this and much more for very little investment.
Their Lemans and Bernie programs allow you to race by time or by number of laps. S.P.T.S. also includes fuel usage based on lap times. The slick part of the fuel usage is you don't need any extra hardware. Stopping over the photoelectric cell lets the software know your refueling. Endurance racing with teams of drivers can be done easily and makes this software the clear choice for the home user.
![]()
Scuderia McEwen's Demonstration Software
I looked at a lot of software and/or systems and I can't say enough about how well this system works. Don't dismiss this software after looking at the screen shots. I almost pasted over it in favor of programs that were formatted in Windows just for the look of Windows. That would have been a BIG mistake !! After using this software I love it. You'll find it's very elegant in its simplicity. Follow the directions and rescue an old computer from being thrown out (Dave,, What are you doing Dave ??? Daisy.... Daisy.....)
Below are some simple updates to the installation instructions that worked well for me. Use them as ideas to improve your own installation.
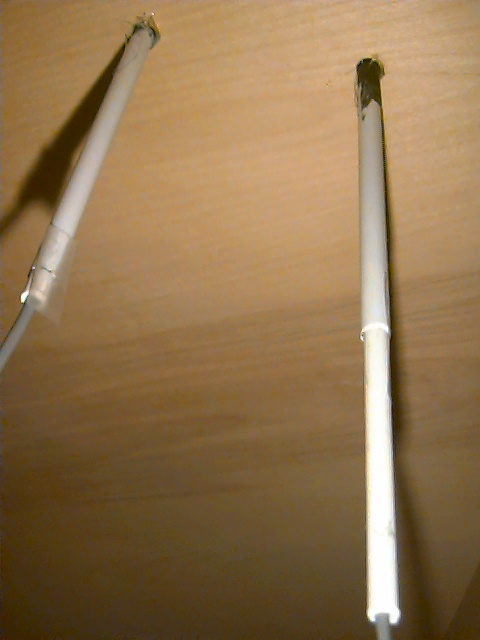
1. To secure the Photo Cells to the track I bought two pieces of plastic pipe at my local hobby shop. I selected the size by taking a PC in and finding the size that was just a bit larger in diameter than the cell. Then I found a second pipe that was just a little larger diameter than the first and would slide over the first pipe.
Once I got these pieces home, I cut both pipes in half, wired the PC and slide the wire through the small pipe. A little glue secured the PC to the top of the pipe and some black paint around the top section of the assembly to made it look good.
Next I drilled holes in my table and in the outside of each lane of my track surface very close to the rails. Slide the larger pipe up through the bottom of the table until it's flush with the track surface. Glue it in place by gluing from under the table. Don't forget to paint the interior of the large pipe flat black. It just makes things look nice.
Insert the small assembly into the larger pipe and DO NOT glue. By sliding the PC assembly up and down you can tune how sensitive the PC is to your light source. I used Scotch tape to secure the assembly. It's quick and easy.
2. For a light source I found an Accent Light at Home Depot that is easily sized and hidden in most any gantry you might build. Before you try other lights go look at this product. I spent HOURS and HOURS building my first gantry and tried LEDs, numerous low voltage bulbs, infrared sensors and emitters, various 110 volt appliance lights and more. The Accent Light blows them all away. It's $10 and easy to modify. It's small, simple, cheap and works well. What more do you want ?
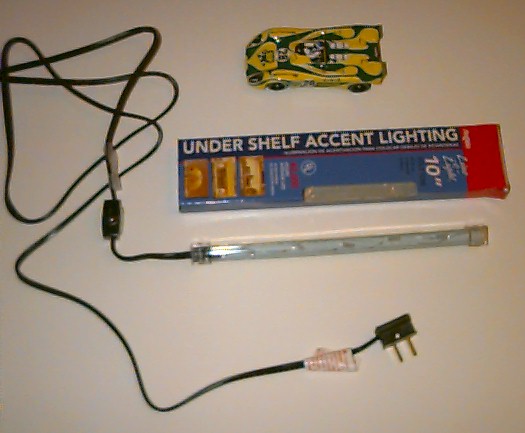
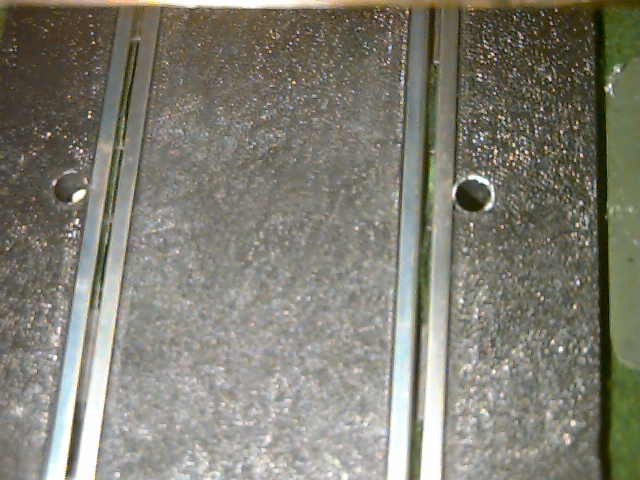
Accent Light Plastic Tubes Sensors in Track Surface
Light Gantry
My gantry is based on the Accent Light I found at Home Depot. After testing to make sure it provided enough light I used a Dremel Cut Off saw to cut the brass housing and inner plastic lens to length. I didn't disconnect any bulbs when I reassembled the unit. Instead I used a long stick to scrunch them together closer without tampering with any of the wiring as I put everything back together.
Next I glued the plastic end pieces onto square plastic tubing from the hobby shop at the correct height. I used cardboard on one as a base and cut the other side to slip over my pit fencing.
To make the light look more realistic I painted everything flat black and added plastic beams from the hobby shop on either side of the light. I left a little room between the beams and the light by gluing them to the plastic ends of the Accent Light. I made the top of the beams about an 1/8 of an inch higher than the light so when I glued the top on there is still room for ventilation.
For Start Lights I used LEDs from Radio Shack. Be sure to use the High Intensity LEDs. Out of the box these do not show up very well except when you look straight into them. I ground them down so that the light can be seen from any angle. Once this is done they are plenty bright.
Grinding the LEDs
I started by grinding the top of the LED flat. I removed about 1/16 as I ground it down.
Next, I ground around the cylinder of the LED on an angle so that the top of the LED became "pointy". Test the LED with a 1.5 volt wall wart. There is no point in tapering the LED or grinding below the point at which the light is inside the lens.
Finally, I used a file to round the edge between my to new surfaces. By making the edge a little round it makes the light just look better.
Once the LED was done I used a Testors Paint Pen to paint the base of the LED black all the way up to where the tapering begins.
Before After
Now you can see the light from any angle and it's bright enough to see from across the room.
I glued my LEDs onto the Gantry and wired them to per the Advanced S.P.T.S. Instructions. . They look GREAT! Art and Bryan made the two outer lights the lane markers so when you get a low fuel or fast time indication it's very easy to see which lane is lit. When the lights are used as starting lights they still come on in the proper order. This is really well thought out. Fun.
Just for Fun...
I made two crew members with lights that are wired to lanes one and two of the S.P.T.S. light circuit. Both crew members are painted yellow and each is placed at a point on the track close to the appropriate lane. Both crew members have two yellow LEDs and a red blinking LED glued to the top of their pit board. When the lane one or lane two LED on the gantry goes on so does the set on the crew members pit board !
Since S.P.T.S. uses these lights to indicate fast laps or low fuel you can now see this indicated at the gantry or as you pass your crew member. Now just like in real life you have to watch the flags (or lights in this case) !!!
Home / Layout / Characters / Homebuilt Cars / Tech Tips / 1:1 Scale / Links