Firebird Front Clip Installation
Before I got my truck, I did some initial investigation by
going to car shows and talking to people that had Advance Design
trucks. The trucks that caught my attention were the ones that
had V8s, power steering, power disc brakes, and coil springs in
front. The method I heard most often was "clip it".
It did not take too long to find out that clip it meant to install
the front suspension from another vehicle. In particular General
Motors front ends on unibody cars are refered to as clips. Everyone
I talked to said that a Camero or Firebird clip is what they had
used. A little searching on the web and I found a few sites that
gave dimensions for front clips from various GM body styles. Camero/Firebird
front clips frrom the mid 70's are a good fit and as a bonus the
rear end is almost and exact fit. The availabilty of a 1974 Firebird
fit right in to my plans.
My next trip to Joliet yeilded a Firebird clip along with the
rearend and rear springs. Yes I want this truck to look like an
old truck 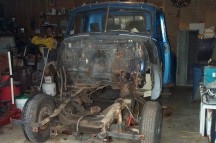 and ride like a new car. This truck
will never have to work again and I intend to ride in comfort.
It didn't long to pull the Buick motor and transmission. After
poking around on the web, reading old issues of Classic Trucks,
and talking to several people who had clipped these trucks, I
decided to go for it. .
and ride like a new car. This truck
will never have to work again and I intend to ride in comfort.
It didn't long to pull the Buick motor and transmission. After
poking around on the web, reading old issues of Classic Trucks,
and talking to several people who had clipped these trucks, I
decided to go for it. .
As I started making plans to install the Firebird clip, besides
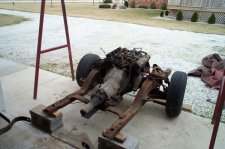 finding the exact axle centerline,
I also wanted to know the heigth with a motor installed. When
I brought the clip home, the only motor available was the Buick
V8. Good choice since I'm sure its heavier than the Chevy 350.
With the motor installed, I leveled the clip in preparation for
figuring out where to cut the 50 frame and how to mate it to the
Firebird clip.
finding the exact axle centerline,
I also wanted to know the heigth with a motor installed. When
I brought the clip home, the only motor available was the Buick
V8. Good choice since I'm sure its heavier than the Chevy 350.
With the motor installed, I leveled the clip in preparation for
figuring out where to cut the 50 frame and how to mate it to the
Firebird clip.
Since the clip would not just slide into the frame like it
will on a Task Force truck, I decided to notch the Firebird frame.
The only thing that I didn't do was plan ahead and map out where
the radiator shell needed to be on the clip. The best way is to
make a jig that allows you to place the support once the clip
is welded in. The Firebird also gave up its steering column, brake
swing petal support, power brake booster, master cylinder, gas
petal and cable, speedometer, transmission crossmember, and proportioning
valve. Those of you that think shame on me for scrapping an early
Firebird will be happy to know that the fenders, hood and rear
quarters went to a good home
The clip is wider than the 50 frame, so I notched the clip
so that I could slide the frame into it and weld the two together.
The way this is usually done lowers the truck much more than I
wanted. This method sets the truck frame right on top of the clip
legs. I choose to mate the two about the same heigth as the ears
for the body mounts on the clip. This lowered the truck about
3". I can still drive it where ever I want without scraping
bottom. By using the Firebird rear springs, the truck sits fairly
level.
One thing that I missed that I wish I had done is to make a
jig that went from the cab to the radiator support. This would
have 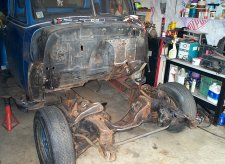 made it much easier place and fabricate
the new mount on the Firebird clip. Once I set the truck on stands
at the heigth I wanted it, I marked the cut lines on it. I found
two factory drilled holes in the frame and used them for reference
marks to make sure the cut lines where the same on each side of
the frame. I also checked the distance from the front of the rear
spring hangers just to be sure. I used a sawzall to cut the frame.
That was the point of no return, it gave my a real queezy feeling
the whole time. Next, I rolled the Firebird clip up next to the
cut off frame to double check my markings of where to notch the
clip. I used a cutting torch to notch the clip, then the sawzall
to clean it up and get right on my marks. When I rolled the clip
into position and engaged the frame into the notches, it came
very close to fitting. A little more work with the sawzall and
a hand grinder made it fit very well. It seems that the rule of
thumb is that you want twice as much weld seam as the frame is
tall. In order to get that, plus a little more, I added a plate
to the bottom.
made it much easier place and fabricate
the new mount on the Firebird clip. Once I set the truck on stands
at the heigth I wanted it, I marked the cut lines on it. I found
two factory drilled holes in the frame and used them for reference
marks to make sure the cut lines where the same on each side of
the frame. I also checked the distance from the front of the rear
spring hangers just to be sure. I used a sawzall to cut the frame.
That was the point of no return, it gave my a real queezy feeling
the whole time. Next, I rolled the Firebird clip up next to the
cut off frame to double check my markings of where to notch the
clip. I used a cutting torch to notch the clip, then the sawzall
to clean it up and get right on my marks. When I rolled the clip
into position and engaged the frame into the notches, it came
very close to fitting. A little more work with the sawzall and
a hand grinder made it fit very well. It seems that the rule of
thumb is that you want twice as much weld seam as the frame is
tall. In order to get that, plus a little more, I added a plate
to the bottom.
How to clip your truck in 12 easy steps:
step 1. Remove the hood, front fenders, inner fenders, and
grill.
step 2. Mark the front axle centerline on the frame.
step 3. Remove the engine and transmission.
step 4. Place the frame on jack stands just behind the cut
line. Level the frame.
step 5. Weld a length of angle iron to the frame. This will
serve as a reference line and it will keep the frame parallel.
step 6. measure ( and write down) lengthes from the angle iron
to:
the axle centerline
the end of the original frame
the holes for the radiator support.step
step 7. Measure the height of the top of the original frame
where the bumper brackets are.
Measure the height of the radiator support
step 8. Mark the axle centerline on the clip. (The ball joints,
not the shocks are the center)
step 9. Cut the original frame 8-10 inches in front of the
firewall. Double check all measurements before you cut.
Step 10. Move the clip into position, check all measurements,
and weld. Before you weld:
make sure the axle centerline is correct. Measure diagonally
from the welded angle iron to the axle centerline. What you are
doing is making a box with an X in it with your dimensions. When
the two side are equal, and the two diagonals are equal, the clip
should be lined up to the truck.
Step 11. Frabricate and install a crossmember for the radiator
shell.
Step 12. Weld a bar across the original frame above the bumber
mounts. Cut that part of the frame off and weld it in place on
the clip.
Home
1950 3100
350 Chevy motor
It Moves
Body Work