If your tower is a low tower, proceed as explained in steps 5 and 6 below. If it is a high tower, follow the instructions in 5-A, 6-A, 7, 8, 9, 10 and 11 below.
5)- Bolt the four medium girts (A141) in the first set of holes below the top girts. The flanges of the girts should be up and out. Use 1/4"x1/2" bolts, nuts and lock washers.
6)- Bolt the tower feet(A-143) in place in the bottom holes, using 5/16"x1" bolts, nuts and washers. The low tower is now complete. If you have a high tower, proceed as below.
5A)- After completing step 4, lay the tower down flat, but be very careful not to damage the main stem or the positive collector nut (A-134).
6A)- Splice the lower legs (B-150) to the upper legs. The upper legs overlap the lower legs 10 inches. The lower legs fit inside the upper legs Leave the upper splice bolts out for the time being, as the medium girts and tower braces will be attached to them later. The tower splice bolts are 1/4"x1/2".
7)- Bolt the lower girts (A-149) to the lower legs (B-150) with the flanges up and out. Use 1/4"x1/2" bolts, lockwashers and nuts.
8)- The tower braces (A142) are bent double. They look very much like the control wire or shut off bale (A-120). The difference is is that the hooks of the braces are bent out, while the hooks of the shut off bale are turned in.
Attach the braces at their center bend to the lower girt (A-149), using a 5/16"x1" bolt. The top brace comes down and bolts to the inside of the girt. The bottom brace goes on the outside of the girt. Use 5/16" flat washers under the head of the bolt and the nut.
9)- Spread the ends of the upper braces apart and bolt them between the middle girt (A-141) and the tower legs. Use 1/4"x3/4" bolts, lockwashers and nuts.
10)- Spread the ends of the lower braces apart, so they will fit over the holes in the bottom of the legs.
11)- Bolt the tower feet (A-143) to the bottom of the legs, being sure that the brace wire (A-142) is between the tower foot and the leg. Use 5/16"x1" bolts, lockwashers and nuts. The other lower brace ends are bolted to the outside of the leg. Use 5/16" bolts, lockwashers and nuts and place a 5/16" flatwasher over the loop of the brace wire to keep it from spreading. The tower feet can be tilted to fit either flat or pitched roofs.
This completes the high tower--tighten all bolts securely as you are ready to install it.
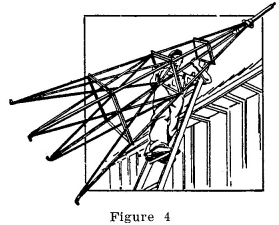
After the tower is assembled, you are ready to place it on the roof. To get the tower on the ordinary roof, it is usually easier for one person to carry it up a ladder as shown in Figure 4.
Most towers are set straddling the ridge row of the roof. On a sloping roof the feet can be blocked up on the low side to make the tower stand plumb.
When choosing the place where the tower is to stand, check to be sure that the bolts, which hold the tower feet to the roof, will be in good, solid lumber. Sometimes it is necessary to nail boards over the shingles and to arrange pieces below the rafters into which the bolts will pull. Use plate washers and lock washers or double nuts to provide sure installation.
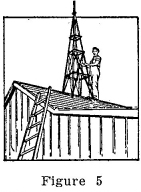
After the tower has been finally located, as in Figure 5, see that it is square on the roof, and not slanting in any direction.
| << Previous Page | Return to Home Page | Next Page >> |