Water, you know, flows more easily through a large pipe than through a small one. It takes more pressure to push the same amount of water through the small pipe. In the same way, water flows more easily through a short pipe than through a long pipe. So it is with electricity. It takes more voltage (pressure) to push electricity through a small wire than a large one. This additional voltage required for the small wire or the long wire is called line loss. By all means avoid line loss if you wish to secure efficient operation from your power plant. Use large wire and short runs.
Just as clogged elbows or rusty sections of pipe hinder the flow of water in the pipe, loose connections and poor splices hinder the flow of electricity in a wire. Be sure all bolted connections are clean and tight and all twisted splices are soldered. Use large wire: make good connections: set your power plant as close as practical to your batteries.
The table with Figure 7 shows the size of wire you should use. Use only heavy duty, weatherproof, insulated copper wire. Iron wire will not carry current well and bare wire will almost surely cause trouble from short circuits. Use the table also when choosing wire from the battery to lights or radio. Heavy drop cord may be used for connecting to lamp sockets.
When choosing a location for the batteries, remember that they should be placed reasonably close to the lights and radio which they are to operate, as this will allow you to use shorter wires and in some cases, smaller wires. They should be placed where they will not freeze in the winter time. They will have to be cared for from time to time, so a convenient place should be found. Since batteries contain acid, which has a tendency to creep out of the cells, they should be placed where this can do no damage.
The instrument panel may be installed in any place which is convenient to you. However, it should be within a few feet from the batteries and so mounted that it can be easily seen.
The general information which we have given below is intended to help you locate the tower in a good place. Check them all over again.
Ordinarily it is best to put the tower on a high barn or other outbuilding. If it is avoidable, do not mount the tower on the roof of a home, as the operation of the power plant may annoy the occupants.
Study the illustrations on page 13, as this shows what the tower looks like when assembled. You see that the tower is made of two sections, upper and lower. The upper section makes a complete low tower when the feet are attached where the word "splice" appears. The two sections together make the high tower.
The upper ends of the tower legs (B-140) are shaped to fit the main stem (C-195) and are held together by the tower clamps (A-117). When assembling the tower, proceed as follows:
1)-Bolt the four upper tower legs (B-140) loosely to the base of the main stem (C-195), using 1/4"x1/2" bolts, nuts and lockwashers. It will be easier to tighten the bolts if the nuts are to the outside. See page 13.
2)-Bolt the four short girts (A-139) loosely to the tower legs (B-140) in the first holes under the main stem base. The flanges of the girts should be up and out. Use 1/4"x1/2" bolts and lockwashers.
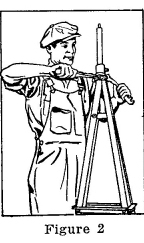
3)-Attach the tower clamp (A-117) around the top of the tower, about one inch below the end of the legs. Bolt the two halves together with 3/8"x1&1/2" bolts, lock nuts and washers. See figure 2.
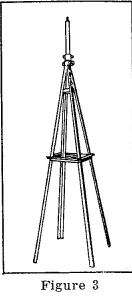
4)-Now tighten all bolts. The tower should now look like Figure 3.
| << Previous Page | Return to Home Page | Next Page >> |