| HOME | NEWS | PHOTO GALLERY | COMPUTER PLUS | COOKING PLUS | ABOUT THE SITE |
| AVG Tutorial Part-1 -- Installing And Configuring AVG 6.0 |
|
AVG 6 Installation After starting the installation and clicking yes to the licence agreement you will be shown the screen where you have to enter the serial number. If you do not have the serial number you will have to visit the AVG website http://www.grisoft.com and register. The Serial Number will be emailed to you in a few minutes time. After you enter the serial number and click on next, you will be prompted for the location to install AVG. The default location being C:\Program Files\Grisoft\AVG6\. Clicking on next allows the installation to proceed until you are shown the Configure Your Protection screen. The default option is all options are activated. I suggest to uncheck all except AVG Control Center. We can configure all the options later on as per our requirements.
After this screen the next screen asks you whether to allow automatic updates.
In my opinion uncheck this option. There are several reasons for doing this, which will be explained later on in this article.
Finally you will be shown the installation finished Screen. Click on OK and your system will restart.
I will now proceed to give you an overview of how you can utilize AVG to its full potential.
Configuring AVG 6
The various options listed under the different menus are given below. |
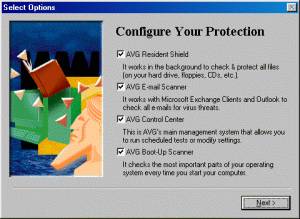
Configure Your Protection screen during Installation
Scheduler
Keep this option checked, which incidentally is the default.
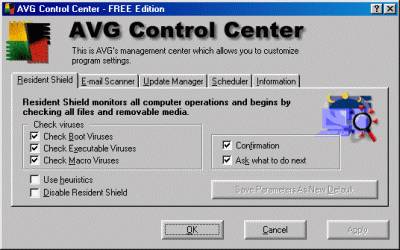
AVG Control Panel - Resident Shield
Information
This section gives information regarding the serial number, Program version etc.
Under Tests we have the following options Custom Test, Complete Test and Removable Media Test.
Custom Test:
In this test we can choose the partitions (C:\, D:\ etc) and or
the folders that we want to scan and then click on start.
Complete Test:
The complete test options scan the full system for viruses.
Removable Media Test:
Selecting this option will display a screen where we have
to select the drive to be scanned. To start scanning we have to
click on the drive, which has the Removable Media, which has
to be scanned.
Under Results we have test results which displays the results of the previous tests