|
BACK
HOME
NEXT
Interfacing with
7-Segment Display
A
7-segment display is compose of seven LED�s. So interfacing it to the
computer port is just similar as with interfacing with LED. There are two
kinds of 7-segment display, common-anode and common-cathode. In
common-anode 7-segment display, the anodes of the seven LED's are
internally connected while In common-cathode 7-segment display, the
cathodes anodes of the seven LED's are internally connected. The examples
here focus only on common-anode 7-segment display.
There
are two basic ways to interface 7-segment display to the computer, direct
and indirect.
Direct Control of Seven-Segment Display
The figure
below shows a common anode seven-segment display interfaced to D0 to D6 of
the parallel port.
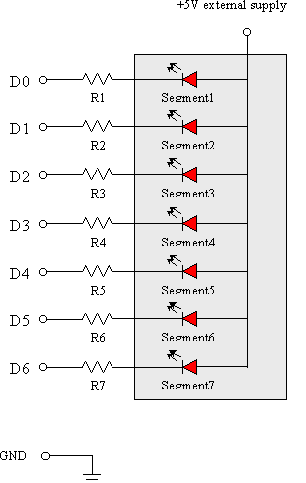
Internal connection of a
common-anode 7-Segment Display
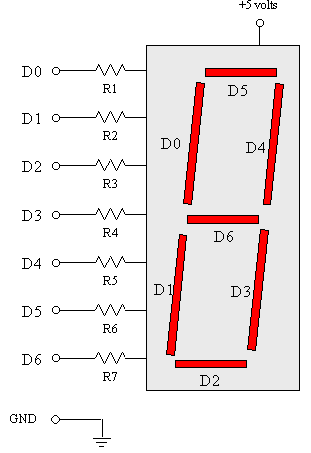
External Appearance of
7-Segment Display
Displaying a number in the
7-segment display is done by letting the appropriate LED's to light. Say for example we want to display no. 4 to the display.
Basing from the connection of above, we must output bits that will cause the segments that are connected to D0,
D4, D6, and D3 to light. So, these will be the bits that we are going to
ouput:

D7
is not included in the circuit but we still have to output a bit to it.
So, we just put there zero so that the binary number will be easily
converted to hexadecimal.
0010
01102 converted to hexadecimal is 2616. Finally, our
Turbo C statement that will output number 4 to the segment will be:

Below is an example of
an interfacing program problem that will control a seven-segment display
that interfaced to the parallel port.
Direct Control of
Seven-Segment Display Program
Problem:
A
seven-segment and four push buttons, Pb1 to Pb4, are interfaced to D0 to
D6 and S4 to S7 respectively. Write a program that will interpret the
pressing of the push-buttons as binary inputs and then display the
equivalent decimal to the seven-segment display.
Binary
1 must mean Pb is pressed.
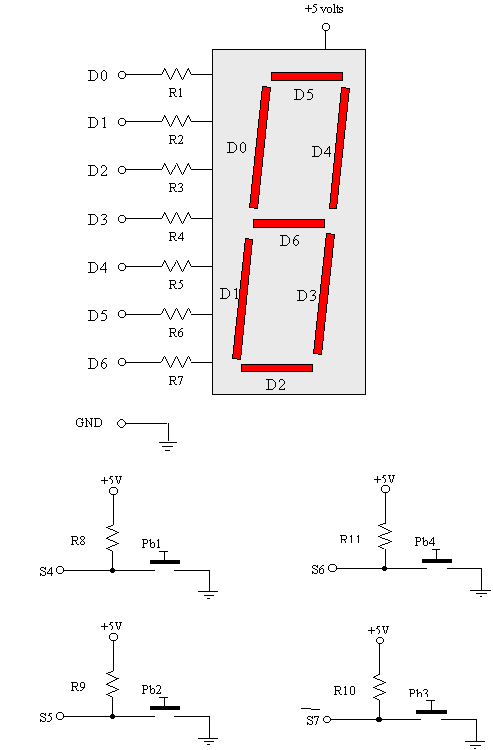
R1-R7 = 330 ohms R8-R11 =
10k
Interfacing Circuit
Diagram
Here�s the program
with line numbers for the following explanations.
|
a
1
2
3
4
5
6
7
8
9
10
11
12
13
14
15
16
17
18
19
20
21
22
23
24
25
26
27
28
29
30
31
32
33
34
35
36
|
#include<dos.h>
#include<conio.h>
void
main()
{
int
in;
while(!kbhit())
{
in
= inportb(0x378);
in
= in & 0x378;
if
(in==0x78)
/* 0 */
outportb(0x378,
0x40);
else
if
(in==0x70)
/* 1 */
outportb(0x378,
0x67);
else
if
(in==068x)
/* 2 */
outportb(0x378,
0x09);
else
if
(in==0x60)
/* 3 */
outportb(0x378,
0x03);
else
if
(in==0x58)
/* 4 */
outportb(0x378,
0x26);
else
if
(in==0x50)
/* 5 */
outportb(0x378,
0x12);
else
if
(in==0x48)
/* 6 */
outportb(0x378,
0x30);
else
if
(in==0x40)
/* 7 */
outportb(0x378,
0x47);
else
if
(in==0x38)
/* 8 */
outportb(0x378,
0x00);
else
if
(in==0x30)
/* 9 */
outportb(0x378,
0x06);
else
/*ERROR*/
outportb(0x378,
0x18);
}
}
|
Line
Explanations
1.
header file for delay function
2.
header file for kbhit, outportb and inportb functions
3.
line space for program readability
4. line space for program readability
5.
main function declaration
6. open brace of main function
7.
variable declaration of integer in
8. repeat the following statements if no key is pressed in the
keyboard
9.
open brace of while
10.
read the status port and assigned it to variable in
11.
mask in with 0111 10002 so that the new in
will only
have a value of either of the
following numbers:
| value of variable
in |
Meaning |
| Hex |
Binary |
|
w
78
70
68
60
58
50
48
40
38
30
28
20
18
10
08
00
|
S7
S6 S5 S4 S3 S2 S1 S0
0
1 1 1
1 0 0 0
0
1 1 1
0 0 0 0
0
1 1 0
1 0 0 0
0
1 1 0
0 0 0 0
0
1 0 1
1 0 0 0
0
1 0 1
0 0 0 0
0
1 0 0
1 0 0 0
0
1 0 0
0 0 0 0
0
0 1 1
1 0 0 0
0
0 1 1
0 0 0 0
0
0 1 0
1 0 0 0
0
0 1 0
0 0 0 0
0
0 0 1
1 0 0 0
0
0 0 1
0 0 0 0
0
0 0 0
1 0 0 0
0
0 0 0
0 0 0 0 |
no
push button is pressed
Pb1
is pressed
Pb2
is pressed
Pb1
and Pb2 are pressed
Pb3
is pressed
Pb3
and Pb1are pressed
Pb3
and Pb2 are pressed
Pb3,
Pb2, and Pb1 are pressed
Pb4
is pressed
Pb4
and Pb1 are pressed
Pb4
and Pb2 are pressed
Pb4,
Pb2 and Pb1 are pressed
Pb4
and are pressed
Pb4,
Pb3 and Pb1 are pressed
Pb4,
Pb3 and Pb2 are pressed
all
push buttons are is pressed |
12.
line spacing for program readability
13.
test if no pb is pressed
14.
send 0100 00002 to the data port to display 0 in the
seven-segment
15.
test if only pb1 is pressed
16.
send 0110 01112 to the data port to display 1 in the
seven-segment
17.
test if only pb2 is pressed
18.
send 0000 10012 to the data port to display 2 in the
seven-segment
19.
test if only pb1 and pb2 are pressed
20.
send 0000 00112 to the data port to display 3 in the
seven-segment
21.
test if only pb3 is pressed
22.
send 0010 01102 to the data port to display 4 in the
seven-segment
23.
test if only pb3 and pb1 are pressed
24.
send 0001 00102 to the data port to display 5 in the
seven-segment
25.
test if only pb3 and pb2 are pressed
26.
send 0011 01102 to the data port to display 6 in the
seven-segment
27.
test if only pb4 is not pressed
28.
send 0100 01112 to the data port to display 7 in the
seven-segment
29.
test if only pb4 is pressed
30.
send 0000 00002 to the data port to display 8 in the
seven-segment
31.
test if only pb4 and pb1are pressed
32.
send 0000 01102 to the data port to display 9 in the
seven-segment
33.
test if only pb4 and pb2 are pressed
34.
send 0001 10002 to the data port to display E (meaning
Error) in the seven-segment
35.
close brace of while
36.
close brace of main
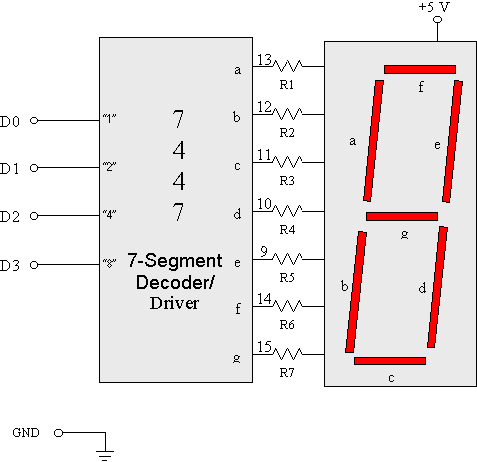
InDirect
Control of Seven-Segment Display
A
7-segment can also be interface to the computer using a 7447 IC (7-segment
Decoder/Driver). The schematic diagram below shows a seven segment
interfaced to D0-D3 of the parallel port:
Here, to be able to
display a number, the program should provide the equivalent number in
binary to pins D0 to D3. Say for example, If you want the seven-segment
display to show number 3, bit 00112
should be sent D3 to D0. The complete bits that can be sent to the
data port are:

D4 to D7 have no
connections so it can be set to zero for ease of number conversion.
Finally, the C/C++ statement that will cause the above seven-segment
to display 3 is:

Below is a problem for
indirect control of seven segment-display.
Indirect Control of Seven-Segment Display
Program
Problem:
A
7-segment Display is interfaced to the computer through a 7447 IC. Write a
program that will cause the display to show up-counting and down counting.
R1-R7 = 330 ohms
Interfacing Circuit
Diagram
Here�s the program
with line numbers for the following explanations.
|
1
2
3
4
5
6
7
8
9
10
11
12
13
14
15
16 |
#include
<dos.h>
void
main()
{
int
c;
for(c=0;
c<10; c++)
{
outportb(0x378,
c);
delay(1000);
}
for(c=9;
c>=0; c--)
{
outportb(0x378,
c);
delay(1000);
}
} |
Line
Explanations
1.
header file for delay, outportb and inportb functions
2.
line space for program readability
3.
main function declaration
4.
open brace of main function
5.
variable declaration of integer c
6.
loop for count-up
7.
open brace of for
8.
output the value of c to the data port
9.
time delay to be able to see the display
10.
close brace of for
11.
second loop for count-down
12.
open brace of for
13.
output the value of c to the data port
14.
time delay to be able to see the display
15.
close brace of for
16.
close brace of main
BACK
HOME
NEXT
|