| The suggested handrail installation on the Trojan saddle tank consists of six lengths of 3mm bright steel rod. Four short lengths, approximately 100mm long, are mounted on the cab sides, one either side of both of the doorways. There are also two long lengths, approximately 400mm long, down either side of the boiler. To add my own personal touch to the Trojan I wanted the handrail on the boiler to run in one continuous length along the sides of the boiler and curved round its front. I explained my requirements to Paul Middleton at Ride On Railways and he was able to supply a single length of 3mm bright steel rod just over 1200mm. |
| Page last updated on : |
| 29/01/2006 |
| Copyright (c) GALT Locomotives 2006, all rights reserved |
 |
| GALT LOCOMOTIVES The Home of the Little Purple Engine |
| Handrail Installation |
| Making the Handrail Curving Jig |
| Unfortunately, with a 3mm diameter bright steel rod, it�s not that easy to bend it by hand with any consistency or get it to match the curvature of the boiler. |
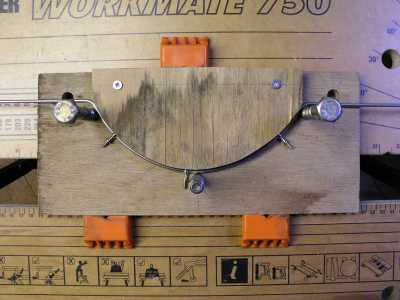
| Consequently, I made a jig, which had the correct handrail curvature that I wanted. To determine the correct curvature for the handrail I simply place the body, front boiler down, onto a piece of paper and drew round it. From this curve I measured in 25mm all the way round and joined all the dots up. When the handrail curvature intersected with the existing handrail mounting points I drew a horizontal line, parallel with the bottom of the boiler to meet the side handrails. A sketch of the drawing is shown on the right. I transferred the drawing on to the wood by using a drawing pin and pushed it through the drawing into the wood. I then used three large bolts (M12) to hold the bent handrail in position and to provide a small radius where the horizontal lines met the handrail curvature. |
 |
| Although the handrail curving jig, which is pictured on the left, was useful I did end up starting the bend on the jig and then finishing it off by bending it by hand a bit at a time and then placing it back on the jig to check the curvature. |
| Suggestions Before bending the small radiuses, as shown above the two top bolts, thread onto the handrail the three stanchions. Once the small radiuses are bent you cannot get the stanchions passed the bend. |
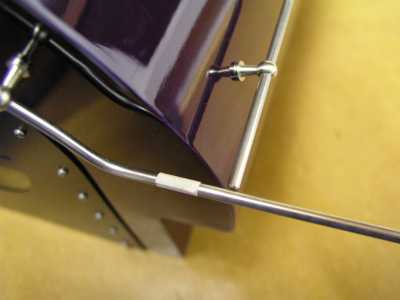
| To determine the position of the small radius, I installed the curved part of the handrail on the front of the boiler. I then placed an off cut of the handrail in the boiler side stanchion closest to the front. Where the two met, shown in the picture on the right, I just measured back 9mm and marked it with some masking tape. The 9mm consisted of 6mm for the radius of the M12 bolts and 3mm for the thickness of the handrail. Consequently, the small radius started at the right hand side of the masking tape shown in the picture. |
 |
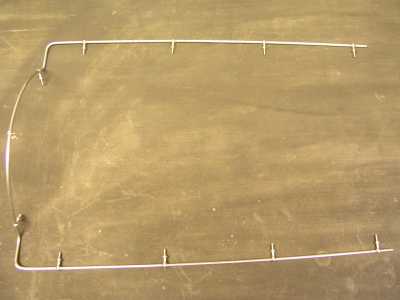
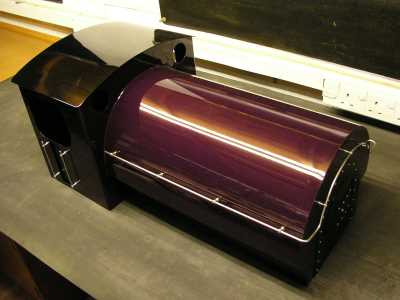
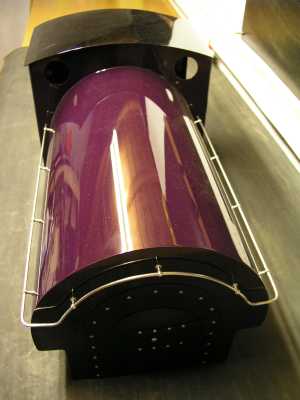
| The completed continuous handrail and the stanchions, placed in their notional positions, are shown in the picture on the right. When mounting the handrail on to the boiler I found it was easiest to fix the stanchions to the boiler and then thread the side handrails through them, finally fixing the stanchions on the front of the boiler. |
 |
 |
| The two pictures shown below and to the right are of the completed handrails installed on the body. Another alternative to the continuous handrail is to have the suggested straight handrails down the side of the boiler and a separate curved handrail on the front of the boiler. |
 |
 |
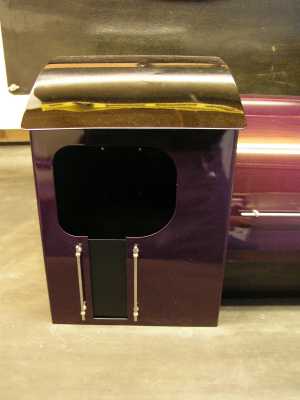
| When installing the cab doors and the handrails I found the doors looked better when they were set in slightly from the body side. I achieved this by placing an additional nut in between the stanchion and the cab door, which gives the impression of depth. |
| Suggestions When doing up the stanchion nuts I found that threading the cab handrail through the stanchion and then doing up the nuts was a lot easier and it had the added benefit of securing in place the handrail. |
 |
| Warning However, as I found to my cost when they fell off while running �Lady Galtbe�, don�t rely on the stanchions to permanently hold the handrails in place on the cab. Use a small spot of NutLock or similar product to make a proper fixing on the stanchions. |