

Please Note: We do not endorse the
sites behind these links. We offer them for your additional research.
Lay 'O the Land -
Native Plants | The Wild Life - Native Animals
| Down by the Sea | Land Ho! | Weather
Watch
|
|


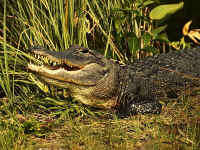
Photo by Ted Bowers
|
University
of Florida Herbarium
Florida Plant Life Online
Florida Ferns
Mangroves
Flora and Fauna Database
Florida
Native Plants
Atlas of Florida Vascular
Plants
|
- Native Plants
- Make a Leaf Collection. See if you have any of these native plants
in your collection:
www.floridagardener.com/FLNatives/index.htm,
http://melanys.tripod.com/natives.htm
- Collect leaves from native plants in and around your yard or
neighborhood.
- Press the leaves between sheets of wax paper and place in heavy
books.
- After a week or so check your leaves to see if they are dry and
flat.
- Add the leaves to a book or poster.
- Label the leaves with the common and/or scientific names.
- Plant a Native Butterfly Garden.
- Visit this website for directions on which native plants
butterflies are attracted to: www.nsis.org/butterfly/butterfly.html
- You may want to also visit your County Extension office to view
their butterfly garden. For a listing of your County Extension
office check here:
http://www.ifas.ufl.edu/www/extension/
- Draw a plan of your garden before you begin.
- Make labels with Popsicle or clean paint sticks for each plant.
- Be sure to include a water source for the butterflies.
- Go to this website to color pictures of some butterflies that
might visit your new garden:
http://melanys.tripod.com/color.htm
- Go on an Exotic Plant Hunt in your yard.
- Help your family remove any non-native exotic plants you might
have in your yard.
- For a list of the plants the Florida Fish and Wildlife Service
considers to be exotic check this website:
www.co.collier.fl.us/natresources/exotics/default.htm
- Plant a native plant in place of the exotics you remove.
- Go out in your backyard, to a park or a natural area. Paint a
picture of everything you see.
- Ever wonder what that strange moss is hanging from many of the
large trees in Florida? Go to this website to find out more about
Spanish Moss: http://www.emilycompost.com/spanish_moss.htm
- Go outside and find some Spanish Moss then draw a picture of it
hanging in the trees.
- Identify the parts of a flower.
- Just for fun visit this website to unscramble a picture of
sunflowers: www.ames.com/kids/game/flower2.html
- Make a Flower Mosaic.
- Tear up scraps of colored paper into ½" and ¼"
sections.
- Lightly draw your picture with pencil on lightweight cardboard.
(A folder works well).
- Attach your colored paper mosaic ‘tiles’ to your drawing
with white glue being sure to cover the pencil outline.
- Cover the entire piece of cardboard with mosaics.
- Visit this website to learn about trees and for a puzzle and word
search:
www.savatree.com/kidspage/learn1.htm
- Draw a picture of a tree and color it with colored pencils.
- Label the six parts of a tree.
- Make a terrarium or dish garden.
- Materials: * Large clear glass or plastic container with lid,
pea gravel, coffee filter, potting soil, peat moss, sand, slow
release fertilizer, small plants such as African Violets, ferns,
mums. *To make a dish garden instead of a terrarium substitute a
shallow container about 3" deep.
- Rinse the clear container and pea gravel with water.
- Put the gravel at the bottom of the container.
- Cover with a coffee filter. This will prevent the soil from
washing down through the gravel.
- Mix the potting soil, peat moss, sand and fertilizer together
then add to container on top of coffee filter.
- With a spoon dig small holes in the soil mixture and plant small
plants.
- For decoration, if you have the space, add a little rock or
small ceramic ornament.
- Mist the plants with a spray water bottle.
- Put the lid on tight (for terrariums only). If you don’t have
a lid for your container use plastic wrap and a rubber band.
- Visit one of Florida’s gardens, parks or natural areas. For a
list of what’s available in your region of the state go to this
website:
www.floridaplants.com/flgardens/regional.htm
- Take pictures on your visit. After your visit make a picture
report by arranging your pictures on paper and writing a caption
explaining each one.
- Visit a Nature Conservancy Preserve and participate in one of
their volunteer programs. For a list of preserves and contact
information go to: www.tncflorida.org/pages/preserves.html
- Make a leaf rubbing.
- Collect a few leaves from your yard. Ferns are especially
pretty for this project.
- Lay the leaves vein side up in between two pieces of
light-weight paper.
- Using a crayon sideways, gently color over the areas where you’ve
placed the leaves. It’s okay if you go outside the edge of the
leaves.
- Write a story about a seed that becomes a tree in Florida.
- Tell about the different stages of growth the tree goes
through.
- Tell of all the things the tree sees in its lifetime.
- Illustrate your story.
- Read your story to your family, friends or homeschool group.
- Read about the Life of a Tree at: www.arborday.org/carly/lifeofatree.html
- What causes a tree’s rings to be narrow and close together?
- How can you tell the age of a tree?
- What are the inner layers of the tree called?
- Go on a hunt for a tree stump to check this out for yourself!
- Make a Nature Box.
- Gather a shoebox or another box with a lid. Decorate the
outside of the box with paint.
- Go on a nature hunt to collect items to put inside your
nature box.
- Some items you may find are: pine needles, feathers, shells,
sticks, wildflowers, palm fronds, seeds, weeds with roots,
rocks, mulch and pine cones.
- Make a Rustic Twig Nameplate.
- Gather small twigs from around your yard.
- Cut a piece of thick cardboard or foam core board
approximately 4"x12". *NOTE: Have mom or dad do the
cutting.
- Paint the cardboard/foam core board.
- Break the twigs into 1" and 2" pieces.
- Assemble twigs into the letters of your name gluing with
strong craft glue as you go.
- Alphabetize, define, spell and use these words in a sentence
or story: garden, exotic, soil, leaves, narrow, trunk, nature,
mulch, stick, moss, seed, flower.
|
|

|
Animated
Animals Coloring Book
Alligator.net
Manatees
& Dugongs
Florida Panther
Loggerhead Sea Turtle
Sea Turtles For Kids
Birdwatching Basics
Endangered
Species of Florida
Florida's
Wildlife Refuges
Habitat Protection
Flora
and Fauna Database
Selected Birds of Florida
Florida Animals
|
- Native Animals
- Visit this website to learn about some of Florida’s endangered
animals:
www.fpl.com/environment/endangered/contents/endangered_species.shtml
- Choose one of the animals listed on this website to learn about.
- Draw a picture on a poster of the animal you’ve chosen.
- Include these details on your poster: Where they live, what
they eat, why they are endangered and what you can do to help.
- Write a letter to your congressman about this animal’s
plight. Include a copy of your picture and your ideas of how to
help.
- List several reasons you think some animals are endangered.
- Experience Expedition Florida! Go to this website: www.flmnh.ufl.edu/expfl/index.html
- Play Florida Wild Animal Pictionary.
- Make up some cards with cut out pictures of Florida animals or
animal names on them. Put the pile face down.
- Make two teams.
- A player from Team 1 picks a card from the pile without showing
it to anyone and starts drawing an animal.
- Both teams try to guess which animal it is before the picture is
complete.
- The first team to guess gets 10 points and draws next.
- The team that gets 50 points first wins.
- Visit one of these websites. Chose and print out an animal diagram
to color:
www.enchantedlearning.com/subjects/turtle/seaturtlecoloring.shtml,
www.enchantedlearning.com/birds/printouts/Greatblueheronprintout.shtml
- Do you think your animal was created to live in the environment
where it lives and eat what it does?
- Explain which features your animal has that help it to survive
in its environment.
- Visit a Florida Wildlife Refuge to learn about your local
wildlife. For a list of Florida wildlife refuges and sanctuaries
go to:
www.floridasmart.com/attractions/outdoors_wlife.htm
- Write a riddle about a wild animal that lives in Florida.
- Tell your riddle to your family, friends or homeschool group.
Can they guess it?
- Visit these websites for Florida Animal Alphabet Coloring Books:
http://floridaconservation.org/educator/colrbook.html,
http://www8.myflorida.com/environment/downloads/education/coloringbook.pdf
- Make a list to compare and contrast mammals, reptiles, birds and
arthropods.
- Give five examples of each.
- Sit outside quietly and play I Spy Native Animals with your
family.
- Read about food chains at this website:
http://edu.leeds.ac.uk/~edu/technology/epb97/forest/fdchn.htm
- Take a walk through a wooded area near you. Quietly observe
the plants and animals that grow and live there.
- Create your own food web based on the animals you’ve seen in
the woods.
- Make a Paper Mache Pet! For instructions to make the alligator
visit this website:
http://familycrafts.about.com/gi/dynamic/offsite.htm?site=http%3A%2F%2Fwww.dltk-kids.com%2Fanimals%2Fmalligator.html,
to make the dolphin visit this website: http://familycrafts.about.com/gi/dynamic/offsite.htm?site=http%3A%2F%2Fwww.dltk-kids.com%2Fanimals%2Fmdolphin.html
- Check out this website about venomous snakes:
http://pelotes.jea.com/vensnake.htm
- Have you ever seen a venomous snake in the wild?
- What should you do if you see a snake?
- Write a story about the time you saw a snake or what you would
do if you did.
- Illustrate your story.
- Sketch a picture of your favorite Florida wild mammal.
- Tell why this is your favorite mammal.
- Explain what distinguishes a mammal.
- Play the Animal Alphabet Game. The first person names a
Florida animal that starts with ‘A’, the next person names a
Florida animal that starts with ‘B’ continue all the way to
‘Z’.
- Read about Rabies, play some games, take a quiz and get a
Certificate at this website: http://www.cdc.gov/ncidod/dvrd/kidsrabies/
- What is rabies?
- Can people catch rabies?
- What animals can get rabies?
- What should you do if an animal bites you or your pet?
- How can rabies be prevented?
- Go Bird Watching! Participate in this fun program called Wings
Over Florida. For information on the program go to: http://wld.fwc.state.fl.us/wof/whatiswings.htm
- Do this fun Bird Word Find at:
www.enchantedlearning.com/subject/birds/games/birdwordfind/puzzle.shtml
- Volunteer for Audubon of Florida’s Eagle Watch program. To
participate check the details at:
www.audubonofflorida.org/leadership/eaglewatch.htm
- Make a Pinecone Bird Feeder.
- Materials needed: Large pinecone, peanut butter, birdseed, and
20"string.
- Tie the string in a knot around the center of the pinecone.
Leave the ends loose.
- Slather the pinecone with peanut better.
- Roll the pinecone in birdseed.
- Tie the pinecone to a tree branch in your yard.
- Watch to see which birds feast at your feeder.
- Complete this frog maze at:
http://puzzlemaker.school.discovery.com/mazedthings/frog.html
- Visit this website to printout the Lifecycle of a Frog:
http://www.enchantedlearning.com/subjects/amphibians/label/froglifecycle/label.shtml
- Go on a butterfly hunt.
- Take a butterfly book with you and identify all the
butterflies you see.
- Did you find any caterpillars or chrysalis?
- Print out this butterfly life cycle diagram and color it:
www.mesc.usgs.gov/butterfly/images/bfly-parts450.gif
- Make an insect model. Read this website for body part names and
descriptions:
www.enchantedlearning.com/subjects/insects/label/insect.shtml
- Materials needed: clay, (4) pipe cleaners, (2) small beads,
Popsicle stick, index cards, box top or cardboard.
- Shape your insect into three distinct body parts: head, thorax
and abdomen.
- Place Popsicle stick down the center of the body parts to hold
it together and cover with clay.
- Cut (3) pipe cleaners in half. Add the six legs to your
insect.
- Cut the last pipe cleaner into four pieces. Use two pieces for
the antenna.
- Place beads on the head for eyes.
- If you would like to add wings to your insect cut the wings
from construction paper or lightweight cardboard (folder) and
attach.
- Write the body part names on index cards and place around
insect with arrows pointing to the correct parts.
- Read about ants and make your own ant farm. Follow the
directions at: www.scholastic.com/magicschoolbus/games/teacher/ants/
- Play ‘Guess Who I Am?’. List 3 to 5 adjectives about a
Florida animal such as what color it is, what size it is, what
sound it makes, if it’s a mammal, reptile or bird, etc.. Have
others guess.
- Alphabetize, define, spell and use these words in a sentence or
story: refuge, endangered, diagram, wildlife, rabies, environment,
insect, mammal, venomous, abdomen, reptile, extinct.
|

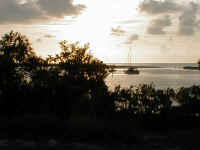
Photo by Ted Bowers |
The
Florida Lighthouse Association
Coral
Reefs
Corals and Coral Reefs
Seagrass
Beds
Oceanography
& Meteorology Servers
The
Aquatic Preserve Coloring Book
Endangered
Marine Life
Marine
Sanctuaries - Florida Keys
Ocean
Pollution
Coral Reef
Conservation
|
- Atlantic Ocean, Gulf of Mexico and Ocean Life
- On a blank Florida state outline map draw in the bodies of water
that border our state and label them.
- Show the lakes, rivers and bays of Florida and label them.
- Learn about our oceans at this website:
www.enchantedlearning.com/subjects/ocean
- Follow a drop of water through Florida’s diverse ecosystems at
this website:
www.flaquarium.net/habitats.htm
- Learn about the water cycle and print out and make a Water Cycle
Wheel at this website:
www.epa.state.il.us/kids/fun-stuff/water-cycle/
- What is a wetland? Learn about it at:
www.wetland.org/kids/kids.htm
- Visit this website to print out an information book to color
with colored pencil called The Young Scientist’s Introduction to
Wetlands:
www.wes.army.mil/el/wetlands/pdfs/ysw1.pdf.
- Read about Florida’s unique oceans, estuaries, bays, beaches,
coral reefs and the Gulf Stream at this website:
www.gorp.com/gorp/location/fl/fishing/marine.htm
- Visit this website to learn about keeping coral reefs healthy
and complete a word puzzle to print and color:
http://www.cmc-ocean.org/splashclas/SC10.html
- What is marine debris? Visit this website for a description and
coloring book:
www.yoto98.noaa.gov/books/debris/debris2.htm
- Go on a beach walk with a large garbage bag and wear gloves to
collect as much trash as your bag can hold. This will help keep
the garbage from washing and blowing into the ocean to become
marine debris that often entangles and kills sea life.
- Take your trash home and separate the items. Put similar items
together in baggies, example: fish hooks and gear in one baggie.
Staple the baggies to a poster board you label Marine Debris.
- Write a paragraph about what marine debris is, what it can do
to sea life and what people can do to prevent it. Give an oral
report, using your poster, to your family, friends or homeschool
group.
- View some beautiful pictures of ocean plant and animal life
and read brief descriptions of each at this website: www.seasky.org/seagallery/seapic.html
- Go to this website to play some sea games like Sea Word Search,
Sea Slide Puzzle, Sea Crossword, Sea Memory and more!
http://www.seasky.org/sea4.html
- Make an Undersea Diorama. Materials needed: Shoe box or small
box, ocean animal and plant pictures or plastic ocean animals,
sand, sea shells, blue and green paint.
- Paint inside and outside of box a blue/green for the ocean
water.
- Cut out ocean animals and plants from magazines or use plastic
sea animals from dollar store packets.
- Turn box sideways. Glue animals and plants in place or arrange
plastic animals by gluing to toothpicks and gluing toothpick
ends to inside of box. Some plastic sea animals can be ‘swimming’
by tying to fish line and hanging at different levels.
- Spread a thin layer of glue on bottom inside of box and dust
with sand.
- Glue shells around bottom of box on sand.
- Read about ocean currents, temperatures, waves and more in the
fun Episodes of Victor the Vector at this website:
http://www.baesi.org/TRG/oceancurrents/victor/
- Read The History of the Gulfstream at this site:
http://www.keyshistory.org/gulfstream.html
- Make a collage from magazine cutouts that show products that
come from the ocean.
- What’s the difference in buoyancy between salt water and fresh
water? Do this experiment:
- Fill 2 glasses with tap water. Add 3-4 Tablespoons of Kosher
Salt to one glass and label it ‘salt water’.
- Place hard boiled eggs in each glass.
- Continue to add salt to the salt water until the egg floats in
the middle of the glass.
- Why did the egg float?
- Label the fish anatomy at this website:
www.enchantedlearning.com/subjects/fish/label/labelfish.shtml
- Make a wavemaker. Visit this site for directions:
http://www.kidskreate.com/article1024.html
- Write a poem about the sea. Read it to your family, friends or
homeschool group.
- Paint an undersea mural in watercolors. Don’t forget to sign
your work like an artist.
- Visit a photo gallery of the ocean around the Florida Keys at:
www.sanctuaries.nos.noaa.gov/pgallery/pgflorida/pgflorida.html
- Do an experiment using the scientific method. Write down this
question as your title: How do mammals stay warm in the ocean
water year round?
- Next write Hypothesis and your best answer to the above
question after it.
- Next write Method. Then write down the steps you do in the
experiment.
- Fill a bowl or bucket with ice water.
- Put a rubber glove on and submerse your hand in the ice
water.
- Try to keep your gloved hand in the ice water for at least
30 seconds. This is what the animals would feel like if they
didn’t have blubber. Do you think they’d survive long?
- Next, put vegetable shortening thickly all over your other
hand. Put the glove on over the shortening.
- Submerse this gloved hand in the ice water. Does it feel
different than the other hand without shortening did?
- Write down Results and write the things you learned from your
experiment.
- Write down Conclusion and give an answer to the question you
asked at the beginning based on the findings from your
experiment.
- What is the difference between a marine mammal and a fish? Make
a list to compare and contrast them. Give examples of each.
- Learn about and color some coral reef creatures at:
www.enchantedlearning.com/biomes/coralreef/coralreef.shtml
- Read about the inter tidal zone and the creatures who live there
at:
www.enchantedlearning.com/biomes/intertidal/intertidal.shtml
- What makes the tides change? Find the answer at this website:
www.enchantedlearning.com/subjects/ocean/Tides.shtml
- Keep a tide chart for one week of the high/low tide times at a
beach near you. Local news channels often broadcast this or
their websites may have this information.
- Color some pictures of marine mammals at this website: www.enchantedlearning.com/subjects/mammals/marinemammals/Marinemammalprintouts.shtml
- Write a story about a sea crab. Illustrate your story.
- Start a shell collection. Checkout a shell book from the library
and label your shells.
- Alphabetize, define, spell and use these words in a sentence or
story: marine, wetland, tide, current, reef, submerse, shell,
blubber, beach, shore.
|

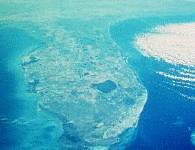
Source: Florida Department of
Commerce
|
Florida
Counties
County Name Origins
Florida - county outline map
Florida
- county with names (outline map)
Florida - outline map with cities
Blank outline map
Rocks
and Minerals
Educational
Resources Index
|
- Land Forms and Geographical Regions
- Make a Florida relief map. Materials needed: foam core board or
Styrofoam 3’ x 2’, clay, brown, green and blue paint, dot
stickers, permanent marker. Visit this website to view a relief
map of the state:
http://fermi.jhuapl.edu/states/maps1/fl.gif
- Cut the foam core or Styrofoam in the shape of the state of
Florida.
- Using the clay make the small ridge for the Central Highlands
in the center of the state and any other small hills you see on
the relief map.
- After the clay has hardened, paint the state green and brown
to show the land and paint the lakes, rivers and bays blue.
- Label the lakes, rivers and bays with the permanent marker
after the paint dries.
- Place a star for our capital, Tallahassee and dot stickers on
the larger cities and your town. Label these.
- Place dots on places you visit during the unit study and
label.
- Make up symbols and attach to toothpicks. Stick these into the
foam in the appropriate areas. For example, draw and color an
orange and place it in the main county where oranges are grown,
draw and color a castle for Disney World, etc. You can add items
to this map as you learn more about Florida throughout this
study.
- If you were born in a different city in Florida than you
currently live in make up a flag that says, ‘_______’s
Birthplace’ attach it to a toothpick and stick it in the
appropriate city.
- Fill in the county names on a blank county map. Write the names
of the states that border Florida as well.
- Take a virtual tour of your town. Draw a map of your town. Be
sure to include historical sites, tourist stops, parks, hospitals,
the post office and other important places.
- Pretend you’re a city planner. Find a nice spot in your town
for a new park. Draw out the layout of the park and the new roads
you’ll need to access it. Give an oral presentation ‘selling’
the idea of why you need a park in that location to the ‘City
Council’. The City Council members can be your family and
friends.
- Label a blank outline map with the geographical regions found in
Florida.
- Where is the tallest peak in Florida located? How tall is it?
Where is the lowest point in Florida located? How low is it? Which
region are these located in?
- Visit this website to complete, color and learn about a Compass
Rose and direction:
www.enchantedlearning.com/geography/printouts/compassrose.shtml
- To learn more about reading a compass check out this website:
http://www.learningtreasures.com/article1063.html
- What’s so special about the Everglades? Find out at these
websites then answer the questions below and take the quiz at the
ThinkQuest site:
http://www.miamisci.org/ecolinks/everglades/,
http://library.thinkquest.org/J001574F/
- What are the five different habitats found in the Everglades?
- Name three animals from each of these groups that are found in
the Everglades: reptiles, mammals, birds and insects.
- What is a sinkhole? Visit this website to find out:
http://www8.myflorida.com/environment/learn/geology/educationalresources/sinkhole.html
- Draw a cutaway of a sinkhole.
- Label each level of earth.
- Tell what causes sinkholes.
- Where are the Florida Keys? Visit this website to learn about
them: http://www.florida-keys.fl.us/flakeys.htm
- Draw a map of the Keys. Label the Keys and the surrounding
water.
- Build a bridge out of Popsicle sticks that you might find in
the Keys. Glue the sticks as you build with strong craft glue.
What is another way you might get to the Keys?
- Make a diorama of one of Florida’s ecosystems. Choose from
Coastal, Freshwater Wetlands or Upland Ecosystems. Get
descriptions of each at this website: http://webworldwonders.firn.edu/eco/index.html
or choose an ecosystem that you live in or near.
- Materials needed: small cardboard box, materials found in
your ecosystem such as rocks, pine needles, leaves, sand and
plastic wrap for water.
- Glue a light layer of ground cover (sand, leaves or dirt) to
the bottom of the box or paint the bottom the color of the
ground.
- Add the plant leaves and rocks. Use plastic wrap for water.
- Add plastic figures or color pictures of animals found in
your ecosystem and glue in place.
- Start a rock collection. Find a few different rocks from your
yard to start your collection.
- Check out a book from the library to find out what kind of
rocks you have.
- Put your rocks in an empty egg carton. Label the inside of
each section with the name of the rock placed there.
- Collect rocks from different locations around the state you
visit on field trips. Indicate where you found them on the
back of the rock name label.
- Collect soil and sand samples from around the state.
- Label the samples with the name of the location you
collected them from.
- Compare the different textures of soil and sand.
- What do you think the soil is made from?
- Crunch up some shells in a plastic bag with a hammer. What
kind of soil do you think bits of shell make?
- Crunch up some dry leaves in a plastic bag. Mix in some bits
of partially rotting tree branches and other rotting plant
life you find around the bottom of a tree trunk. What kind of
soil do you think this makes?
- Alphabetize, define, spell and use these words in a sentence
or story: adapt, habitat, fauna, flora, conservation, brackish
water, preserve, swamp, aquifer, limestone.
|

|
Florida
Climate Center
Florida Forecasts and Warnings
Oceanography & Meteorology Servers
Average
Annual Precipitation
Hurricane Tracking Chart
Another Hurricane Tracking Chart
Hurricane Preparedness
FEMA for Kids
Tropical Prediction Center/National
Hurricane Center
Florida Weather Monitor Online
|
- Hurricanes, Tornados, Lightning, Drought, Flooding and Sunshine
(of course)
- What is a hurricane? Find out at this website:
http://www.fema.gov/kids/hurr.htm
- In what direction does a hurricane rotate?
- What is the eye of the hurricane?
- When is it safe to go outside?
- How fast is the minimal hurricane wind?
- How do you know a hurricane is coming? You track its path. Go to
this website to find out how and to print a tracking map:
http://www.fema.gov/kids/hurrtrac.htm
- Visit this website to play a game about preparing your yard for
a hurricane:
http://www.fema.gov/kids/games/hurhouse/
- What other preparations can you take?
- Who are hurricane hunters and what is their job? Read about them
at this website:
http://www.fema.gov/kids/huhunt.htm
- Find out what a tornado is at this website:
http://skydiary.com/kids/tornadoes.html
- What is the difference between a funnel cloud or twister and a
tornado?
- Draw and color a picture of a tornado.
- Can tornados occur in Florida?
- What is the Fujita Scale?
- What should you do if a tornado is coming?
- What is lightning? Read about it at this website:
http://skydiary.com/kids/lightning.html
- How can you tell how far away the lightning is striking?
- What should you do if you’re outside when a lightning storm
approaches?
- Where are two safe places to be in a lightning storm?
- How is a drought caused and what is it? Visit these websites to
find out:
http://www.state.nj.us/drbc/drought/kids_whatisadrought.htm
http://207.156.43.72/floridadisaster/drought/overview.htm
- What are some ways to educate your family about conserving
water? Visit this website to find out how you can help:
http://www.state.nj.us/drbc/drought/kids_whatyoucando.htm
- Draw and color a ‘Water Police’ badge.
- Tell your family that you are going to be giving warning
tickets to all who break the water conservation rules. After
three warnings start giving tickets with a quarter fine. Keep
the fines collected in a jar. Have your family vote on what to
do with the money when the jar is full.
- What causes rain? Do the experiment at this website to find out:
http://www.familyeducation.com/article/0,1120,22-5051,00.html
- What happens in a flood and what should you do? Go to this
website for answers:
http://www.fema.gov/kids/floods.htm
- We’re in the Sunshine State. Find out about sunshine on this
site:
http://www.wxdude.com/page13.html
- Do this experiment:
- Place a black shirt and a white shirt next to each other in
the direct sunshine.
- After 30 minutes touch each shirt. Which one is hotter? Why
do you think they aren’t both the same temperature? Do you
think you would want to wear a dark or light shirt if you were
going to be playing outside on a hot sunny day?
- Try this other sunny experiment:
- Materials needed: 2 pieces each of colored paper (red, blue,
yellow, green, black, white)
- Find a sunny windowsill or a sunny place outside that rain
won’t get to.
- Place one sheet of each of the colors of paper in the sun.
- Wait three days then check your papers against the colored
paper that was not in the sun. Has any faded?
- Leave the colored paper in the sun for another four days.
Now compare the paper that’s been in the sunshine a week
with the paper that hasn’t. Have any of the colors faded? If
so, which colors have faded the most?
- You can continue this experiment for as long as you like.
- Wildfires can happen in Florida. Visit this website to find
out about wildfires and for a coloring book about them: http://www.fema.gov/kids/wldfire.htm
- Visit this website to complete a weather word search: http://skydiary.com/kids/puzzle.html
- Prepare a Disaster Supply Kit. Go to this FEMA Kids site to
find out how to help make one for your family: http://www.fema.gov/kids/dizkit.htm
- Make a Florida Sunshine Shake.
1 cup Florida Orange Juice
1/2 cup Florida Grapefruit Juice
1 ripe banana
1/2 cup low-fat vanilla yogurt
1/2 teaspoon vanilla extract
Combine all ingredients in blender until smooth. Pour
into glass, and serve immediately. Makes two 8-ounce servings.
NUTRITION FACTS PER SERVING: 182 cal., 4 g pro., 40 g
carbo., 1 g fat (0.1 g sat. fat), 0 mg cholesterol, 37 mg sodium,
2 g fiber, 91 mg vit. C.
- Keep a weather chart.
- Each day record the temperature, sky condition (clear,
cloudy or raining), humidity and wind direction/speed.
- Set up a rain gauge in your yard to record the amount of
rain each day. Click here for directions for making a rain
gauge: http://www.miamisci.org/hurricane/rainmeasure.html
- Check this website http://cirrus.sprl.umich.edu/wxnet/states/florida.html
for information on several Florida cities or check your local
television website or news.
- One day a week give a weather forecast to your family for
the day and the extended forecast for the week.
Sing some weather songs like Rain, Rain Go Away and others like it
from this website: http://members.spree.com/family/tiredw3/SongsFingers/weather.htm
|
