
Origami Diagram:
- Break Heart
- Butterfly
- Fan ornament
- Gloves
- Grashhoper
- Japanese lantern
- note case
- Foundation
- lantern decoration
- Houou
- Quilt
- Stand Mirror
- Bed
- Cat
- Congratulatory Gift
- Photo Stand of Sunflower
- Ring
- Shirt
- Shoes
- Snail
- Spider
- Stag Beetle
- Table
- Vest
- Water Lily
- Windmill
- Window
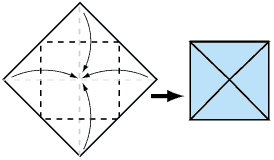
HOW TO MAKE A ROSES
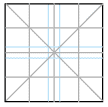
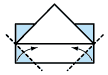
1. Make these creases.
2. Form the 4 corners.
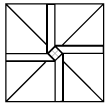
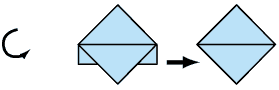
3. Flatten, while rotating counter-clockwise.
4. Turn over.
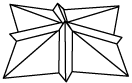
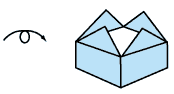
5. Form the 3D rose by taking each top right corner and folding to next quadrant, counter clockwise.
6. Form rose within the palm of your hand.
7. Turn over and smooth inside of rose, by pressing down slightly at the base.
8. Fold down edges and tuck in to form the bottom of the rose.

9. Turn over, open centre of flower and smooth.
10. Roll the petals down to curve them. Finished rose.


2.HOW TO MAKE A CROWN
1. Start with your paper white side up.Fold in half, and open, then fold in half once again, in the other direction.
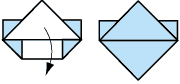
2. Now fold all corners into the centre.
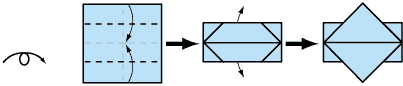
3. Turn the model over. Then fold the top and bottom toward the
centre. When you do this, the triangular flaps should pop out
from underneath

4. Fold the bottom triangle upwards.
5. Fold the 2 bottom corners upwards.
6. Fold triangle back down
7. Rotate the model. Now repeat steps 4-6.

8. Now you need to open out the model to complete your crown.
Open the flaps outward and shape the inside into a square shape
9. Turn over. Your Crown is finished!
3.HOW TO MAKE A SNAPPER
1. Start with a rectangular piece of paper, coloured side up. Fold in half, then open.
2. Fold in half downwards.
3. Bring corners in to centre line.
4. Fold uppermost layer upwards & do the same to the back. Crease well.
5. Pull the sides out and flatten.
6. Fold front layer up to top, & do the same to the back.
7. Pull the sides outwards and flatten.

8. Gently pull the top parts of the model outwards, making a boat shape.
9. Flatten well.
10. Tuck the little centre triangle under one of the sides. Then bring
the outside corners to meet together, letting the sides move outwards.
Finished Snapper. To make it snap, hold as shown and press together. It looks especiallly good with eyes!
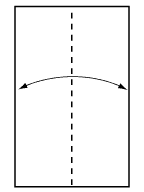
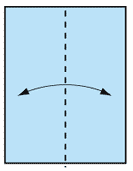
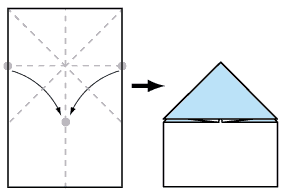
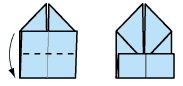
1. Start with a rectangular sheet of paper, white side up
Fold it in half, and open out again
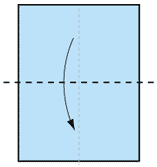
2. fold both top corners to the opposite edge of the paper then unfold. Your creases should look like this.
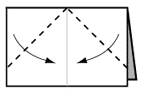
3. Where the diagonal creases meet in the middle, fold the paper backwards, crease well and open.
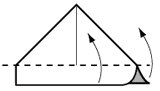
4. Hold the paper at the sides, bring these points down to the centre
line, then flatten. The creases should do most of the work here!
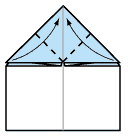
5. Fold the uppermost triangles up to the top point.
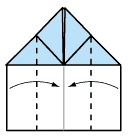
6. Fold sides in to the centre line.
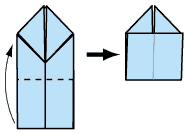
7. Fold bottom of model upwards so the end sits in the centre of the top diamond.
8. Now fold the same part downwards, in half.
Turn over, your Jumping Frog is finished!
To make him jump, press down on his back as shown.