Click
Network above for a complete rundown on cards
verified to work (and not work).
|
|
|
|
|
Click
Network above for a complete rundown on cards
verified to work (and not work).
|
|
Fun Stuff for Hacked ePods |
||||||
| Have something interesting to share with other hacked ePods users? Please your file, tip, or discovery, and I'll post it here to the site! | ||||||
|
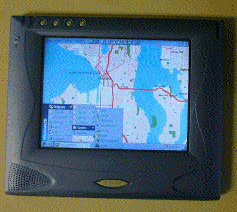
Thanks
to "Saridnour" on the Discussion
Board for what is probably the most USEFUL and IMPORTANT modification
yet. Instead of the usual dotty 8-bit display, you can have a luxurious
16-bit display. Take a look at the difference:
You obviously can't do without this little hack. Good news: It doesn't slow anything down. Bad news: You'll need to allocate more RAM to memory, and store new programs on the optional Compact Flash card. Here's how to do it: 1) Click here to order a cheap Compact Flash card if you don't already have one. After you install your card, whenever you use ActiveSync to install a new CE application be sure and answer no when it asks if you want to install to the default location. You'll then be able to select the "Storage Card" as your installation location and free up needed memory for your improved video. 2) Click this link to download the Astrosoft Registry Editor application. You'll use it to set up your new 16-bit video. This Registry Editor must be installed from a Windows desktop machine via ActiveSync, so if you've not yet installed ActiveSync, go back to the first page of this site and heed Step 2. After you've installed the Registry Editor to your ePods unit from your desktop computer, you're more than halfway there. 3) Open the Registry Editor application on your ePods. Navigate this path:
When you double-tap "Bpp" you'll see a dialog box. Where it says "8" (for 8-bit video), insert "10" and then tap the "Decimal" radio button. Voila, you'll see that the "10" turned to "16"... (10 Hex is equal to 16 Dec. If you knew that already, forgive me.) Click "OK" to close the box. Quit the Registry Editor application. 4) Tap the Settings icon at the top of the screen. Double-tap the System icon. Click the Memory tab. Slide the bar so that you've allocated 11080 KB to Program Memory. This will leave 4736 for Storage Memory. Since you've installed a shiny new Compact Flash card, that won't be a big deal. Click "OK" and then click the "exit" button. 5) Do a soft reset by inserting the stylus into the little hole on the back of the unit for a second. Bingo! You've got incredible video now! |
||||||
|
Forget the dull stock ePods background screen. Look for the file named "ep_mainbar.bmp" in your ePods unit's "ePods_System/ifc" subdirectory. Copy it over to your desktop PC so you can examine it with any graphic program of your choice that will edit .BMP files. Note that you probably won't want to tamper with the navigation bar across the top. Edit as you like and then move it back to your ePods. If you like, you can replace your original background screen with one of our ready-to-go fashion statements:
|
||||||
|
This is the granddaddy hack that ePods Inc. never intended: Go to the Software page on this site for full instructions. You've got two options – one version for the meek and one for the ballsy. Only you can decide whether you're meek or ballsy, so click on over and fully enable your ePods now.
|
||||||
|
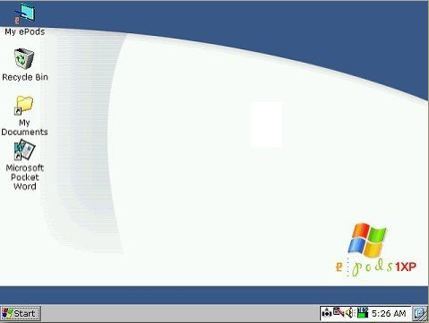
I also mentioned this on the Software page, but it's worth repeating: "PTCheezer" has undertaken a complete graphical overhaul of the ePods desktop in the style of Windows XP – and provided a nice IE4 bookmark workaround as well! After you've undertaken the full Windows CE shell hack mentioned above, consider making over your ePods in the style of Windows XP (if you like WinXP). Visit his site here: ePods1XP Now check out this great ePods1XP screen shot!
Wait, before you do the ePods1XP hack, heed this all-important tip: If you do my v2.04 hack first (per this site's Software page), then make sure you put the ePods1XP hack files in the \Win_CeFiles subdirectory rather than the \ePods System subdirectory. This is absolutely critical. Note this discussion board thread as well. This wonderful hack works if you apply it correctly! |
||||||
| Once you see handwriting recognition on the ePods, you won't want to give it up. Microsoft decided to release this software as Microsoft Transcriber. Feel free to click here to access the latest public domain Microsoft Transcriber file, hosted by the monolith itself, natch. (Thanks to "Goalkeepr" for the link.) | ||||||
|
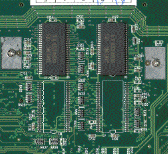
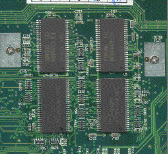
First, the meek (i.e., most people) should simply use a cheap Compact Flash card to bolster storage capacity and free up some memory space in turn. The cards plug right into the CF slot on the left side of the ePods unit and are available in 16, 32, 48, and 60 megs (and even larger for the wealthy). Click here for some inexpensive deals on Compact Flash cards. Second,
the bold (i.e., people with a lot of experience soldering small electronic
surface-mount components) might take a tip from "Glitch",
who increased his built-in memory from 16 megs to 32 megs simply by soldering
two more chips to the board in the appropriate spots. This mod
significantly increased overall speed as well. Keep in mind that this
is still a work in progress and reportedly works only on revision 1.2
motherboards (more to come). Even worse, we suspect that you'll need to
populate a couple of surface-mount capacitor pads as well (again, more
to come), even though it's worked for a few ballsy souls without additional
components. On the good side of life, internet appliance mavens can repurpose
the two chips found on the Netpliance i-opener's discarded 32 meg SODIMM
(for those who've upgraded to 64 or 128 megs). Those who've never toyed
with an i-opener can probably net one of these memory SODIMMs by begging
to buy one on the i-opener section of the Discussion
Board. Electronics buffs may have some memory chips sitting around,
but Glitch advises that they need to be "1M x 16 bit x 4 banks (a Micron
MT48LC4M16A2-8E equivalent)." Samsung
K4S641632D high speed synchronous DRAM will work. Remember that
you can fry your ePods permanently if you try this, so step lightly.
Thrill-seekers will easily find the correct positioning on the back side
of the circuit board:
Click here for detailed internal pics. Glitch offers a bit of advice for those brave souls who elect to undertake this advanced hack: "Put some electrical soldering flux on the chip leads and motherboard pads and line up the chip. Use a clean fine tipped solder iron and tack down the two opposite corners. If you use chips removed from the old i-opener memory SODIMM, you shouldn't have to add any solder since the leads and pads are already tinned. After you've determined that the chip is where you want it, tack down the rest of the leads. Making sure the chip is where you want it is important since once it is in place you would need more specialized equipment to remove it." |
||||||
| Have something interesting to share with other hacked ePods users? Please your file, tip, or discovery, and I'll post it here to the site! | ||||||


