bird box plans


build a incubator plan

Build a economical incubator for eggs with simple home tools.


bird moving box

Bird boxes to make transportation easy.


cat enclosure plan

An easy to build cats enclosure.


how to build a kennel

Building a kennel to plans.


insulating a dog house and kennel

How to insulate a dog house and kennel.


bird home

bird box plan


A heated bed for dogs that is an ideal addition for a pets doghouse.
The heated bed for pets is weather proof and can operate safely within a dogs house or out doors.

Heating is controlled by a built in automatic thermostat that will control and adjust the preset temperature automatically.
The heated bed for dogs is powered by a low voltage transformer or battery* A special reticulated padded cushion built into the pets heated bed allows the warmth that is created by the heater to circulate safely beneath the dogs body.

Cleaning the dogs bed is a simple matter of wiping it with a damp cloth.
The pets heated bed comes in three sizes to accommodate small, medium and large dogs.

An automatic switch controls the heaters operation. When your pet rests upon its bed the heater will activate. The heated bed will turn of automatically when the dog moves from the bed.

Small heated dogs bed: 450 mm long (18 inches) 300 mm wide (12 inches)
Medium heated dogs bed: 600 mm long (24 inches) 450 mm wide (18 inches)
Large heated dogs bed: 900 mm long (36 inches) 450 mm wide (18 inches)

Pets heated bed will fit into most dog houses and are light weight and easily transported.


The price of a small heated dogs bed is only $47


The price of a medium sized heated dogs bed is only $98


The price of a large heated dogs bed is only $146

Free dog house plans


The free dog house plan is an easy to read step by step plan and if followed correctly will result in a basic dog house that will give years of trouble free service.

Modifications can be carried out during the doghouse construction.
Measurements for panels of the dog house that have yet to be constructed may be altered by any modification.

It is relatively simple to modify all following measurements to suit alterations that are made to the dog house plans.
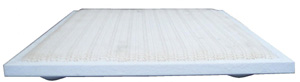
A dog house heater that is very economical to operate and weather proof. The dog house heater can be positioned under the dog house to warm the interior of the dogshouse through a suitable floor or positioned within the dog house.

The dog house heaters dimensions are approx 90 mm round ( 3.75 inch ) and 20 mm high ( .8 inch ) The dogshouse heater will warm s small area of the interior of the dogs home floor to a comfortable and safe level.

The heater operates from a low voltage transformer or battery ( not supplied ) and will warm the dogs home safely for long periods of time and at a very low cost.

$24


Construct a dog house


To construct the dogshouse we start with the predetermined measurements of the dogs house base and then adapt the following measurements.

A1/A2 Are equal measurements but larger than A5/A6 by approximately 20%
A3/A4 Are equal measurements but larger than A7/A8 by approximately 40%
A5/A6 Are equal measurements to A7/A8
A7/A8 Are equal measurements to A5/A6

Base of the dog house and doghouse

The base plywood is the first panel that is cut to size for the construction of the dogs home.
Plywood panels and timber have a natural grain running in one direction.
If the surface of the dog house is to be varnished to feature the wood grain ensure that all panels for the dogshouse are cut with the grain facing in one direction.
Wastage can be considerable when cutting panels to match grain patterns.
The measurements that are used to construct the dog house base will be guided by the width and height of your dog. Your dog should be able to turn around inside the doghouse without brushing the sides and be able to stand within the dog house without touching the roof.

doghouse 
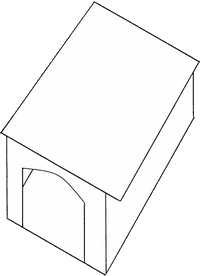
When you have decided on the correct measurements of the dogs home apply them to the base of the doghouse and this becomes the center piece and reference point to all the remaining measurements.

If you plan to insulate your dogs house or kennel the guide to insulating a doghouse that is hosted on this site should be read.

B1 The height of the dog plus 20%
B2 The height of B1 plus 20%
B3 Draw a line connecting together B1 and B2 after putting in the B4 measurement.
B4 Equal measurements to A7/A8 measurement

Dogs home plan


Patterns for the Dog home plan should be cut out of stiff card board and transferred onto the dog house plywood panels if unsure of any measurements for the dogs home.

The sides for the doghouse or dogs home will be the following measurements.

B1/B5 .. B2/B6 .. B3/B8 .. B4/B7 Equal measurements. These measurements are for the sides for the doghouse.

Cut out the first side B1/B2/B3/B4 of the dogs home and use this side as a template to make the second side B5/B6/B7/B8. If the surface of the plywood you are using is different on either side make sure that the template pattern is marked on the same sides. This will ensure a uniform finish to the painted surfaces of the dog home when you construct the panels.

C1/C2 Equal measurements to A5 and add on twice the thickness of the plywood being used for the side needs to be added on to the overall measurement.
C3/C4 Equal measurements to B1/B5
C5/C6 Equal measurements to A5 plus add on twice the thickness of the plywood being used for the side of the doghouse.
dog house plan 
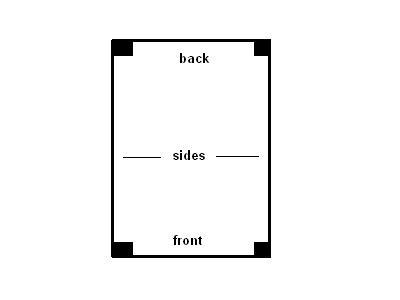
C7/C8 Equal measurements to B2/B6

A1+A2=The ends of the doghouse roof
A3+A4=The sides of the doghouse roof

A5+A6=The ends of the dogs home base
A7+A8=The sides of the dog house base

B1+B2=The ends of the doghouse side1
B3+B4=The sides of the dogs house side1

B5+B6=The ends of the doghouse side2
B7+B8=The sides of the doghouses side2

C1+C2=The ends of the dog house back
C3+C4=The sides of the doghouse back

C5+C6=The ends of the dogshouse front
C7+C8=The sides of the dogs house front

Dog house plans


The materials that are used to construct the doghouse will be decided by the amount of money that is available to build the dogs home.

Plywood panels chosen for the dog house plans should not be an exterior plywood that has been treated with chemicals that may be toxic to your pet.

Select framing timber that is approximately one inch square ( 25 millimeters ) and is suitable for the style of construction you intend to use. ( ie screwed glued or nailed )

Timber will be required to line the inside of the base, sides and four corners of the dogshome.
Timber will also be used for guides to reposition the roof.

Build a dogs house


Galvanized nails, screws and sand paper are other items used for the construction of the dogshouse and kennel. The doghouse will be exposed to weather so all fixing screws and nails will need to be galvanized or zinc coated to prevent rusting:
Construction grade glue is ideal for this type of building.
Any paint that has lead or zinc in it should not be used for the dog house. Some paints give off excessive fumes so a curing period will be required after painting.

Building a dogshouse


Building a dogshouse with metal fittings that are exposed to the dog can be a hazard.
If galvanized or zinc mesh wire is to be used as the front or on a window of the dogs house select mesh wiring that has been electroplated with a galvanized or zinc coating. The majority of mesh wiring on the market has been dipped into a galvanizing bath. Dogs can get zinc or lead poisoning if the wire mesh is chewed.

Construction of the dog house plan


A heater for cold climates can be fitted to the dog house. The heater can be installed under the base of the dog house. A good heater for a dog house and kennel can be found at this web site. The heaters are compact and weather proof.

The first part of the dog house that is constructed will be the base of the dogshouse.

Line the interior borders of the dog house base with the timber. Remove a section of front timber that is the same width as the door opening.

Assemble the sides to the base using galvanized nails and glue or nails.
Keep the plywood's side flush with the doghouse base and fixed to the under side of the dogshouse base.

Position and fit the upright corner pieces of the timber framing to the side edges of the doghouse.

Next position and fit the back of the dogs home. The plywood back must sit flush to the outside of both plywood sides and flush to the base underside.

When joining the panels to the framing using screws or nails drill a pilot hole into the plywood and the dog house frame.
The pilot hole will be smaller than the screw or nail shaft.

Pre drilling into the frame and plywood will prevent the dog house frame from splitting.

Dog home plan


Fit the front with the edges flush with the sides of the dog home and base underside.

Finally place the roof of the dogs home in a position that is suitable for the enclosure and then fit the roof guides to the underside of the roof.

Any timber that is left over can be used as framing beneath the floor.

When you are happy with the structural strength of the doghouse sand back any rough areas of the dogs new house and paint.


DISCLAIMER


HOME.... Incubator plan.... Bird moving cage.... Cat enclosure plan.... Build a kennel.... Dog house insulation
birds
Heatmats for pets    Heating     Small heaters    Small heaters    Rat hutch plans
Reptile lights   
Inquiries to : Warmpets P.O. Box 324
Chelsea. Victoria. Australia. 3196
Email : [email protected]
Phone : 0397742839

*Transformer or battery not included 2001-2009 free dog house plan doghouse plans home plans construct a dogs house.


Dog house plans

are presented in a easy to understand format.

Dog home plans

are free for personal use.

Dog house plans

are plans for pets.

Dog houses

are economical to build.

Dogs houses plans

have easy to follow plan designs.

Doghouse plans

have adjustable measurements.

Dogshouse plan

have a list of required fixtures.

Doghouses plan

describe the finishing steps of each pet structure.
bird bird bird
Hosted by www.Geocities.ws

1