Creating the actual globe and its base.
The construction of the globe itself is usually the most difficult part of making the device. Also there is very little information available on the internet about this subject. With these plans i hope to provide enough information for anyone to construct and enjoy their own plasma display.
The parts list.
- A large glass jar or globe which can withstand a vacuum inside and can tolerate the heat generated by the plasma streamers touching its walls. The jar i use is approximately 15cm(about 6 inch) in diameter and about 20cm(about 8 inch) in height. I have no idea where it came from though.
- Epoxy-glue, it is best to use epoxy glue because it is incredibly strong and it fills gaps easily. As a matter of fact it needs a gap to form a strong connection. Epoxy is ideal for making air-thight seals because it almost doesn't shrink when setting. I had to use metal epoxy-glue because i could only choose between metal and superfast glue. The latter had a processing time of only five minutes.
- A one-way valve. I used a tiny one-way valve out of an old bike-tire. This valve is then reversly placed into the the glass body letting only air out. Before placing, it should be fitted with a small piece of flexible rubber hose which is superglued to the valve. The shorter this hose is, the better. A long hose is limiting the maximum reachable vacuum because it's a death air-space.
- A 60cc(or any large volume) plastic syringe to extract the air from the globe via the rubber hose.
- A 20 x 20cm(about 8 inch) piece of plastic at least 1cm(about 0.4 inch) in thickness. Make sure the plastic is glueable to epoxy. I used a piece of thick plexiglas. Some plastics like polypropylene or polyethylene cannot be glued to epoxy.
- A piece of pvc tubing approximately 10cm(about 4 inches) in length. This is used to insulate the rod forming the main electrode as well as supporting the metal ball on top of it.
- Metal ball of about 2 to 3cm(an inch) in diameter. This should be solid metal because it's exposed to the air inside the globe. When powering up the globe it will soon start to oxidise. The walls of a hollow metal ball might collapse if they are thin enough and oxidise.
- Threaded rod to form the main electrode. And a very small bolt that can be inserted through the main electrode. The high-voltage wire from the flyback transformer is soldered to this little bolt.
- A piece of plywood and some treaded rods nuts and washers and copper or steel tubing to create a support for the electronics transformer and globe. Or you can make your own “design” case. This is not critical.
Building the globe
Start building the globe by cutting the plexiglass to size. Then drill four holes of the same diameter as the threaded rods for the supports into the four corners of the plexiglass plate. Next place the opening of your globe or jar in the middle of the plexiglass. Mark the plexiglass in this place. Mill a groove into the plexiglass where you marked the opening. It should be about 0.5cm(0.2inch) wide and deep. You can use a dremel multitool or a similar tool to do this. Don't worry about an uneven surface inside this groove, it will be filled with epoxy later. Drill a small hole through the threaded rod forming the central electrode. Drill a hole in the center of the plate to fit the threaded rod forming the central electrode. Also drill a hole for the one-way valve somewhere next to the central electrode. Cut the pvc tube supporting the central electrode to length in such a way that the metal ball will be in the center of the globe later. Solder the metal ball to the end of a piece of threaded rod. Use a heavy solder iron for this. You can also weld it to the rod. Now, put some epoxy in the hole for the central electrode. Place the pvc tube on the rod and push the rod through the epoxy-filled hole. Take a washer and a nut and screw them tightly onto the threaded rod. Superglue the flexible plastic tube to the one way valve. Glue them both in the second drilled hole with plenty of epoxy glue. Fill the circular groove with epoxy. Place the opening of the jar into the epoxy filled groove. You can make a support for the globe by cutting a piece of plywood the same size as the plastic plate and placing threaded rods with steel or copper tubing as supports between them. Or you can make your own design case.
Extracting the air.
After the epoxy has set the globe is done. Except for one thing: extracting the air. To do this one can use a syringe or something similar. I used a 60cc syringe. It is best to do this with two people. One can pull and hold the plunger of the syringe while the other detaches the plastic hose from the tip of the syringe. Empty the syringe in free air and repeat. Ofcourse with a vacuumpump this will all be alot easier.
Remember that P1xV1=P2xV2, where P1 is the normal air pressure of about 10^5 Newton/m^2 if i'm correct and V1 is the volume of the jar. P2 is the end pressure in the jar and V2 is the volume of the jar + n x volume syringe. Where n is the amount of extracted syringes. Therefore the endpressure P2 can be calculated by:P2= P1 x V1/(V1+n x Vsyringe).
Some pictures to clarify certain things.
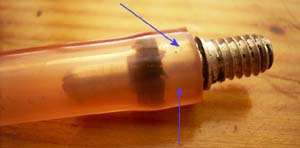
One way valve superglued into flexible tube. Only put glue on the area indicated by the arrows. Otherwise you might block the valve.
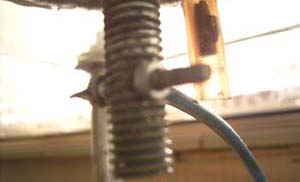
Small bolt through main electrode rod with blue high voltage wire soldered to it.
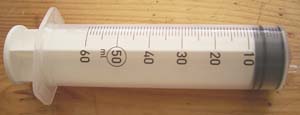
The 60cc syringe used to extract the air from the glass vessel.
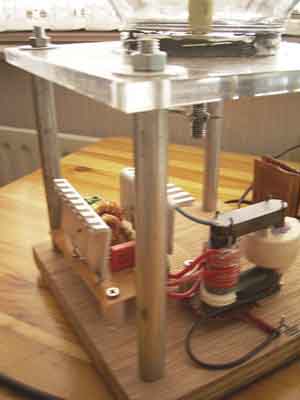
Plywood base with flyback transformer and oscillator circuit. The plexiglass plate is held up by steel tubes with threaded rods through them. Notice the dark color of the epoxy. This is because it contains a metal filler. The only transparant epoxy i could get was superfast setting one. So i had to choose for a less aesthetic result. The copper plates in the background serve no purpose anymore. They used to form a capacitor to ground. One of them was connected to a piece of aluminium tape taped on the glass of the jar to attract bigger streamers.
More details.