|
|
|
|
|
sent me someone's rare veteran handbrake in the mail. I was fortunate to have found a spare handbrake that was previously buried under dirt with only 2" exposed, when tripping over it on my search for parts on a farm.
The windscreen frame proved to be one of the most frustrating exercises, The frame had twisted and the bottom corners of the side posts had cracked from the smash. I found the bronze castings very difficult to weld and achieving the correct angles of the frame a real headache! With the frame re-plated in nickel and the lower glass set into the frame, I then proceeded by fitting the windscreen to the body. Soon after, I noticed a bow in the glass and within 5 minutes, the glass began to crack. Whilst leaning against the side post, in disbelief the side post then broke off at the weld. The other post also broke with a push. My enthusiasm at this stage of the restoration was at an all time low! Once my confidence had regained, I then tried another welding technique and this time I thoroughly tested the strength of the side posts.
Having decided that it would be more interesting to do the upholstery myself. I enrolled in an upholstery course at the TAFE College, learnt the correct techniques and eventually completed the interior with the original design pattern. The sewing machine I used was my mum's 35 year old; domestic Japanese made Atlas that handled the work very well.
Many hours were spent, welding all the wheel edges and the inner tyre resting band back onto the wheels. I also repaired the Speedo, Speedo cable and other instrumentation that included re-drawing the numbers onto some of the instruments. Damage also extended to the hood bows, which had broken in a few places, and were bent out of alignment, having spent hours reshaping the bows, they were then powdercoated in black.
As my patience was wearing thin, I then decided to prepare the Crossley so I could at least get it registered and experience the pleasures of vintage motoring. The front mudguards also required work with the presence of the car at the TAFE College, so the guards were brushed with cheap black paint and were fitted to the car for the time being. After fitting a battery clamp, the Crossley then passed the roadworthy and was fully registered in November 1991. By this time, I was fed up with the spray painting fumes so the front mudguards were taken off to a panel repair shop and painted with Acran paint to minimise stone chipping.
The Crossley's first major trip was to the Echuca Steam Rally in June 1992, accompanied by my stepfather and another Crossley enthusiast who sat in the back seat all the way to Echuca. On arrival to the show grounds, Bob was just speechless; in fact his face was nearly frozen solid! This problem and the heavy rain incurred on the way home prompted me to my next challenge, "cover the hood"! On my first attempt I tried to carefully copy the original material and stitch it with little success. The second time around after using
|
|
|
|
|
|
|
|
|
|
more material, I placed the material upside-down on the hood bows and attached it at both ends. I then stapled the side strips to the centre piece to hold it into the desired shape with the use of a paper stapler and sewed them together with the sewing machine. With the hood successfully completed, the next job was to do the sidecurtains. These seemed to take forever, however with my friend's wedding looming; I reassured the bride-to-be that it wouldn't be windy in the back seat of the Crossley on her wedding day. This meant spending many late nights sewing sidecurtains in the week before the wedding. By around 4.00 am on the morning of the wedding, I had finished all but the drivers curtain. It was quite a busy wedding for me that day, not only did I chauffeur the couple around to their selected venues, I also play the organ at the reception.
I encountered some teething problems when first driving the car on the road, the most expensive being the gearbox as the old gears were sounding rather unhealthy. With the generous assistance of my great uncle who cut the blanks on his lathe, I now have a new set of gears. The clutch posed a few more problems. The first being the large cone spring which would slip out of its retainer to one side and lock up the clutch at higher engine speed. Meanwhile the pressure plate would disengage unevenly in a loose manner, causing drag on the clutch plate due to the nature of its design. A few modifications to the clutch remedied these faults. The radiator needed more professional attention due to the cars rapid ability to boil. The Crossley still boils due to the absence of a water pump, although a lot less than before. A recovery tank and regular checking after every 100 km has alleviated this problem for the time being,
After being unable to find a matching front parking lamp, I decided to teach myself from library books the process of metal spinning. With the use of wood lathe, I managed to successfully complete the second parking lamp and two divers helmet tail lamps with brake/indicators lights combined into the units,
The Crossley is performing very well now and has so far traveled 3000 miles with only one mishap on the way to Kyabram when the front tyre came off the wheel. Within the first 150 km's of road use, the car handled the road extremely well until the suspension wore in, the car then became a nightmare to drive. After installing a pair of friction shockers on the rear, the Crossley is now a pleasure to drive.
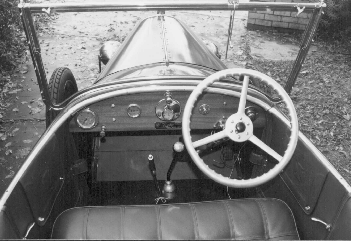
The two wheel braking system works surprisingly well so long as you plan further ahead when driving. The gear ratios are not well spaced because of the large ratio jump from second to top gear with an overall ratio being quite high. The Crossley's cruising speed is around 50 mph with a maximum speed of 70 mph. Fuel consumption is between 23 and 27 mpg. The Crossley was made in March 1923; the body was made at the Crossley factory that features a rare and unusual windscreen. The chassis, engine, body and a lot of other mechanical parts are stamped with the numbers 25425 indicating that the car was certainly hand made. The car is fitted with Rotax electrical equipment, Smiths speedometer and oil pressure gauge, a Solex carburetor and a magneto
|
|
|
|
|