Projects                                                                                Astro_Odds_Icon


   equipment_icon   project_button   gallery_button   imaging_button   technical_button   links_button

Click the Astro Odds logo to go back to the home page

The following sections contain details of projects that I have used to customize and improve my equipment.

Meade ETX125 finder scope extension bracket
Illuminated accessory tray
Flash gun bracket mounting for finder scope
Reticle Eyepiece
Canon DSLR cable release
PalmV USB controller cable for Canon DSLR

Meade ETX125 finder scope rear anchor

Meade ETX125 finder scope extension bracket

When I bought the Meade DSI, it was immediately obviolus that the camera could not be mounted in the correct orientation because the USB cable clashes with the body of the finder scope. I looked for a right angled USB adapter that would redirect the cable but nothing exists. The next obvious course of action was to extend the finder scope bracket so that the body of the finder clears the USB cable as in the picture below left. The picture on the right shows the bracket itself.
I decided to keep the finder in the same orientation and just extend the arm outwards.
Meade_DSI_USB   ETX_finder_extender_rear  
For the bracket I used the type of clear perspex that can be bought in DIY stores in sheets. It's rigid, easy to cut and can be glued with a good epoxy resin. I sprayed the finished bracket black, it looks better but it's hard to photograph!
One end of the bracket fits inside the original finder bracket and is secured with a nylon bolt and nut to protect the plastic. The other end has a circular hole which fits over the plastic suround of the screw thread used to fit the finder scope to the ETX. The extension has to be removed to store the ETX in its case so the screw has a non slip washer and a tap washer to make it easy to handle in the cold and dark.
dismounted_finder   Bracket   Bracket2
At first I tried a straight flat bracket but it flexed too much to be usable. Therefore I glued two fins at right angles. One rests on back of the OTA the other fits under the slot used by the original finder. To make sure the bracket did not crack at low temperatures I glued right-angled strips of plastic along the joins. It works well and once the finder is zeroed in it works fairly well.

Illuminated accessory tray

I used the clear perspex to make an accessory tray to hold eyepieces and the ETX125 handset. I used two steel pins (cut from an old spindle from a scrapped fax machine) to hold it on the Voyager tripod and prevent sideways moement while a piece of wood stops it moving vertically.
ETX125_accessory_tray   ETX125_accessory_tray_dismounted   ETX125_accessory_tray_unplugged
A red LED is glued to the side and the whole accessory tray acts as a light guide. The power comes from a rechargeable battery connected via a strip connector that has screw terminals on one line and pins or sockets on the other side. Once unplugged I can recharge the battery through the pins using a racing charger for a remor
te cotrol car.  When not in use the battery plugs into the wooden block. Sadly the tripod fell over and there is a crack through the tray!  Spot of glue is easier than making a new one.

Flash gun bracket mounting for finder scope

I needed a finder scope for using the Canon DSLR for widefield or when it is bolted up to the SD66Z. I acquired a Skywatcher 50mm finder scope and bracket but could see no way of easily mounting the bracket on the scope or tripod. The obvious mounting point was the shoe for the flash gun on the camera, all that was needed was a fitting.
Camera_shoe_mount  Camera_shoe_mount_closeup
The white plastic block shown in the picture came from a curtain rail system and was the right size,  just needed two narrow slots on either side cut with a scapel. I need two blocks due to the recess on the Skywatcher bracket. The holes in the bracket allowed the blocks to be bolted through to the bracket.


Reticle Eyepiece

This project was inspired by a page on the web but I have forgotten where and cannot credit the original  author. I had bough a wider field 26mm eyepiece and decided to convert the original Meade Series 4000 Plossl eyepiece to a reticle eyepiece. There is a collar in the barrel of the eyepiece that is just in the plane where the eye focusses. I was easy to print a reticle on a transparent overhead projector slide. The eyepiece is shown in the picture with the 1.25 inch barallel removed.

DIY_reticle

 I cut out the reticle with a compass cutter to keep it circular. It took quite a few attempts to get the hole produced by the needle in the centre of the cross hairs but after a dozen or so attempts I got my "golden" reticle. I just used tape to stop it from dropping out of the eyepiece.

Some light is blocked but I only use this eyepiece for alignment and the stars are usually the brighter objects. The hole created by the window proves useful because when a bright star is dead centre, you can see the light clearly through the hole. 


Canon DSLR cable release

The cable release was relatively easy and quick but the following description is for information only and should be taken as advice! I cannot warrant that the design will work or be responsible for any damage caused and you are at your own risk. 

Some research on the web revealed that the Canon EOS350 shutter release socket accepts a 2.5mm stereo jack identical to headphone connectors. The screen is a common rail, the tip connection opeartes the shutter and the middle ring the focus. For astro photography the focus is not required and the camera is usually set to manual focus. I decided to include a focus switch for terrestial daylight work such as nature shots where I could be using high maginfication lens on a tripod and want minimal camera shake.

The design was simple and cheap, a soap-style enclosure with a circuit board containg two tactile push-to-make switches and slide switch for manual exposures greater than the 30 seconds the EOS350 allows.
Shutter_release_case   sutter_release_pcb   sutter_release_switches
The third switch is a silde switch that is a "bulb" switch for exposures longer than 30 seconds (the maximum selectable exposure of the EOS350). The enclosure is big enough that it's easy to find in the dark and as the switches are proud of the case, I can tell which is which simply by touch.

PalmV USB controller cable for Canon DSLR

When I was searching the web for the cable release wiring diagram I found the Astronomist pages on the PalmDSLR control software and cable. I had a  PalmV that was no longer used and downloaded the freeware. The program is simple and intuitive, you just set the length of the exposure the number of frames and the delay between each. It's also possible to record the date time and some observation notes. I realised that it would be useful for taking multiple widefield exposures, either for stacking or for capturing meteor trails. I decided to make my own cable and choose a different design to the one described on the  Astronomist cable page. I also had a USB charging cable for the PalmV that had the 10 pin connector for the PalmV on one end and a USB plug on the other end. I used a meter and the serial cable to work out the ground and data transmit connections on the 10 pin connector. The circuit diagram and assembly are shown below.
PV_shutter_cable_diagram
  PV_shutter_cable_assy

In the diagram the 10 pin palmV connector is drawn pins upward, just as it is shown in the photograph. The cover of the 10 pin connector came off and there was enough room to fit the 4-pin optocoupler and resistor inside the body of the connector itself. I even managed to reuse the strain relief cover from the charging lead. This made the lead very simple and clean and apart from the length of cable, everything is pictured in the photo above. The cable is long enough so the PalmV can rest on the ground or a chair without hanging and straining the connections. I first tested the set up with a meter and I made certain everything worked before connecting to the camera.

I used the set during the peak of the Persieds in 2007 and set the software to capture 250 fifteen second exposures. A 1 second delay between frames was required to let the camera write to the memory card. I captured a number of aircraft, a couple of satellites and half a dozen meteor trails, the best of which is in my Gallery.


Meade ETX125 finder scope rear anchor

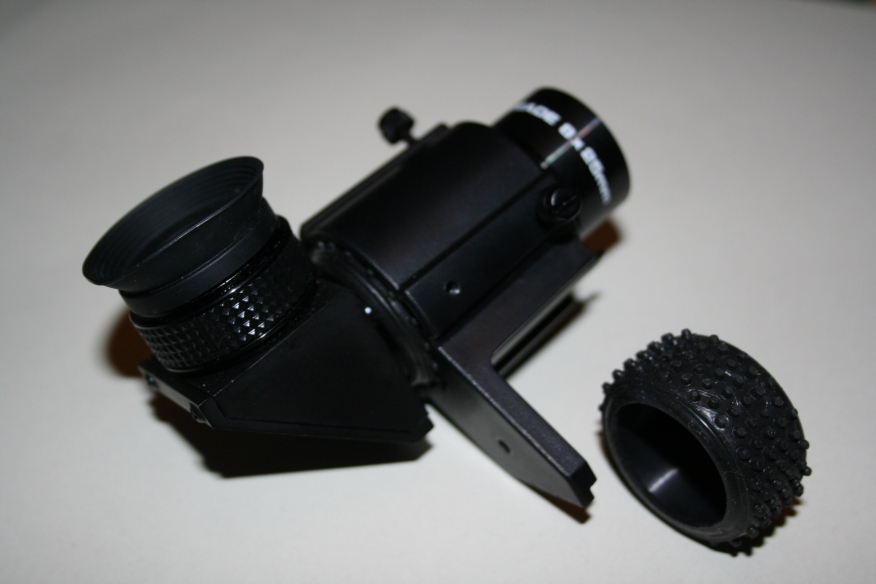
The Meade ETX125 finder has six alignment screws, three forward and three at the rear. The screws are soft and tend to bend against the finder scope.  It's not intuitive to manipulate all six screws so I decided to simplify the set up by fixing the rear of the finder scope.
 rear_anchor
The only problem was finding something that would fit around the spotting scope, fit inside the bracket and allow the scope to move with the front screws. I went through my boxes of junk and found the perfect component....a tyre from a kids model car. A tyre is shown in the picture above and there is a second one just visible inside the finder bracket. The finder scope alignment is now intuitive, quick and easy.

Counter Visitors since 17th Nov 2007
1
Hosted by www.Geocities.ws

1