![]()
![]()
![]()
![]()
![]()
![]()
![]()
The following is a set of stand-alone programs that can be used with Alias. Some of these utilities are optional components of the Alias system. All of these stand-alone utilities are run from a UNIX shell.
| AlToCa | translates Alias wire files to CAI files. |
| AlToIv | translates Alias wire files to Inventor files. |
| AliasToRenderman | creates a RIB file from an Alias wire file. |
| Alias | is the Alias interactive package's binary file. |
| Alias | sets all environment variables required and runs the interactive package in the same location as this file. |
| AliasBatch | The standalone utility Alias -B has been replaced by the application AliasBatch, which uses the OpenModel API |
| alias_to_sgo | converts Alias triangle files to SGI sgo files. |
| AlToSt | converts Alias wire files to ISO10303 format |
| alias_render_demon | is part of Distributed Render Control. |
| aliasWarning | displays error messages for the interactive package. |
| aquant (Alias Image Quantizer) | quantizes Alias image files down into fewer bits per pixel. |
| aXe | is a text editor program. |
| axe | is a script that sets important variables for the executable aXe. |
| beep | rings the console bell. |
| convert | provides a number of simple image processing tools such as changing the number of channels or creating a complimentary image. |
| depthmap | converts a camera depth_file into an Alias run-length encoded mask (8-bit) file. |
| dxf_info | provides information on DXF entities. |
| fastrender | is a real-time renderer that uses SGI's Reality Engine. |
| filace | interlaces scanlines of images rendered on fields into a single interlaced image. |
| findit | is a shell script that checks whether a given picture file exists on the render engine. It is used internally by Alias for the standard render control window. |
| FLEXlm | is a licence management program from Globetrotter Software. |
| flipbook | is an Animation preview utility with advanced playback and compression options. |
| fmovie | converts a sequence of Alias image files into an SGI or Apple QuickTime movie. |
| fpaste | pastes images together incompletely rendered images. |
| froam | roams through pix files that are larger than the screen size. |
| fstats | provides information on the number of completed scanlines in an Alias format pix file. |
| ftarga | converts AT&T TARGA Format 10 image files to Alias pix files (and vice versa). |
| ftiff | converts Alias pix files to TIFF format. |
| ftile | tiles a sequence of images into a single, larger image. |
| gamma | applies a specified gamma conversion factor to an image. |
| get_alias_variable | determines the value of an Alias preference variable. |
| getid | displays Alias system information. |
| harry | converts Harry format files to or from Alias format. |
| hp_glplotf, hp_gl2plotf | translates Alias plot files into HP-GL (IBM-GL) and HP-GL2 formats. |
| iges_info | provides information on IGES entities. |
| IncreaseVSwap | verifies that the size of a machine's virtual swap space is at the optimal level. |
| install_glib | installs the games library |
| IvToAl | translates Inventor files to Alias wire files. |
| linerender | renders the polyline files created during a PowerToon render. |
| makebot | creates block ordered texture file |
| lmutil | is the executable that runs the FLEXlm license management program. See the FLEXlm section in this manual. |
| make_pix_icons | produces icons to represent image files in the File Browser. |
| matteRGB | converts 8-bit matte files to Alias format. |
| nprocs | displays information about the host machine's processor(s) |
| onlineDocs | opens online documentation viewer (HyperHelp) with welcome window. |
| pim | plug-in manager |
| pixdiff | compares two pix files for differences. |
| pix2omf | converts Alias run-length encoded files to OMFI format. |
| powercaster | is a command line parallel renderer for Alias SDL files. See the description for the renderer/raytracer (incl. powercaster/powertracer) stand-alone. |
| powertracer | is a command line parallel raytracer for Alias SDL files. See the description for the renderer/raytracer (incl. powercaster/powertracer) stand-alone. |
| PRenderToAlias | converts Pro/Engineer Render Format files to Alias wire files to import them into Alias. |
| print_wire_header | views the header of wire files. |
| psplotf | translates Alias plot files into PostScript. |
| pst, pstget | creates simple editor windows of the type used by Alias. |
| raytracer | is a command line raytracer for Alias SDL files. |
| rb_stereo | combines stereo pairs of images for viewing with red/blue glasses. |
| renderer/raytracer (incl. powercaster/powertracer) | is a command line renderer for Alias SDL files. |
| renderit | is a shell script to execute the rendering code. It copies files to the proper locations and, if necessary, starts the renderit script on a remote machine. |
| rndctl | runs the distributed render job control window from outside Alias. |
| runalias | starts the Alias interactive package and sets the environment variables. |
| Run3Design | starts the 3Design program and sets the environment variables. |
| RunComposer | starts the Record Only Composer program and sets the environment variables. |
| setupacct | customizes user account for use with Alias software. |
| showstereo | loads images onto Stereographics monitor. |
| sla | translates files for SLA-1 output. |
| StToAl | Converts ISO10303 files to Alias wire files. |
| surfmate | processes triangle data to ensure that objects are topologically closed (watertight). |
| systemInfo | displays Alias system information in a window. See the getid stand-alone description for more information. |
| unlace | splits one or more image files into separate even and odd fields. |
| vda_info | provides information about VDA entities. |
| viewErrlog | opens the Alias error log file in a text editor.
For more information, see File |
| write_multiple_sdl | converts wire files to SDL files. |
| wrl | displays Alias files on the screen. |
The standalone utility Alias -B has been replaced by the application AliasBatch, which uses the OpenModel API. You will find this new application offers more robustness. For help on this new facility, type:
AliasBatch -h
Alias -B is no longer supported.
The usage statement for AliasBatch is as follows:
AlToCa translates Alias wire file to CAI (CATIA/Alias Interoperability) format files.
The usage statement for AlToCa is as follows:
AlToIv translates Alias wire file to Inventor format files.
The usage statement for AlToIv is as follows:
AliasToRenderman converts Alias wire files to Renderman Interchange Bytestream (RIB) format files.
The usage statement for AliasToRenderman is as follows:
All options except -H require an argument.
You do not need to specify any options, but omitted options assume their default value or behavior.
You can specify any combination of options in any order.
alias_to_sgo converts Alias extended triangle files to Silicon Graphics Object (SGO) files.
An Alias extended triangle file is produced by
saving an Alias model using the Object Separators option of the
Polygon File Output Options window (File ![]() Export
Export ![]() Save polygons -
Save polygons - ![]() ).
).
The usage statement for alias_to_sgo is as follows:
To view the results of the conversion, use the following command:/usr/demos/bin/perfly -d cube.sgo
An example of a usage statement for alias_to_sgo is as follows:alias_to_sgo -v cube.tri cube.sgo
The color-per-vertex value stored with each triangle vertex in the Alias extended triangle file is affected by Alias lighting and shading calculations.
To avoid permanent highlights on objects in the resulting SGO file:
When you import an SGO file created by alias_to_sgo to another program (for example, the SGI Performer demo perfly), you may notice that some surfaces are missing, or are rendered transparent or black. This occurs because the surface normals are pointing away from you. The program you imported the SGO to renders only surfaces where the normals are pointing toward you.
To avoid this problem, make sure that the surface normals are pointing in the direction you want them before you create the Alias extended triangle file. Preferably, check the surface normals as you create each surface.
When creating a surface or group of surfaces that describe an enclosed volume, make sure that the surface normals of each surface point toward the outside of the volume (like a porcupine).
You can examine surface normals by using Evaluate
![]() Continuity
Continuity ![]() Surface continuity, Locators
Surface continuity, Locators ![]() Deviation measures
Deviation measures ![]() MinMax deviation, or by simulating the other program's rendering
as follows.
MinMax deviation, or by simulating the other program's rendering
as follows.
Any surface that has its normals reversed (that is, pointing into the volume) will not be rendered when you are looking directly at it, and will allow you to see through the volume.
If you can't see completely through the volume, a surface on the other side of the volume also has its normals pointing towards the inside of the volume.
To flip the normals of a surface to be in the correct
direction, use Object Edit ![]() Reverse
Reverse ![]() Reverse direction and choose either U or V from the
option box and click Go.
Reverse direction and choose either U or V from the
option box and click Go.
When the Alias extended triangle file is created,
the number of triangles produced for each surface is governed by the rendering
subdivision type. This can be set using Render ![]() globals and Windows
globals and Windows ![]() Render stats....
Render stats....
To produce the minimum number of triangles for surfaces and also the lowest quality, use the following instructions according to which command you have chosen to use.
In the Object Rendering Parameters window, toggle Adaptive Subdiv OFF and set the Minimum and Maximum Subdiv levels to 1.
In the Render Globals window, select LOW for the Global Quality Level, Adaptive for the Subdivision type, and set the Adaptive Maximum level to 1.
Converts Alias wire files to ISO10303 format, specifically application protocols ISO10303-203 (Configuration Controlled Design) conformance classes 1-4, and ISO10303-214 (Core Data for Automotive Mechanical Design Process) conformance classes 1-2. The import and export of this data is supported via ISO10303-21 Physical file exchange.
The geometric data contained within ISO10303-203 and ISO10303-214 are identical. This comprises the core of the implementation of the translator. The following table shows the mappings made.
When retrieval is finished, without errors this message is displayed:STEP files retrieved successfully.
If there were errors in the retrieval, this message is displayed:Problem Reading Step File, refer to log file for details.
The STEP logfile contain a specific error message for each problem entity that is encountered. Each error contains the STEP entity ID and entity type.
The usage statement for AlToSt is as follows:
aquant quantizes 24-bit images down to 16 or fewer bits.
By default, aquant creates a 24-bit image, with the same name as the input pix file, but adding the extension _quant. This new image is in the same file format as the input file and uses only the colors calculated in the reduced color table.
The usage statement for aquant is as follows:
TIFF files can only be generated for quantization to 8 bits/pixel.
The usual method for quantizing an animation for playback on 8-bit hardware (such as a games system) is a 2-step process:
The by-frame (-b) is set to 50 in order to sample just a few of the frames.
The colour map generated is redirected (>) to the file color.map with a median cut algorithm on all the pixels of the files listed above.
Use the file color.map generated in the above run as input to aquant for a 2nd pass to quantize all of the files in the sequence. The following command quantizes each image of the full sequence when rendering: aquant -s 1 -e 201 -b 1 -F -P color.map file
The by-frame (-b) value is now set to be 1, to quantize each frame. The -P option specifies the colour map file to use.
aquant creates a quantized version of each file in the animation called file_quant.<frame>t
aXe provides an easy introduction to text editing, but it is hoped that it is also sufficiently flexible to continue to meet most of your needs as your editing skills develop.
aXe can be used to edit several files at once, with each file allocated to an editing buffer. An aXe window can support many buffers, but only one is visible at a time. You determine the allocation of files to buffers, and hence to windows.
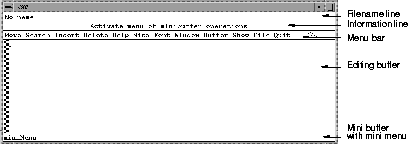
The aXe window consists of five visible parts as follows:
The Filename Line is a field showing the name of the file currently displayed in the editing buffer window. If a file has not been associated with this window then No name is displayed on the Filename Line.
The filename is preceded by * if the text in the Editing buffer contains unsaved changes.
The symbol ~ at the beginning of a filename is shorthand for your home directory.
You can suppress the display of the Filename line. See the Help Menu -> customize for details.
The Information Line is a field that is updated with brief explanations of the action that would be performed if the left mouse button were clicked with the mouse pointer in the current position.
The information line also displays information arising from some actions, and for some error messages.
If an action can be performed using a keyboard shortcut, the information line contains a description of the shortcut. The shortcut is enclosed in square brackets as follows [ Ctrl-a ].
You can suppress the display of the Information
line. See the Help Menu
![]() Customise for details.
Customise for details.
Many of the operations found in the menus, and some operations of the buttons, have keyboard shortcuts. The complete set of default shortcuts can be seen in a separate window by selecting Bindings from the Help menu.
The keyboard shortcut Ctrl-a, which moves you to the beginning of the line, means press and hold down the Ctrl key, press and release the A key, and then release the Ctrl key.
Other operations involve the use of the Alt key. The Alt key is used similarly to the Ctrl key.
Some of the operations that are available via the menus and buttons do not have default keyboard shortcuts. Instructions on how they too can be associated with key strokes can be viewed in a separate window by selecting Customise from the Help menu.
Customizing keyboard shortcuts assumes you know how to use and specify X resources.
The Menu Bar contains pulldown menus.
To select a menu item, drag down the menu list, and release the button when the pointer is over the menu item you want to select.
As the mouse pointer moves over a menu entry a one line explanation of the item's function is displayed in the information bar immediately above.
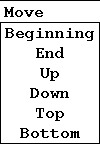
The Move menu appears as follows:
The Move menu contains commands to control the position of the cursor within the editing buffer.
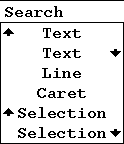
The Search menu appears as follows:
The Search menu contains commands to search within the text in the editing buffer.
The Text entry with the upward pointing arrow searches backward through the text for the item you have selected.
The Text entry with the downward pointing arrow searches forward through the text for the item you have selected.
The Line entry searches for a specific line in the text in the editing buffer.
The Caret entry searches for the text insertion point within the text in the editing buffer.
The Selection entry with the upward pointing arrow searches backward through the text for the item you have selected.
The Selection entry with the downward pointing arrow searches forward through the text for the item you have selected.
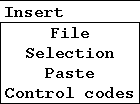
The Insert menu appears as follows:
The Insert menu contains commands to add text or codes to the text in the editing buffer.
The Delete menu appears as follows:
The Delete menu contains commands to remove text or codes from the text in the editing buffer.
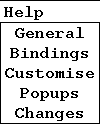
The Help menu appears as follows:
The General entry displays the general help information about aXe.
The Bindings entry creates custom keyboard shortcuts for menu commands. For further information, see the Keyboard Shortcuts section above.
The Customise entry creates a special set of buttons for menu commands. For further information, see the Menu Buttons section below.
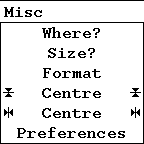
The Misc menu appears as follows:
The Where? entry displays the pathname to the location of the text in the editing buffer.
The Size? entry displays information about the size of the text file in the editing buffer.
The first Centre entry positions the text equidistantly from the beginning and the end of the editing buffer.
The second Centre entry positions the text in the centre of the editing buffer equidistantly from the sides.
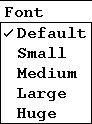
The Font menu appears as follows:
The Font menu contains options for you to specify the size of the text in the editing buffer.
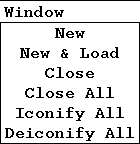
The Window menu appears as follows:
The Window menu contains options for you to open, load, close, minimize, or maximize editing buffer windows.
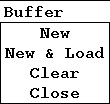
The Buffer menu appears as follows:
The Buffer menu contains options for you to open, clear, or close the editing buffer window.
The Show menu appears as follows:
The Show menu shows the names of all of the files you have loaded into buffers. The name of the file in the current editing buffer window has a check mark beside it.
Dividing lines are drawn to group the files associated with individual windows.
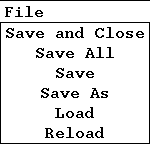
The File menu appears as follows:
The File menu contains the save and load functions.
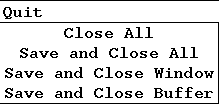
The Quit menu appears as follows:
The Quit menu contains the functions that save text files and close the editing buffer windows and the aXe window.
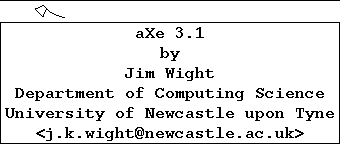
The aXe menu appears as follows:
Clicking the axe icon in the menu bar opens the above information window about the version of aXe you have on your machine.
After a time you may find it too slow to access operations you perform frequently using the menus. There is an optional button interface in which an array of buttons representing every menu bar menu entry is permanently displayed underneath the menu bar.
To use the button interface, start aXe with the following command:axe -buttons
To use a menu button, click the left mouse button when the mouse pointer is over it and the button is highlighted.
You can display a customized set of buttons by selecting
Help ![]() Customise. A good compromise is to have your most frequently used
operations available via buttons and the less frequently used operations
still in the menus.
Customise. A good compromise is to have your most frequently used
operations available via buttons and the less frequently used operations
still in the menus.
The Editing Buffer is an area displaying the text of the file that is being edited or created.
You can move through the text in the editing buffer and make changes to it from the keyboard or by using the mouse.
The current position, or insertion point, in the text is denoted by a caret (^). It lies between characters and is initially right at the top of the file before the first character.
In order to edit using the keyboard, the mouse pointer - the symbol that moves around the screen as the mouse is moved - must lie somewhere within the editing buffer area.
The pointer symbol changes depending on which part of the screen it is over. When it is in an editable text area, the editing buffer or the Mini Buffer, it looks similar to the letter I.
With the pointer in the editing buffer area, typing on the keyboard inserts the characters typed at the insertion point.The character immediately to the left of the insertion point is erased by using the Delete key.
The insertion point can be moved one line or one character at a time by using the cursor (arrow) keys.
An easier way to move the insertion point, especially if you want it to be some way away from the current position, is to move the mouse until the vertical bar of the pointer lies over the character to the right of where you want the insertion point to be. Press and release the left mouse button. The information line updates to show the new line number.
Text is selected so that some operation can be applied to it, for example deletion or copying to another part of the file.
Slightly moving the mouse while the button is pressed down may result in one or more characters highlighting. If this happens, you can either try again or simply ignore it for the time being.
Some features involve the notion of selected text. Selected text is identifiable as an area of highlighted text. You may already have accidentally created one by moving the mouse with the left button pressed down when attempting to adjust the insertion point.
One way to create a selection is as follows:
Another way to make a selection is to move the pointer to where you want the selection to start and click-drag with the left mouse button to the end point. You can then adjust the selection with the right mouse button.
You can cancel a selection by clicking the left mouse button within the buffer.
Clicking the left mouse button within the buffer usually moves the insertion point to the place where you clicked.
If you didn't highlight the text you wanted, a selection can be adjusted at either end. Just move the pointer to the new end point and click (quickly press and release) the right mouse button, or press the right mouse button and drag toward the new end point while continuing to hold the button down. Release the mouse button when the correct text is highlighted.
Another way to highlight text is to rapidly click the left mouse button the following number of times:
2 selects the word under the pointer. Words are delimited by spaces, tabs, and carriage returns.
3 selects the line under the pointer.
4 selects the paragraph under the pointer. A paragraph boundary is defined two carriage returns with only spaces or tabs between them.
You should be aware that the selection mechanism is not peculiar to this application. Many other X applications support it, but there can only be one selection across all applications at any one time. Insert/Selection, however, results in the selection, whichever application owns it, being inserted at the current insertion point. And a selection made in this application can be transferred to some other by using its insertion method - usually by clicking the middle mouse button.
You can copy text by choosing Insert ![]() Selection or by clicking the middle mouse button. The selection
is inserted at the current insertion point. The insertion is at one of
the ends of the selection immediately after it has been made, so it will
normally have to be moved.
Selection or by clicking the middle mouse button. The selection
is inserted at the current insertion point. The insertion is at one of
the ends of the selection immediately after it has been made, so it will
normally have to be moved.
Using the mouse to move the insertion point causes the selection to unhighlight, but it will remain available for insertion until another one is made.
The Mini Buffer area contains a menu and a one line text buffer.
The miniMenu for the Mini Buffer appears as follows:
The miniMenu provides convenient access to some of the more complicated facilities that are only available via the Mini Buffer. The options feed the contents of the editing buffer to an external UNIX command for processing and display the output, if any, in a fresh window.
You can suppress the display of the Mini Buffer.
See Help Menu ![]() Customise for details.
Customise for details.
beep causes the console to make a beep sound.
beep has several uses. One common use of beep is to have the console beep at you when a render is complete.
The usage statement for beep is as follows:beep
convert uses an input image to produce the following:
For information on the Alias version of convert,
see the Alias Menu Book at Render ![]() Filter
Filter ![]() Convert -
Convert - ![]()
convert accepts and produces the following file formats:
The usage statement for convert is as follows:
Type convert at the command line to see the list of options.
The default usage statement is as follows:convert -rgby3 infile outfile
Options y, h, l, L, s, c, C, t, T, x, X, z, and Z are mutually exclusive operations. That is, only one of these options may appear on the command line at a time.
Options 1, 3, and 4 are mutually exclusive. That is, only one of these options may appear on the command line at a time.
Options 0, 1, 3, and 4 may be used in conjunction with any option from among the y to Z sub-list, above.
One or more of r, g, b, and a can be used with L, c, C, t, T, x, X, z, and Z. If none of r, g, b, or a is specified, all three colors and alpha will be extracted.
Options y, h, l, and s extract r, g, and b automatically.
If the option x is used alone (for example without r, g, b, or a) the resulting image will be entirely white.
The h, y, and s options use only r, g, and b in their evaluation. However, if you use the a option with y (luminance) or s (saturation), the alpha channel output is the same intensity as the r, g, and b values. If a is not used, the alpha value is zero.
h has no effect on the output alpha.
TIFF, TIFF16, and RLA formats are always 32 bits deep. Therefore, the 4 option is automatically used if the output file ends in .tiff, .tiff16, or .rla.
The input file must be 24 or 32 bits deep.
depthmap converts camera depth files into Alias run-length-encoded, mask or PIX files.
depthmap converts the
Z depth information of a depth file into an alpha mask or PIX file.
The depth file is created with the depth directive in the camera by toggling
on Camera Mask in the Image File Output section of
the Render Globals window (Render ![]() Globals...).
Globals...).
The usage statement for depthmap is as follows:
dxf_info prints on the screen a summary of the dxf entities used in the named dxf files.
The usage statement for dxf_info is as follows:dxf_info file [file ...]
The following is an example of how dxf_info is used.dxf_info SAMPLE.DXF
Information about the file SAMPLE.DXF is displayed as follows:Summary of file SAMPLE.DXF ---------------------------------------------entity unsupported if marked *** BLOCKS SECTION:
fastrender is a real time rendering tool capable of handling arbitrary Alias models, multiple light sources, textures, and reflection mapping.
fastrender is designed to make the best use of the RealityEngine developed by SGI. Therefore, for the fastest rendering, we suggest that you use the RealityEngine. However, lower-end SGI hardware supports fastrender as well.
fastrender cannot be used to preview animations. If the model is animated, fastrender displays snapshots of the animation. However, camera animation is supported.
fastrender cannot be used to preview transparency maps and bump maps. Regular transparency, achieved by value as opposed to by texture maps, is supported.
Other features are supported with toggle shade (Display
![]() Tgl shade) excluding solid textures, linear or area lights, glows,
and particle systems.
Tgl shade) excluding solid textures, linear or area lights, glows,
and particle systems.
All geometry, lights, shaders, textures, backgrounds, and viewing windows are grouped as one object known as a stage. Many stages can be created in one model. The geometry in each stage can be displayed simultaneously or the display of geometry for selected stages can be turned off. The perspective window view or background for any stage can be chosen as the window or background for all the stages. This allows you to create parts of a model in different stages.
The usage statement for fastrender is as follows:fastrender [datafile]
The option [datafile] must be a fastrender datafile. If no datafile is specified in the command, one can be selected while the program is running.
For additional information about fastrender, see the Alias Menu Book.
filace interlaces scanlines of images rendered on fields into a single interlaced image.
The usage statement for filace is as follows:
The scanlines used for the first field come from the odd image. These scanlines are then interlaced with the scanlines from the even image to create the second field. Both images should be half the height of the output image you want to create.
If output is not specified, the interlaced image is sent to standard output.
findit determines if a specified picture file exists on the render engine.
The usage statement for findit is as follows:
| where | |
|---|---|
| <pix_path> | specifies the picture file to locate. |
| <machine_name> | specifies the name of the render engine on which to search for the picture file. |
findit completes the search for the picture file and then returns on of the following values:
| $1 | is the render code location, the location of picturefile.1. |
|---|---|
| $2 | is the host machine directory location. |
findit is used by Alias for remote rendering using the V7 Render Control window.
If the picture file exists, findit writes information about it to the file _lout on the host machine.
![]()
![]()
![]()
![]()
![]()
![]()
![]()
Copyright © 1998, Alias|Wavefront, a division of Silicon Graphics Limited. All rights reserved.