As well as modeling with NURBS curves and surfaces, Alias includes a number of polygon- based modeling tools. Polygonal models are essential if you are developing computer games or integrating Alias models with other 3D programs. Using the polygonal tools, you can either create a model from scratch or import a DXF model from elsewhere.
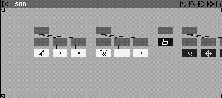
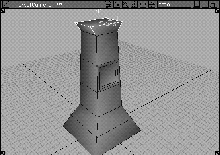
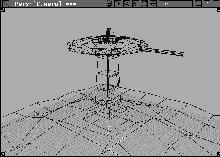
This lesson shows you how to build a space- age gun turret using four methods of polygonal modeling:
As you work through this lesson, you will be exposed to issues specific to polygon modeling techniques. For example, you will often need to keep track of both polygon count and surface normal direction. It is also important to keep an eye out for non-planar and n-sided polygons. By initially modeling with Shade on, you can see the model evolve as a fully shaded model.
If Alias is already running on your machine, you can either save or delete current work. Otherwise, launch Alias and open up four modeling views.
 All (Studio) to display the Top, Front, Side, and Perspective windows.
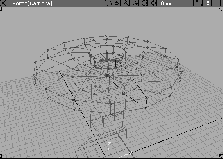
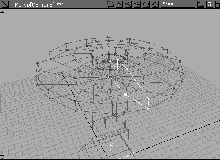
| Tip: Use the tumble and dolly tools in the Perspective window to get a larger 3D view of the workspace. |
You can draw with three (triangular) or four- sided (quadrilateral) polygons. However, since some video game systems don't work well with triangular polygons, this lesson uses quadrilateral polygons.
Later you can convert these to triangular polygons using the Polygon Edit Split Into triangles tool.
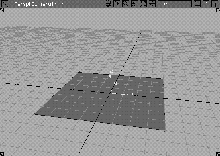
 Select Polygons Add Polygons-
 . Change the
 Polygon sides to 4 and leave the Polygon Mode set to Single. Click Go to begin building a quadrilateral polygon.
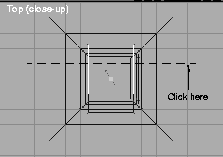
Alt key to temporarily turn on grid snapping and click at the following points: (-4,4,0), (4,4,0), (4,-4,0)
| Note: After you enter the third vertex of the quadrilateral polygon, a dotted line appears between the first vertex and the third. This is a signal to remind you that you are working with quads and that a fourth vertex is required. |
-4,-4,0.
|
Tip: Creating a polygon in a clockwise fashion ensures that the resulting surface normal is pointing out. If you accidentally build a poly in the wrong direction, use the Poly Shading Flip tool to change the direction of the normals. You should be checking polyset normals throughout this lesson. |
Note: Although the default Shade settings work quickly on all computer systems, they temporarily cause the interruption of the shaded mode during view operations and some modeling functions. Depending on the speed of your system, you may want to change these settings so your work is more interactive. For example, try turning off the Interruptible option. |
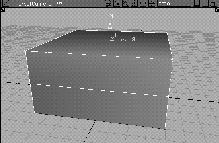
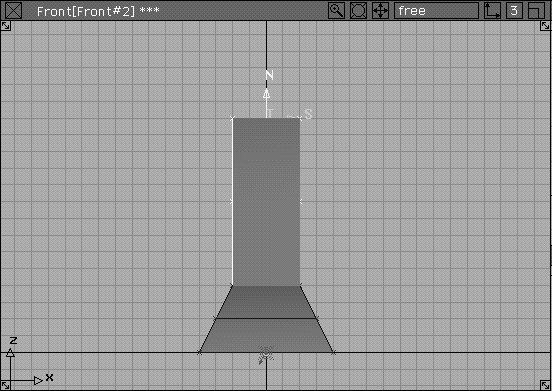
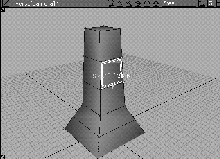
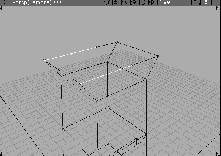
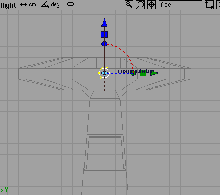
 Select Polygons Extrude polygon Translate. In the Perspective window, click and drag the top face of the polygon with the left mouse button. Drag up until the new shape reaches a height of about 4 units.
| Tip: You may want to use the Front window to help you measure the 4 unit extrude. This tool has no mechanism for entering an exact extrusion value. |
| Note: The left mouse button extrudes along the normal direction (marked N). You can also use the middle mouse button to extrude in the T direction and the right mouse button to extrude in the S direction. |
Extrude polygon Scale. Click-drag with the left mouse button to uniformly scale the top polygon of the extruded shape around its center. Scale the top polygon to half of its size.
| Note: Toggle Shade off if you want to see the grid for more accurate scaling. |
 Select Pick Nothing. This deselects the top polygon and lets you work with other parts of the polyset.
When you use the Polygons Extrude tools, the extruded polygon becomes the top polygon of the extrusion and the extrusion has no bottom polygon. In many cases this bottom polygon is not needed because it is under the polyset and can't be seen.
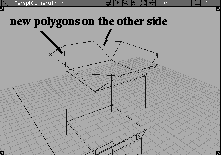
For the tower, it should be added.
 Select Polygons Add Polygons to build a quadrilateral polygon.
Ctrl key and click at the four bottom corner points of the polyset in a clockwise direction.
|
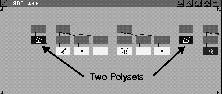
Note: To treat the tower as a single polyset, you must combine the two polysets. While you can do this by selecting Polygon Edit Polyset Combine polygons and picking the two polysets, here you will delete the bottom polygon and start again using a different method. |
 Select Pick Object. Click the bottom polygon in the SBD view. From the Delete menu, select Del active.
 Select Pick Object. Click on the extruded polyset.
| Tip: By picking the polyset before you draw the next polygon, you can add the next polygon to the selected polyset. When you first drew the bottom polygon, the extruded polyset was not active so they were not combined. |
 Select Polygons Add Polygons to build a quadrilateral polygon.
Ctrl key and click at the four bottom corner points of the polyset in a clockwise direction.
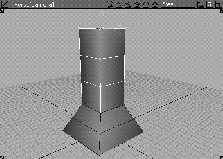
The SBD window now shows only one polyset because the new polygon was added to the original polyset.
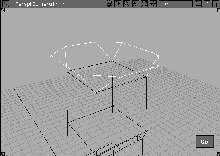
 Select Poly Shading Flip and click on the polyset. Surface normals automatically appear for each polygon.
 Select Pick Nothing.
So far you've used two of the polygon extrude tools. These tools let you use one polygon as the basis for creating new shapes. They also let you translate, rotate, and scale the end polygon of the extrusion. You can use one or more of these tools on a single extrusion, but you must remember to unpick the extruded polygon before you attempt to extrude another polygon.
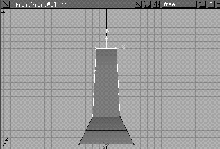
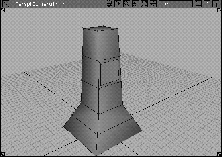
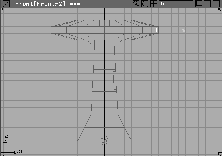
 Select Polygons Extrude polygon Translate. In the Perspective window, click on the top polygon and drag up to extrude it 10 units along its normal axis. You may need to use the Front window to count the units properly.
| Tip: If you can't extrude the full 10 units in one click and drag, release the mouse button and continue extruding with subsequent click-drags. |
3 to increase the number of segments along the extruded section's length.
| Tip: The polygon extrude was originally created with two segments along its length. You can increase or decrease the number of segments along the length of a polygon extrusion by entering a new value using the keyboard. |
Since polysets have no construction history, this value can't be edited after the polygon extrusion has been deselected.
 Select Polygons Extrude polygon Scale. Click-drag with the middle mouse button to scale the top polygon about one-half unit in the negative S direction.
This shows how the Extrude polygon Scale tool can be used in one direction only. Since the top of the tower should be scaled in two directions, you need to undo this scale.
| Tip: Notice that when you use different Extrude Polygon tools in combination, the Undo undoes all actions and not just the last one. |
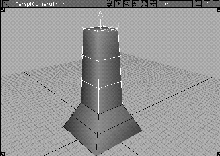
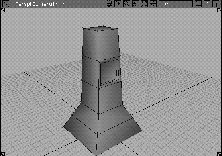
 Select Polygons Extrude polygon Translate. In the Perspective window, again click on the top polygon and drag up to extrude it 10 units along its normal axis.
 Select Polygons Extrude polygon Scale. Click-drag in open space using the left mouse button to scale the top polygon about one-half unit around the normal.
 Select Pick Nothing to leave the extrude tools.
You can add a window to the polyset with the polygon extrude tools. To create the window, use the extrude scale and extrude translate tools.
 Select Polygons Extrude Polygon Scale. Click-drag on the middle polygon on the right side of the turret tower to scale it in.
| Note: In the shaded view mode, the old polygon and the new extruded polygons are in the same space until the extrude is completed. After the action is completed, the old polygon is removed. |
1 to change the number of segments along the length of the scaled polygon to one.
 Select Pick Nothing. The old polygon is removed and replaced by the extruded polygons. The extrude scale tool lets you add new polygons while remaining in the plane of the old polygon.
 Select Polygons Extrude polygon Translate. Click-drag on the center plane of the window and push it back a little. Again, the original polygon remains until you have completed the action. The depth of the extrusion is easier to see if you toggle Shade off.
 Select Pick Nothing. The window is now complete.
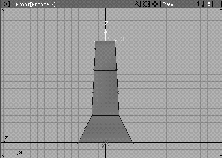
So far you've been modeling with polygons interactively, making decisions visually without worrying about accuracy. Next, you use keyboard data with the polygon move and scale tools to accurately place and size the top polygon of a new extrusion.
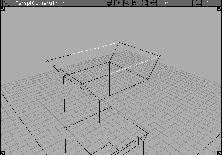
 Select Polygons Extrude polygon Translate. Click-drag on the top of the tower to extrude it by about 1 unit.
 Select Pick Nothing.
 Select Polygon Edit Xform polygon Translate. Click on the top of the gun turret to pick it.
0, 0, 15. The top polygon of the gun turret is now positioned at an exact height of 15 units.
 Select Polygon Edit Xform polygon Scale. Enter
 1 1.5 and press Enter to scale the top polygon by 1 in the S direction and 1.5 in the T direction.
| Note: When scaling with this tool, you can only use a relative scale. Absolute scaling is not possible. |
 Select Pick Nothing.
To finish the top of the tower, you need to add extra vertices to the top polygon. Once added, you can move them and check for non-planar polygons.
 Select Polygon Edit Insert Vertex and insert two vertices along each side of the long edges of the top polygon.
| Tip: Exact placement of these points is not important. |
 Select Pick Nothing to deselect everything.
 Select Polygon Edit Pick Vertex. Click on the two vertices at the front of the tower on each of the long edges.
 Select Xform Move. In the top window, press the
 Alt key and click on the grid line one unit below the X-axis using the right mouse button to snap the vertices to this line.
 With Nothing picked, select Polygon Edit Pick Vertex. Click on the two vertices at the back of the tower.
 Select Xform Move. In the top window, press the
 Alt key and click on the grid line one unit above the X-axis using the right mouse button. This snaps the vertices to the grid line.
 With Nothing picked, select Pick Point Types CV. Click on all four of the new vertices.
| Tip: As you can see, the vertices of a polyset are really the CVs and can be picked and transformed as normal CVs. |
 Select Xform Nonp scale. In the top window, click-drag with the middle mouse button to scale along the X-axis until the top of the tower has an octagonal shape.
| Note: To move vertices, you must pick them within a polyset and then use the Xform tools to edit them. When editing vertices, you must be aware of the pivot point location of the selection. Normally the pivot point of a polyset is placed at the origin. In this Nonp scale, you scaled around the pivot point at the origin. |
 Select Pick Nothing.
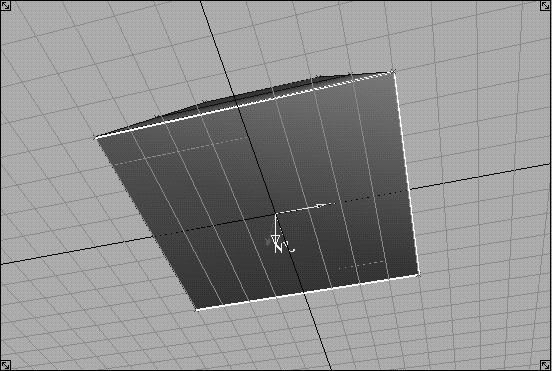
The front and back polygons of the tower's top section are now non-planar and n-sided. A non-planar polygon does not have all of its vertices within a single plane. An n-sided polygon is one with more than four vertices. By adding edges to these polygons, you can make sure that they are broken into planar pieces. Also, these polygons have more than four edges. This makes them n-sided, which could be a problem for some game systems. However, adding edges to the polygons solves both these problems.
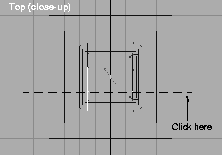
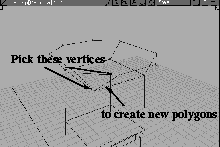
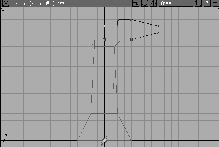
 Select Polygon Edit Insert Edge. Alias prompts you to
 Select first vertex of edge to insert. Click on the two vertices shown below:
This breaks the larger n-sided polygon into a triangle and a new n-sided polygon.
When working with polygons, you have to be aware of the number of polygons and vertices used in your model. You can use the polygon stats feature to verify the size of the models.
 Select Polygon Edit Pick Polyset. Click on the tower.
|
Tip: You could also have used Pick Object, but if you have a complex scene that mixes polysets with other object types, this pick tool makes things easier. |
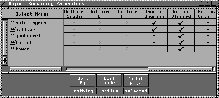
Information window.... Click on Polyset Geometry info to open the section, which shows that you have 38 polygons and 40 vertices.
Information Window.
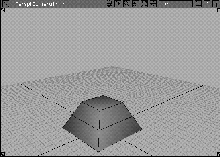
Often, you will need to remove unwanted polygons, such as the top surface of the gun turret tower. Since this polygon will be covered later by the rotating piece of the turret, you don't need to keep it. This polygon also has more than four vertices. If you wanted to keep it, you would have to break it down into at least quad polygons.
 Select Polygon Edit Polyset Extract polygons.
 Select Polygon Edit Pick Polyset. Click on the tower to pick this polyset.
Information window. The
Select Polygon Edit Pick Polyset. Click on the tower to pick this polyset.
Information window. The Polyset Geometry info section shows that you now have 37 polygons and 40 vertices.
| Note: Although you have deleted one polygon, you have not changed the number of vertices. |
So far the tower has been built using polygon tools only. You can also use traditional NURBS surfacing tools to build polysets, by using a special preference setting.
 Select Pick Object Types All obj/lights. From the ObjectDisplay menu, select Template. Now you can focus on the new pieces of the tower.
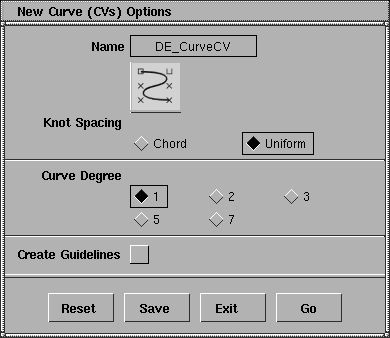
 Select Curves New Curves New Curve (cvs)-. In the
 New Curve option window, change the Curve Degree to 1 and Click Go.
| Tip: Degree 1 curves appear to be polygonal but they are still NURBS-based. You can use higher degree curves when creating polysets but the degree 1 curves give you the closest approximation of the resulting polygonal shape. |
(0, 0, 15), (4, 0, 15), (8, 0, 16), (8, 0, 17),
(4, 0, 18), (2, 0, 18), (2, 0, 17), (0, 0, 17).
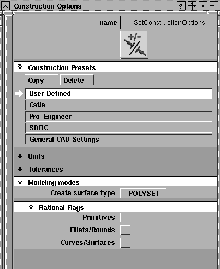
Modeling modes section and set Create surface type to POLYSET. Close the Construction Options window.
Now when you use the surfacing tools such as Patch and Revolve, you'll create polysets instead of NURBS surfaces.
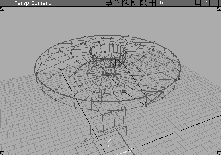
 Select Surfaces Revolve. Click on the profile curve of the top of the turret. It revolves around the Z-axis line.
| Important: Don't unpick this surface until you have completed the next step. |
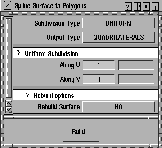
 Select Polygons Create polygons.... In the
 Spline Surface to Polygons window, change the Subdivision Type to UNIFORM and the Output Type to QUADRILATERALS. Change the Subdivision Along U to 1 and Along V to 4. Click Build. The polyset is updated to reflect these changes.
Uniform Subdivision Along V to 2 and press the Enter key to reduce the polygon count on the surface. The change is automatically taken into account.
| Note: Although the polygon extrude tools do not have construction history, the surfacing tools do. This history lets you edit the number of polygons with the Create polygons tool. |
The polyset still has a seam where the two ends of the revolve meet. You need to merge the vertices at the seam and then clean up the center polygons that converge to the Z-axis.
 Select Pick Object. Click-drag over the construction curve and the revolved surface. Click again on the surface to unpick it and leave the curve picked.
| Note: As with other surfaces, history lets you edit the surface by editing the construction curve. Since it is not needed, it can be deleted. |
The revolved surface has extra vertices at the end where the profile was revolved. You need to merge these pieces to clean up the polyset.
 Select Polygon Edit Vertex Merge-. In the
 Vertex Merge Options window, make sure that Use texture coord tolerance is not checked on. Click Go.
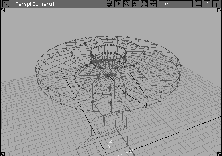
In this section, there are several triangular polysets that all converge at a center point. Although this condition is acceptable in most cases, some gaming systems do not work well with triangular polygons. To deal with these cases, you can change these triangular polygons into quadrilateral polygons.
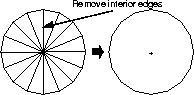
 Select Polygon Edit Delete Edge. Click on the interior edges around the center of this polyset one at a time.
| Tip: Because this tool only removes edges, it is not possible to remove the center vertex. |
 Select Polygon Edit Pick Vertex. Click on the center vertex to pick it.
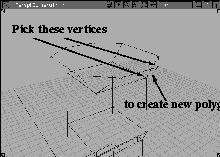
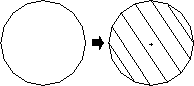
 Select Polygon Edit Insert Edge and click on opposite vertices of the n-sided polygon as shown in the following diagram.
| Tip: You may have to tumble and dolly the Perspective view to see the vertices. |
| Tip: This is a good way of breaking down an n-sided polygon into a number of quadrilateral polygons. |
You can repeat these steps for the bottom of the revolved surface, since it is also made up of triangular polygons.
 Select Poly Shading Flip. Click on the revolved surface. The normals appear and seem to be going inwards. Click on a polygon with the left mouse button to flip its normal.
| Note: Since the profile of the revolve was drawn in a counter-clockwise direction, the normals are backwards. |
 With Nothing picked, select Pick Object. Click on the revolved polyset.
You have now built polysets from scratch and created polysets using the polyset toggle in the construction options. You can now place a primitive that uses the polyset modeling mode.
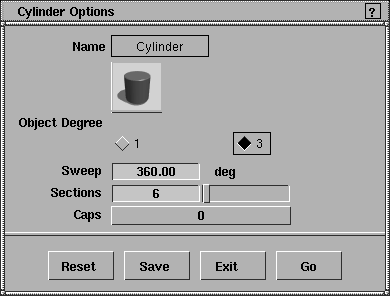
 Select Objects Primitives Cylinder-. In the option window, set the
 Sections to 6 and set Caps to 0. Click Go.
 Select Xform Nonp scale. Enter
 8, 0.6, 0.6 to scale the cylinder.
 Select Xform Move. In the Front window, click-drag with the middle mouse button to move the cylinder to the edge of the revolved surface.
Object. Click on the cylinder to pick it.
Select Xform Move. In the Front window, click-drag with the middle mouse button to move the cylinder to the edge of the revolved surface.
Object. Click on the cylinder to pick it.
When converting NURBS surfaces, the conversion takes into account any displacement maps that may be assigned. If a displacement map is used, the resulting polyset has more detail.
Modeling modes, set the surface type to NURBS. Close the Construction Options window.
Primitives Plane. Press the Alt key and place a plane at the origin in the Top window.
 Select Xform Scale. Enter
 60 and press Enter to create a plane the size of the required landscape.
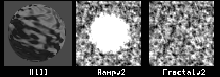
Shaders.... From the Multi-lister's Edit menu, select New Shader. Double-click on the shader's name and rename it Hill.
Hill shader to open up the shader editor.
Special Effects section, and click on the Map button next to Displacement.
Ramp. This places a ramp texture on the shader.
Ramp Type to CIRCULAR.
Intensity to 1.0 and its Position to 0.295.
Intensity to 0.0 and its Position to 0.475.
Intensity section of the ramp editor. Click the Map button next to Aoffset.
Fractal to add this to the shader. Now the hill is a little rough.
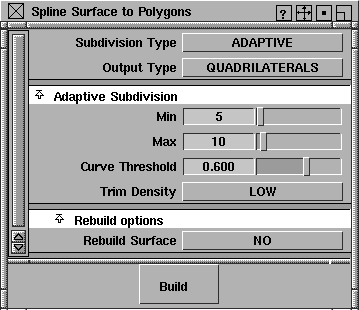
 With the plane picked, select Polygons Create polygons.
Subdivision Type to ADAPTIVE and the Output Type to QUADRILATERALS. Change the Min and Max Subdivisions to 5 and 10.
Build.
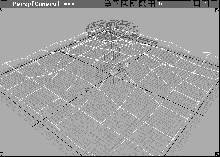
Alias creates a polyset surface based on the displacement map of the primitive plane.
 Select Pick Object. Click-drag over the new polyset and the original plane to unpick the polyset and pick the plane.
 Select Pick Template. Click-drag over the pieces of the tower.
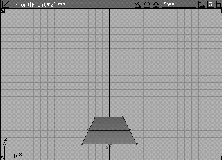
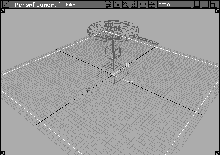
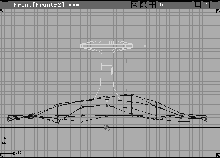
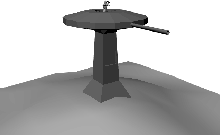
 Select Xform Move. Click-drag in the Front window and place the tower on top of the hill.
Object. Click on the hill geometry.
Select Xform Move. Click-drag in the Front window and place the tower on top of the hill.
Object. Click on the hill geometry.
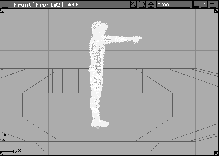
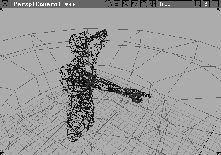
So far you have built the pieces of the model in Alias. However, you can also retrieve polygonal geometry saved in DXF file format. A model of a human figure has been provided.
| Important: This section involves the reduction of a polyset using the polygon reduction tool. Not all products ship with this capability. If you don't have this tool, skip to the next section -Rendering Polygons. |
File. In the File Lister, pick L26_PointingMan.dxf and click Retrieve.
 Select Pick Object. Click on the new polyset.
 Select Xform Scale. Enter
 2.5 and press Enter to increase the size of the polyset.
 Select Xform Rotate. Enter
 0, 0, 90 and press Enter to rotate the figure so that it is pointing in the same direction as the gun.
 Select Xform Move. Click-drag with the right mouse button in the
 Front window to drag the character so that its waist is in the center of the gun turret.
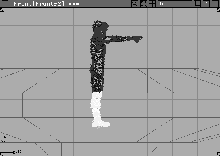
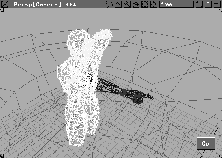
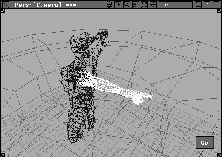
 With Nothing picked, select Pick Point Types CV. Click-drag over the CVs below the figure's knees.
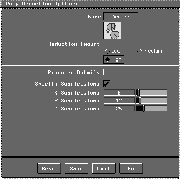
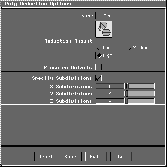
 Select Polygon Edit Polygon reduction-. In the option window, make sure that
 Reduction Amount is set to High and then click on Specify Subdivisions. Set the number of X Subdivisions to 8, Y Subdivisions to 12, and Z Subdivisions to 25.
| Tip: Don't pick the vertices of the right arm. |
Go. The bounding box that surrounds the picked vertices is split into areas known as voxels. There are 8 voxels in the X direction, 12 in the Y direction, and 25 in the Z direction as specified in the option window. All the vertices in a single voxel are converted into a single vertex and then the model is cleaned up.
| Tip: The resulting polyset is much smaller and suitable for use as background geometry or as the basis for remodeling the piece. You need to learn how the voxel to vertex relationship works to effectively reduce your polysets. |
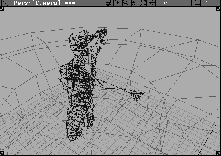
 Select Polygon Edit Polygon reduction-. In the option window, make sure
 Reduction Amount is set to High and that Specify Subdivisions is on. Set the number of X Subdivisions to 8, Y Subdivisions to 4, and Z Subdivisions to 4.
Before rendering polygons, you must decide whether you want a smooth transition between the various polygons in a polyset or whether you want to see the edges between the polygons. These parameters are set in the Render stats window.
 Select Pick Template. Click-drag around all of the templated objects. From the ObjectDisplay menu, select Template.
 Select Pick Object. Click-drag around all of the polysets in the scene to pick them.
. With the
Select Pick Object. Click-drag around all of the polysets in the scene to pick them.
. With the scope set to ACTIVE, turn All to Off and click Go. Close this window.
| Tip: Now the vertices of the polysets are hidden. They can be hidden and displayed as needed while modeling. |
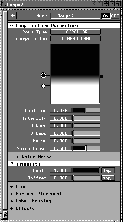
Render stats. If you want to rename the polyset names to something more recognizable, double-click on each name.
Smooth Shading. Turn smooth shading off for some or all the shapes. When it is turned on, the edges between polygons are smoothed.
| Note: All edges are smoothed when this setting is turned on regardless of the angle between the polysets. If you want a sharp edge between some polygons but a smooth edge between others, you'll have to extract parts of the polysets. Edges that lie between polysets do not render smoothly and can be used to indicate an edge condition. |
. In the option window, turn Textures Off and change the Shading Frequency to 10. Click Go.
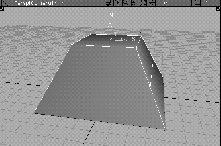
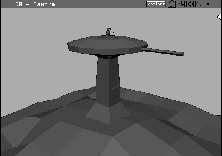
In the image above, all of the polysets had Smooth Shading turned off.
Polygon_tower and click Save wire.
Create surface type option back to NURBS. You must remember to do this if you want to use Alias modeling tools to create spline geometry.
You now have a basic understanding of how to work with polygons in Alias. There are other polygon-based tools that help you work with and clean up polygonal geometry. Be sure to read about these tools in the Polygonal Modeling in Alias manual so you can use them in your own work.