Particles are small pieces of geometry that help you create natural phenomena such as gases or liquids that are difficult to simulate using surface geometry. Particles can be emitted either through lights or through shaders. Particles are integrated with motion dynamics features such as wind, gravity and collision, giving particles the ability to create very realistic effects.
This lesson takes the form of a science experiment to help you explore particle systems. First, you will create a particle simulation that begins with smoke billowing from a flask. The smoke is emitted from a light source. As the experiment gets more active, you introduce an eruption of chemical goo that is emitted from a shader. This lesson shows you how to set up the particle system, how to adjust some of the parameters to change the attributes of the particles, how to integrate particles with other motion dynamics, and finally how to integrate the particles for a rendered animation.
You start this lesson by opening an existing file. The file contains all the required geometry and shaders. The scene itself consists of the glass flask, the interior liquid, an area light and a semi-spherical object at the mouth of the flask. In this lesson, you emit particles from the area light and partial sphere.
L25_Science to retrieve it. A full-screen Perspective window appears with the pre-built geometry.
The smoke particles will be emitted from the area light called smoke, at the mouth of the flask. In the light attributes, you first turn on the particle emission, then control the generation of the emission.
 Lights... to list the lights only.
smoke to open the Light editor.
Active Effects section and set Emit Particles to ON.
You have now turned particle emission on for the area light. A new Particle Emission section appears as part of the Light Editor.
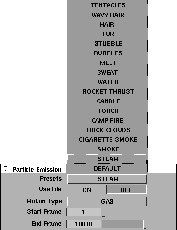
Particle Emission section, make sure that the Presets is set to STEAM and the Motion Type is set to GAS.
Note: The Particle Presets is a list of particle emission effects that are ready for you to use in your work. These presets set the necessary parameters in the Editor and even the Environment to set up a good starting point for your work. |
| Even though you are trying to create smoke, you did not choose this option from the list since you need to learn how to set particle parameters on your own. After this lesson you may want to return to the presets list and experiment with the various options available to you. |
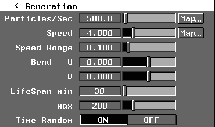
Generation section to open it.
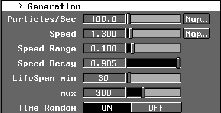
Generation section, set Particles/Sec to 100, to reduce the amount of particles and to obtain a scattering effect.
Speed to 1.3. This lets the smoke come out of the flask at a moderate speed.
Speed Decay to 0.985. The decay refers to the percentage decrease in speed over time. Setting the decay close to 1.0 ensures that most of the initial speed is preserved during the animation, allowing the particles to create a smoke trail.
LifeSpan min to 30, and LifeSpan max to 300. On average, you want the particles to exist between 30 and 300 frames. The lifespan controls how many particles are in the scene, as well as how long the particles move about before being dissipated.
After you have turned on the particle emission for a light, you can preview the simulation using a wire representation of the particles. You can then add the light to the simulation picklist and evaluate the particle simulation.
 . This opens the
 Run Dynamics window.
| Tip: You should position the window towards the top right corner of the screen, so you don't obscure the mouth of the flask. |
Run Dynamics window, go to the Frame Control section and set the End Frame to 200 to limit the simulation to two hundred frames.
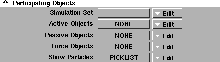
Participating Objects section and set the Active Objects to NONE, Passive Objects to NONE, and Force Objects to NONE, to limit the amount of influence to the smoke during the simulation. This lets you evaluate the simulation as you go along, adding other participating objects to enhance it as you need to.
Show Particles to PICKLIST. This setting uses whatever you have picked to emit particles if particle emission has been turned on.
 Select Pick Object and type
 smoke on the prompt line to pick the area light. Picking the light adds it to the active pick list for emitting particles.
Run button on the bottom of the Run Dynamics window, to begin the simulation.
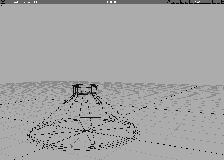
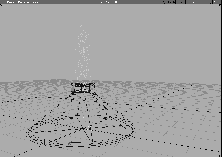
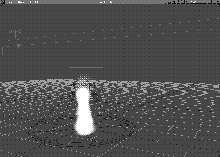
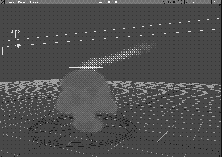
Notice how the particles are being emitted from the area light, and are streaming upwards. The simulation stops automatically at frame 200.
Reset button to bring the simulation back to the start frame (frame 1), then click the Run button again.
The particles have surface attributes that dictate their look, feel and movement. The particles' attributes are set to look like white smoke.
smoke area light to open the Light Editor.
Particle Emissions section, click Render Parameters to show the rendering attributes for the particles.
Render Type defaults to THIN GAS and the Color is white. You can leave these parameters at their defaults.
Incandescence color swatch and set the RGB values to 150 150 172.
Transparency color swatch and set the RGB values to 220 220 220. You should also set the Density to 0.35.
These settings make the smoke transparent and airy, with a slight glow.
To visualize the particles, you can choose from several different display types.
Particles-.
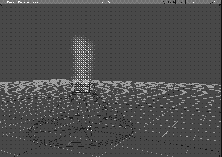
Display Method to Color Outline and click Go.
Reset, then the Run button in the Run Dynamics window to preview the particles.
The simulation is now displayed in more detail than before.
Particles -. Set the Display Method to Full Shaded and click Go.
Reset, then the Run button in the Run Dynamics window to preview the particles.
You can barely see the simulation because the light grey background is too close in color to the particles.
User colors.... In this window, open the Modelling Window Colors section and click the color swatch next to the word Background.
Reset, then the Run button in the Run Dynamics window to preview the particles.
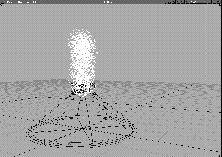
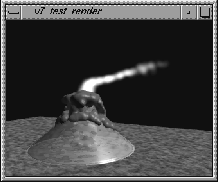
You can now see the particle simulation in the modeling view window as a rendered effect.
Another method to test the look of a simulation is to QuickRender a single frame to see how the simulation is rendering.
 In the Palette, select Anim View frame, and type
 100, to see frame 100. The simulation is updated to frame 100.
. Turn Background on and set the Shading Frequency to 8. Click Go to get the first evaluation of the particles. After rendering the geometry, QuickRender calculates and renders the particles.
| Tip: You may also do a test render at this point, to get a better evaluation of the particles and to render the glass transparent. |
The simulation you have been running is based on a temporary picklist. To make your choice permanent for the purpose of storing or rendering the simulation, you must create a particle set. A particle set contains the objects participating in the simulation - in this case, the area light emitting the smoke particle.
Run Dynamics window and scroll down to the Participating Objects section.
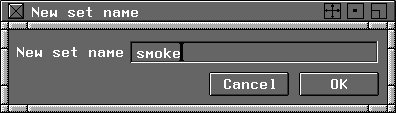
Show Particles, click the Edit menu and choose Add pick to set. A dialog box appears and prompts you for the name of the set.
smoke in the name field to create the smoke set containing the smoke area light.
Show Particles is set to <smoke>. The object in the smoke set should now show the particles during a simulation.
 Select Pick Nothing to unpick the area light.
Reset button at the bottom of the Run Dynamics window to reset the simulation to frame 1.
Run button to rerun the simulation. The smoke area light is picked and included in the simulation because it is part of the simulation set.
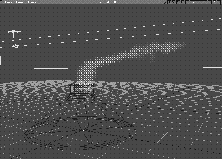
The particles emitting from the smoke area light are streaming upwards in a rather structured and dull looking manner. In the environment shader, you can set environmental effects such as turbulence to give the particles a swirling effect.
Run Dynamics window, click the Edit Environ button to open the Environment editor window.
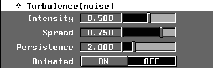
Dynamics Globals to open this section, then click Turbulence (noise) to show the environmental turbulence parameters.
Intensity to 0.5, the Spread to 0.75 and the Persistence to 2.0. Set the Animated parameter to OFF. This sets the amount, force and fluctuations of the turbulence.
Run Dynamics window, choose Reset to return to frame 1 of the simulation.
Run to begin the simulation. At the initial introduction of turbulence, an internal force table is generated which is used in the simulation. The table may take a few seconds to create.
| Tip: You can adjust the turbulence parameters while the simulation is running if you need instant feedback. |
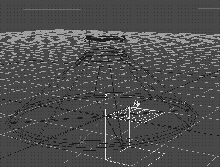
The particle system is integrated with the basic dynamic capabilities, and can therefore be influenced by forces. In this section you add a wind force created with a volume light to blow the smoke during the simulation. The volume light wind force is set up as an "upper draft" to alter the direction of the smoke plume as it rises in the air.
 Select Objects Lights Volume.
-4, 0, 3.5 to place the volume light above and to the left of the flask.
 Select Xform Nonp scale, and type
 10 6 1 at the prompt. The volume light is now a stretched sphere sitting above the flask.
Draft.
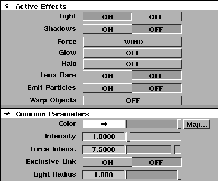
Active Effects section, change the Force to WIND. The volume light now exerts a wind force. Click the Common Parameters section to open it, and set the Force Intens. slider to 7.5. This is the strength of the wind force inside the volume light.
| Note: The light has two different intensity parameters, one for the light itself and one for the force that it emits. Make sure that you set the Force Intensity. |
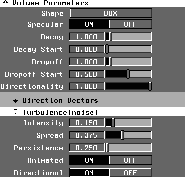
Volume Parameters section and set the Shape to BOX. This gives the draft a layered effect.
Turbulence section. Set the Intensity to 0.15, the Spread to 0.375, and the Persistence to 0.25. This gives the wind force a little action as it affects the particles.
This new light affects how the smoke particles react as they rise from the flask when you again run the simulation. To begin, you must add the volume light to the simulation as a Force object.
Run Dynamics window, open the Participating Objects section.
Force Objects to PICKLIST. This setting uses whatever you have picked to act as a force in the simulation.
Show Particles is still set to <smoke>, so that the smoke particles are part of the simulation.
Nothing, then Pick Object. Carefully pick only the draft volume light to add it to the active pick list for Force Objects.
Reset, then Run on the bottom bar of the Run Dynamics window, to begin the simulation.
Participating Objects section, go to the Edit menu next to Force Objects and select Add pick to set.
Draft in the set dialog box. Click OK. The Force Objects is now set to <Draft>.
Reset, then Run to run the simulation.
Now the two lights are included in object sets. At this point, even if you were to unpick all the objects and lights and then run the simulation, the smoke and wind force would still participate.
Having created smoke emanating from the flask, you can now create the simulation of chemical goo oozing violently from the flask. The chemical goo itself is just particles emitted from a shader. First, you turn on the particle emission for a shader that is assigned to the semi-spherical object goo. Like lights, shader emitting particles must be added to the simulation as participating objects and must have all the proper parameters set.
Goo shader to open the Shader editor.
Special Effects to show the shader effects parameters.
Emit Particles to ON, to turn on the particle emissions for the shader. Note that the Particle Emission menu choice appears at the bottom of the shader attributes.
Special Effects section to close it.
Particle Emission section to show the shader's particle parameters.
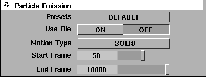
Motion Type to SOLID. Unlike the smoke, this goo should have solid properties.
Generation section and set the Particles/Sec to 500.0. For the chemical goo, you need lots of particles.
Speed to 4.000. This is a moderately fast initial velocity, which you need if you want the particles to boil out of the flask.
LifeSpan min to 30 and LifeSpan max to 200. This gives the chemical goo particles a lifespan between 30 and 200 frames before they dissipate.
To explore the chemical goo particles, you need to set up a simulation for these particles on their own. You can later combine the goo and the smoke into a single simulation.
 With Nothing picked, select Pick Object and type
 goo to pick this object. It is a small partial sphere at the mouth of the flask.
Run Dynamics window is not already open, from the Animation menu select Run dynamics-. In the Run Dynamics window scroll down to the Participating Objects section.
Active Objects to None, the Passive Objects to None, and the Force Objects to None.
Show Particles and choose PICKLIST.
Edit menu and select Add pick to set. Name the new set GOO and click OK. Make sure that the new <GOO> set is chosen.
This temporarily leaves the smoke particles out of the simulation so you can evaluate the chemical goo.
Reset, then Run to see the simulation.
As the particles are emitted from the surface, they stream downwards. The direction of the shader particle emission is dependent on the normals of the surface. You need to adjust the surface normals to reverse the direction of the emissions.
Shader particles are emitted in the direction of the surface normals. If the normals are pointing in the opposing direction, as in this case, you must flip the normals by changing the direction of the U and V of the surface.
 Select Object Edit Reverse direction-. Set
 Surface reversal mode to Swap U and V directions and click Go. When prompted, click the goo object with the left mouse button to display the direction of the normals. Click the middle mouse button to swap the U and V directions hence reversing the normals which should now be pointing upward.
Reset, then Run to see the simulation. Now the particles stream up from the surface. Gravity then takes hold and they begin falling down to the surface of the flask.
| Note: Gravity is found in the Environment Editor. By default it is set to 1.0 and affects liquid particles. |
If you let the simulation continue, the particles fall to the ground and pass through the surface of the flask. By introducing collisions, the particles can collide with the flask's surface and flow down its sides. To achieve this affect, you apply collision detection to the shader particles and add the flask to the simulation as a passive colliding object.
Goo shader to open the Shader editor. Minimize the Multi-lister.
Particle Emission section and then the Behavior section. Set Collisions to ON. This turns on the collision capabilities for the particles. Leave the Hit method set to BOUNCE. Close the Shader Editor.
 Select Pick Nothing, then Pick Object and type
 flask to pick it.
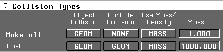
Run Dynamics window, open the Collision Types section.
Particle Collision to GEOMETRY, so that the flask can now be detected according to its geometry.
Participating Objects section and select the Edit menu next to Passive Objects and choose Add pick to set.
FLASK in the set dialog box. Make sure that the Passive Objects are set to <FLASK>. The flask is added to the simulation as a passive object with collision detection.
Reset, then Run to see the simulation. The particles now rise, with some falling back and colliding with the flask, then sliding along its sides.
Like particles emitted from lights, the particles emitted from shaders have surface attributes that dictate their look, feel, and movement. To experiment with this, you can turn the particles into a blob of red and black chemical goo.
Goo shader to open the Shader Editor.
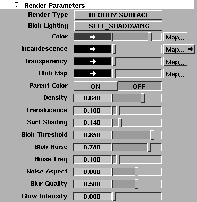
Particle Emission section then click Render Parameters to open this section. Set the Render Type to BLOBBY SURFACE, and set the Blob Lighting to SELF_SHADOWING.
Color swatch and enter RGB values of 200 0 0.
Map button beside the Incandescence parameter to open the color mapping window.
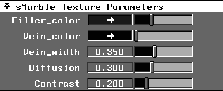
Solid section and open it. Click sMarble to use this mapping type as the incandescence map.
sMarble Texture Parameters and set the Filler_color to RGB values of 74 0 0, and the Vein_color to RGB values of 0 0 0.
Vein_width to 0.35, the Diffusion to 0.3 and the Contrast to 0.2. This develops the colors for the incandescence map.
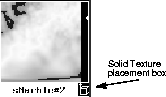
 Select Pick Nothing then click the Solid Texture placement box in the bottom right of the
 sMarble texture in the Multi-lister. (See the following illustration.)
 Select Pick Object and click the texture placement box in the Perspective window.
 Select Xform Scale and scale the box to
 0.3.
Render Parameters section of the Goo shader, click the Transparency swatch and set the RGB values to 0 0 0.
Density to 0.64, the Translucence to 0.1, the Surf Shading to 0.14, the Blob Threshold to 0.85, and the Blob Noise to 0.78. These settings were generated based on a lot of experimenting.
After you preview the goo, you may want to reset some of these parameters to see how they affect the look of the particles.
| Tip: It is always important to experiment with the settings to obtain the desired look and feel for solid particles. |
You have a simulation for smoke and a simulation for chemical goo. To run both together, you just add all the components to the simulation. Once they are running, you can render the results.
Run Dynamics window, set the Active Objects to NONE, the Passive Objects to <FLASK>, and the Force Objects to <Draft>. The flask and the draft volume light are included in the simulation.
Show Particles to ALL. Since there are only two objects emitting particles, both are included in the simulation.
Reset and then Run to see the simulation. Notice that both simulations are occurring at the same time.
Particle Emission options, set Start Frame to 50. The shader should now start emitting particles at frame 50. Minimize this window.
Run Dynamics window and click Reset and then Run to see the simulation. Although the smoke appears immediately, the chemical goo doesn't start until frame 50.
Before you render the complete animation, you should always render a single test frame to see the final effect of the shader attributes. Rendering it in low resolution yields faster results.
Render Globals window.
Render Globals, set the Animation to OFF, so that the animation sequence is not rendered.
Image File Output section to open it. Make sure that the X and Y resolutions are set to 645 x 486 (NTSC). Close this window.
Tgl time slider.... Set the current frame to 120 to move to this frame where both the smoke and goo are present.
. Set the Renderer Type to Raycaster and turn on the Test Render option. Set the Test resolution to 0.5 and click Go. The raycast automatically starts. It may take several minutes.
Render status from the DisplayTgls menu so that you can monitor the progress of the animation. From the Render menu, select Show render to watch the current frame being rendered.
You can now render the final animation. Set the Render Globals to accept an animation and then Raycast an animation of part of the simulation.
Min/Max button and select Start/End. Enter 1 for the Start frame and 150 for the End frame. In the top right corner of the Time Slider, set by to 2. This means that every other frame between 1 and 150 is rendered. (This keeps the rendering smaller.)
Render Globals window. Here you set the quality and resolution of the animation.
Render Globals window, set the Animation to ON, so that the animation sequence is rendered. Close this window.
. Turn the Test Render option off and click Go.
science_anim and click the Save SDL button. Once you have saved the SDL file, the raycast automatically starts. This may take several minutes for each frame.
science_anim.1 and the sequence automatically loads into the flipbook. Once all the frames have been loaded, flipbook plays them back at 30 frames per second.
Earlier you set the background color to a darker color in order to better visualize the particles. If you want to reset your user color back to the default grey, then enter the values shown below.
User Colors.... In the Modeling Window Colors section, click the color swatch next to the word Background.
161, 161, 161. This resets the background to its default gray.
You now have a basic understanding of particles and how to integrate them into the Alias environment. In this lesson you have learned how to: