Once an animated character's basic movements have been set, you can begin applying secondary motions such as the squash of a ball or a car's windshield wipers. One issue that arises is how to make sure that the primary and secondary motions are synchronized. You can set primary motion using keyframes, but if you later make changes to the primary motion, all secondary motions have to be updated as well.
Alias simplifies the animation process by letting you link one animation node to another using expressions, thereby making it easier to synchronize primary and secondary motion.
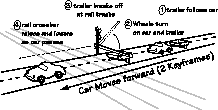
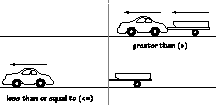
This lesson shows you how to link the animation of a car driving towards a railroad crossing with the animation of a trailer, the rotation of the car's wheels, the back and forth motion of the windshield wipers, and the raising and lowering of the rail crossbar.
With expressions, you only need to set keyframes for the car. All the other pieces and objects will animate based on their linked relationship with it. This way, if changes are made to the car animation, the other movements update automatically.
An expression is a mathematical equation that defines a relationship between different parameters within a scene. Expressions are entered in the Action window. In effect, an expression replaces the animation curve of a parameter and animates the linked object using the equation.
Using expressions requires some knowledge of basic mathematics. While many animators often rely on more creative techniques to complete an animation, this lesson is designed to show you how to derive simple mathematical equations to improve your animations.
When using expressions, you must follow the proper syntax to ensure that Alias can interpret the inputted equation. Expressions use a syntax composed of text strings derived from Alias' Scene Description Language (SDL) programming language. For more information about SDL, see the Scene Description Language manual provided online.
The most basic expression is written in this manner:
obj_name:TZ
This expression may be added to the animation channel of almost any other dag node. The first part of the expression (obj_name) is the name of the dag node being referenced. The next part (TZ) states that you are linking to the Z translation parameter of the object (obj_name). If you split the name of the object from the chosen parameter, Alias generates a syntax error.
Note: You can enter either X_Translate, XT, or TX and the system will automatically use TX. |
Expressions are case sensitive, so if your object is named "Ball" and you refer to it as "ball," you'll get a syntax error. You then place a colon ":" and following that, a parameter reference.
If spaces are placed between these parts, you will again get a syntax error.
Once you have one parameter linked to another, you can apply mathematical functions to the expression. You need to understand how mathematical operational symbols such as (), *, /, +, -, are applied in an expression.
Every expression is a mathematical equation that solves a problem set out by an animation's particular requirements. The best way to learn how to use expressions is to look at specific animation problems and derive the appropriate expressions. The car example included in this lesson has many of these. By completing the lesson, you'll learn how to create simple and complex expressions.
You use an existing wire file to start the animation. This file does not have expressions or keyframes set on any of the objects. By taking these objects and defining relationships between them, you can use expressions to animate all of the pieces based on the simple forward motion of the car itself.
L19_Expressions from the File lister and then click the Open button.
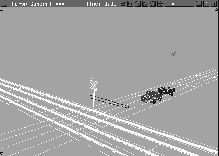
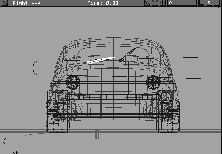
The wire file opens to show a simple scene consisting of a car, trailer and highway. In the foreground, there is a railroad crossing and tracks.
 Select Pick
  Object, and click the grouped railroad track and highway geometry.
| Tip: The track and highway geometry can still be used as a visual reference in toggled mode. Since these pieces won't be animated, it is best to keep them in the background. |
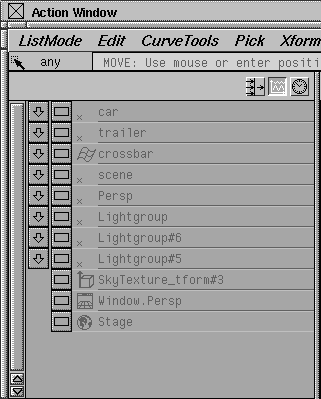
Note: During this lesson, you need to pick various objects and components. By listing All in the Action window you can have access to all of their animation channels at all times. When an animation becomes more complex, however, you should list only Picked nodes and use the modeling or SBD windows to pick and unpick the items you are animating. This will avoid slowing down the Action window as it processes and re-processes all animated channels. |
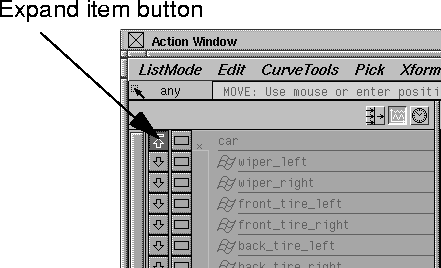
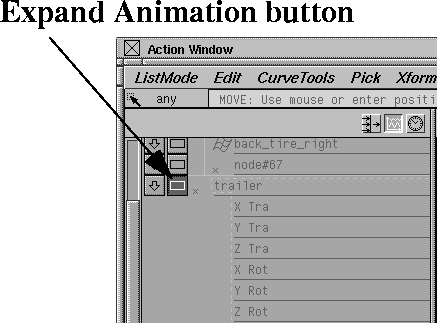
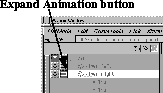
Expand item button (next to car) to display the lower nodes of the grouping hierarchy.
Expand Animation button next to trailer to display the parameters of the chosen dag node.
| Note: Take note of the proper spelling and case of the letters for each node for when you begin writing expressions. Remember to use the list mode in the Action window to check the names of each part as you enter your expressions. |
Use the expressions to relate a parameter belonging to one object to parameters belonging to other objects. To begin, relate the motion of the trailer to the motion of the car.
The parts of the car and trailer are set up under separate hierarchy nodes. By applying an expression to the top node of the trailer, you can directly relate its X translation to the X translation of the top node of the car.
| Note: You may wonder why you don't group the car and trailer together to link their motion. By keeping them separate, you can add future animation effects simply by editing the expression. |
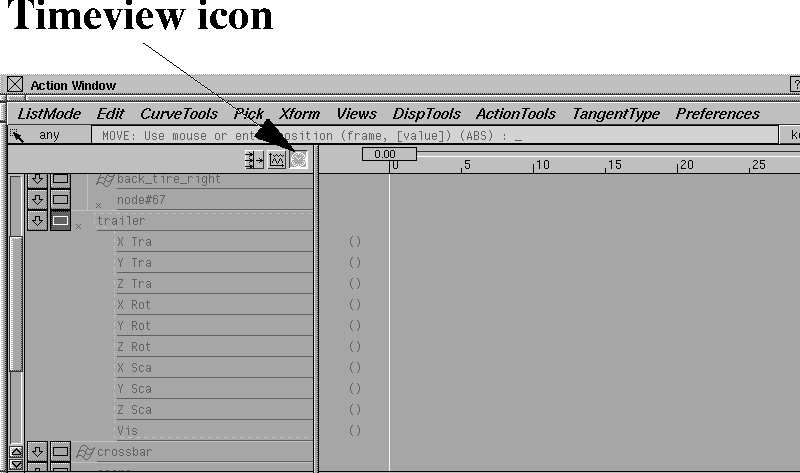
Timeview icon at the top right corner of the Action Lister, which is shown as a small clock icon. The Action Timeview appears in place of the Action Graph Editor.
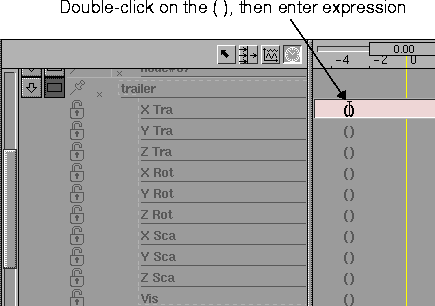
XTra channel and enter the following expression:
Press Enter or click anywhere in the workspace. The expression is automatically calculated and applied.
| Note: If you make a mistake entering the expression, Alias responds with a Expression Error window. Click cancel and try again. Remember that expressions are case sensitive and cannot have spaces between the node name, the colon, and the parameter reference. |
This expression directly relates the movement of the car in the X direction to the movement of the trailer in the X direction. Whenever the car moves, the trailer follows. This is the simplest type of expression, requiring no other mathematical functions.
 With Nothing picked, select Pick Object from the tool palette. Click the body of the car to pick the top node of the car hierarchy.
 Select Xform Move. Use the middle mouse button to click-drag to constrain along the horizontal direction and move the car to the right. When you release the mouse button, the trailer's movement automatically updates so it is right behind the car. At the moment, however, they don't seem to be animating together.
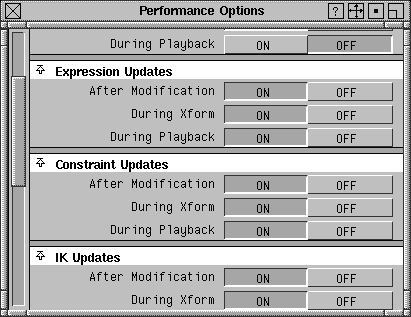
Expression Updates section and turn the During Xform setting to ON.
Close the Performance options window.
Note: This option ensures that the result of the expression updates as you move the car. In a complex animation, expressions may take a long time to calculate, so this option can be turned on and off. For most animations, however, you can leave this option ON. |
 With Xform Move still selected, use the middle mouse button to click-drag the car to the left and right. The trailer position now updates interactively as you drag the mouse back and forth. Release the mouse button at any point.
Move still selected, enter
With Xform Move still selected, use the middle mouse button to click-drag the car to the left and right. The trailer position now updates interactively as you drag the mouse back and forth. Release the mouse button at any point.
Move still selected, enter 0 and press Enter to reset the position of the car.
You can set the wheel rotations with a second expression. The first expression was simple because you were relating a translation parameter to another translation parameter. The second expression, however, requires mathematical functions to create an accurate relationship between the rotation of the wheel and the translation of the car.
The first step to derive the relationship between the forward motion of the car to the rotation of the wheel is to look at how these two movements are related. Simply stated, as the car moves forward (in the X direction), the wheel rotates (around the Y-axis).
By building the expression piece by piece, you can see how a simple expression can evolve into a more complex one.
trailer parameters by clicking again on the Expand Animation button.
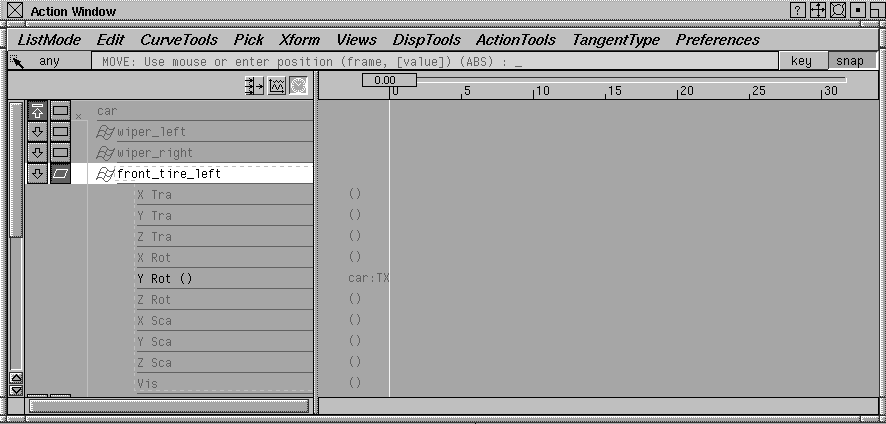
Expand item button next to car. Next click the Expand Animation button next to front_tire_left.
Y Rot channel belonging to front_tire_left and enter the following expression:
This expression links the front left tire rotation (along the Y-axis) to the forward and backward movement (translation in the X direction) of the car.
 With the upper node of the car still picked, select Xform Move. Click-drag with the middle mouse button to move the car along the X-axis.
As the car moves forward, the tire is rotating at a very slow rate. In fact, you cannot notice any rotation because the expression is using defaults-rotating the tire 1 degree for every unit the car is moving.
|
Tip: Now you can see the advantage of using the List All mode in the Action window. You can edit the animation channels of the tire while another dag node is picked in the Modeling views. If you were to use List Picked, you would have to be constantly picking and unpicking the car and tire nodes as you edit and test your expression. |
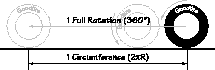
Circumference length = 2 R, where R is the radius of the wheel.
The distance the car travels is equal to the number of rotations of the wheel multiplied by the circumference of the wheel. That is:
An expression for the number of rotations of the wheel can be derived as follows: the number of degrees that the wheel rotates is equal to the number of rotations of the wheel multiplied by 360 (the number of degrees in one rotation). That is
Rearranging the above expression shows that:
This expression can be substituted into the original expression:
Rearranging the above expression gives a value for the Y rotation of the wheels:
is 3.1415, and the radius of the wheel is 1, therefore:
Expand item button next to car to re-open the car hierarchy.
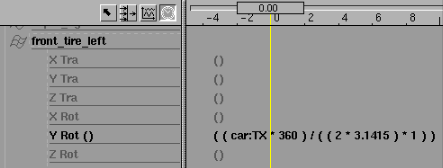
Y Rot channel belonging to front_tire_left and edit the expression to read as follows:
(car:TX * 360) / (2 * 3.1415 * 1)
Tip: Be sure to put one space on either side of all brackets and operators (/,*,+,-). Alias will put spaces into your expressions if you don't. After you press Enter, more brackets are automatically placed around the expression, to ensure the expression is broken down into its simplest parts. |
 With the top node of the car picked, select Xform Move. Use the middle mouse button to click-drag slowly to move the car along the X-axis. The tire now rotates correctly.
L19_Expressions2 and click the Save Wire button.
You can copy an animation from one tire to the other three tires of the car by physically copying the expression or by using a new expression to accomplish the same goal. Both methods are shown here for comparison.
Y rot () channel in the front_tire_left section.
front_tire_left.
Expand Animation button next to front_tire_left to close the parameter channels.
Animation button next to front_tire_right to open the parameter channels.
Y Rot channel belonging to front_tire_right to select it. This selects the empty Y Rot channel belonging to the second tire.
Expand Animation button (next to front_tire_right) to close the parameter channels.
Expand Animation button next to back_tire_left to open the parameter channels.
Y Rot channel belonging to the back_tire_left and enter the following:
This expression links the Y rotation channel of the back left tire to the Y rotation of the front left tire.
While both of these methods of copying expressions are valid, you should remember that the second method is much more efficient. This is because if you edit the first tire expression, the other tire channels will update automatically. With the first method, the expression would need to be copied and re-pasted every time it changed.
Y Rot channel of the fourth tire. You may want to also use this method on the second tire so any future edits can be made to front_tire_left.
 With the top node of the car picked, select Xform Move and click-drag slowly with the middle mouse button to move the car along the X-axis. The tires are all rotating now.
Now try using the same type of expression to link the rotation of the two trailer tires to the trailer. While this expression is similar to the car expression, you should make note of a couple of key differences
First, the radius of the trailer tire is 0.75, not 1.0. Second, be sure to relate the rotation of the trailer tire to the upper node of the trailer and not the upper node of the car. While relating the trailer tires to the car appears to work, it may work too well-the trailer tires will keep rotating even if the trailer becomes unlinked from the car.
Tip: You can copy and paste the Y rot channel of front_tire_left to the trailer tire Y rot channels, then make changes to reflect the above information. It is often easier to reuse and edit an expression than creating one from scratch. |
So far, you have learned how to use simple mathematical functions in expressions that link different types of channels. In this section, you use expressions for more complex types of animated motion. These expressions require mathematical functions such as trigonometric functions and include conditional statements. You start by making the windshield wipers move back and forth as the car moves forward.
Generally, when creating an expression, you first determine what factors influence the object(s). For the windshield wipers, you must first figure out what range of rotation on the wiper you are trying to achieve and then establish how this range can be related back to a mathematical function. You can determine this range by examining one of the wipers.
 With Nothing picked, select Object and pick the trailer.
| Note: Don't forget to make it visible again when you view the expression. |
 With Nothing picked, select Pick Component-
 . Make sure that all the options are set to
 On, and click Go.
Information window to help determine the required range of rotation.
 Select Xform Rotate from the tool palette. Click-drag using the left mouse button so that you are rotating the wiper only around the X-axis. Rotate the wiper so it lies on the left at an angle. This sets up the starting point of the wiper.
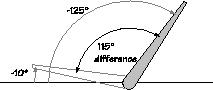
| Note: The values used in this expression are purely subjective and determined by evaluating what is seen in the modeling view. A value of -5 or -30 might just as easily have been chosen. The key is that the minimum and maximum rotation values are determined for the windshield wiper so that the expression can be written. |
 With Xform Rotate still selected, rotate the wiper to the right at a slight angle from the horizontal. Check the Information window to see what the rotation value is. In the illustration below, the value of the rotation is about -125 degrees.
Using the values shown above, you can set the expression's range of motion from -10 to -125. This means that the wipers rotate by 115 degrees between these two values.
You now want to create an expression that oscillates 115 degrees between -10 and -125 as the car moves forward.
Applying an expression to the windshield wipers of the car requires a more complex relationship between the X translation channel of the car and the X rotation of the wiper.
The expression must allow for the back and forth movement of the wiper. To do this, you need to be able to control the range of rotation so the wiper does not rotate off of the windshield.
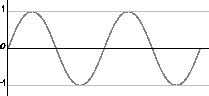
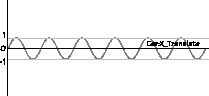
To apply a rotational limit to the rotation of the wiper, you can use a standard trigonometric function. The sine function is useful because it maps any value to a range of solutions that lie between -1 and 1. To better understand how the sine function works you can refer to the sine wave graph shown below.
As you can see, when a sine function, such as y = sin(x) is applied to a value, the result oscillates between -1 and 0 and 1. This function can be used as a basis to create the back and forth motion of the windshield wipers.
You start by using the sine function to establish a basic relational value between the X translation of the car and the X rotation of the wiper.
Expand Item button next to the car. Click the Expand Animation button next to wiper_right to display the parameter channels.
X Rot channel and enter the following:
This relates the rotation of the wiper to the translation of the car.
sin in front of the expression and adding brackets around the parameter reference as shown below:
sin (car:TX)
This now takes the value of the car's translation and evaluates it to a sine value between 1 and -1. If you were to test the motion of the wiper at this point, it would rotate back and forth from 1 to -1. Since you want final values between -10 and -125, you need to modify the expression.
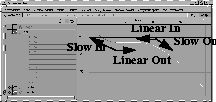
Several graphs are used to illustrate the shape of the Action curve that result from the corresponding expression edits. These show you how the various parts of the expression affect the final animation. The first graph shows the initial sine wave before any edits:
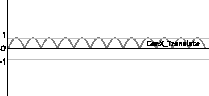
fabs function, which uses only the absolute or positive value of the expression.
Edit the expression as shown below:
fabs (sin (car:TX))
Now the wiper rotates between 1 and 0. The graph below shows how the action curve of this edited expression would look.
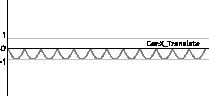
But remember, you need the rotation to be in the negative direction.
- (fabs (sin (car:TX)))
The range of motion is now set between 0 and -1, which better suits the wiper. The graph below shows how the action curve of this edited expression would look.
Now all action is in the negative direction.
(- (fabs (sin (car:TX))) * 115)
This changes the value of the expression so that it oscillates between 0 and -115 degrees. The graph below shows how the action curve of this edited expression would look.
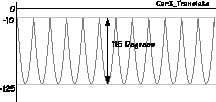
(- (fabs (sin (car:TX))) * 115) - 10
This changes the value of the expression so that it oscillates between -10 and -125 degrees. The graph below shows how the action curve of this edited expression would look.
Expand Animation button (next to wiper_right) to close it. Click the Expand Animation button next to wiper_left to open it.
X Rot channel and enter the following expression:
Now the second wiper references the first.
 Pick the top node of the car and select Xform Move. Click-drag with the left mouse button to constrain the movement of the car along the X-axis. The wipers should be animating in a back and forth motion. But, it seems like they are moving too fast. You can slow them down by adding a multiplier to the wiper expression.
Expand Animation button next to wiper_right to open it.
X Rot channel and add a multiplier of 0.2 to the expression as follows:
((- (fabs (sin (car:TX * 0.2))) * 115) - 10)
This reduces the value of the car translation so the wipers move more slowly.
 Minimize the Action window. Pick the top node of the car and select Xform Move. Click-drag with the left mouse button to constrain the movement of the car along the X-axis.
The wipers now animate more realistically. You can often add a multiplier to ensure that you have control over the speed of movement.
The expression now satisfies the goals set out at the beginning of this section. You have created an oscillating motion using a sine wave that is adjusted to work only between a specific range. As your expressions become more complex, this type of problem solving technique is used to make sure that your expression satisfies all of the animation requirements of particular objects.
| Note: You may be asking yourself whether this expression is realistic. If the car was to speed up, slow down or stop then the wipers would follow this pattern. In real life, the speed of windshield wipers don't depend on the motion of the car. Keep in mind, however, that the goal of this lesson is to set only two keyframes on the car, so it moves at a constant speed. If more keyframes were to be set on the car, you would have to find another way to animate the wipers. |
So far, all of the expressions in this lesson have been direct links between one parameter and another. However, you can also create expressions that take effect only when a certain condition is met, such as when an object is above ground level. These are called conditional statements.
A conditional is part of an expression that evaluates whether a value is greater than (>), less than (<) or equal to (=) another value. If the statement is True, it is given a value of 1. If the statement is False, it is given a value of 0.
You can then use these two types of values to turn other expressions on and off. If an expression is multiplied by a True statement, it is still on and if it is multiplied by a False statement it goes off.
At the beginning of this lesson, you used an expression to relate the X translation of the trailer to the X translate of the car. Here you'll edit the expression so that at a certain point, the trailer breaks free of the car as if the hitch is broken.
A conditional expression is needed so that the trailer pops off at a certain point along the highway.
Expand Animation and Expand item buttons, then click the Expand Animation button next to trailer.
X Tra parameter channel to edit it. Edit it as follows:
car:TX * (car:TX > 0)
This means that if the car translation value is greater than 0, the conditional evaluates to 1 and the car's translation affects the trailer's. If the car translate is less than 0, the conditional evaluates to 0 and the trailer does not move.
 Minimize the Action window. Select Xform Move and, using the left mouse button, click-drag to watch the results of the expression.
| Note: Because of the orientation of the X-axis, moving the car forward makes the X Translate value smaller, while moving the car backward makes the value bigger. You must always be aware of how the axes are oriented when setting up expressions. |
 Minimize the Action window. Select Xform Move. Using the left mouse button, click-drag to watch the results of the expression. Watch what happens as the car moves past -30, which is situated around the middle of the rail tracks.
| Note: As the car moves past the -30 point, the trailer pops back to X=0. This is because you have not established what should happen to the trailer when the car moves past the -30 point. A final "or" statement must be added to the conditional. |
(car:TX * (car:TX > -30)) + (-30 * (car:TX
<= -30))
This new statement means that when the car is less than or equal to -30, the first half of the equation evaluates to 0 as before. However, the second conditional is now true. This second half, therefore, evaluates to true (1) multiplied by -30, which makes sure that the trailer stops at the -30 point instead of popping back to 0.
| Tip: The + sign between the two conditionals serves as an "or" because when one side of the equation is true, the other is false and vice versa. Also, when one conditional is set to "greater than" (>), the other must be "less than or equal to" (<=), so that all three conditions are met. If you forget the "equal to" (=) part of the conditional, one value would still create an incorrect result. |
 Select Xform Move. Using the left mouse button, click-drag to watch the results of the expression. Watch what happens as the car moves past the point of -30. The expression is now working correctly.
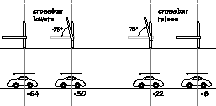
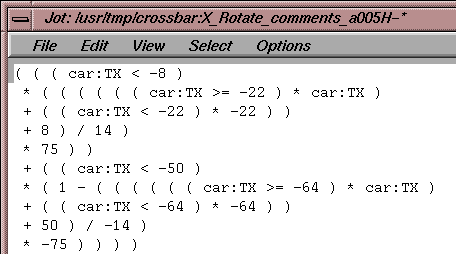
One final expression will be added to the scene, incorporating conditionals with other functions. The goal is to make the rail crossing bar raise and lower as the car passes.
This time, the conditionals are written based on the position of the car at several points along the highway. First, as it approaches the rail crossing and the crossing bar raises, then as the rail crossing bar lowers, and finally, as the crossing is closed. Instead of a single point where the conditional reacts, you need conditionals at the following four points:
As you can see, the rotation of the rail crossing is directly linked to the car's position. The expression has to take the values shown above into account (X locations of -8, -22, -50, -64).
| Note: The evaluation steps that identified the above X locations were done for you. The exact positions of the car and the rotation of the crossbar were determined by positioning the car in the modeling views and checking the Information window to see the resulting values. |
This process is similar to how the wiper rotations were established earlier. You may want to confirm these values yourself, using the Information window.
You can begin to create the expression, keeping in mind the rail crossing bar should open by about 75 degrees when the car moves from -8 to -22 and close from -50 to -64.
Since this expression is quite long, you'll use a text editor to enter it. When using a text editor you do not have to enter the whole expression on a single line. You can press Enter and insert a carriage return at any point and not worry about syntax errors. One thing to watch for is the proper use of parentheses, which can get difficult with multi-line expressions.
| Note: When you save an expression in a text editor, all the carriage returns are replaced by spaces and the expression becomes one line of text. If you later edit the expression, you have to reformat the text so that it's readable. |
The next few steps outline all the parts of the expression. You can either enter the parts of the expression as they are introduced or you can wait until the last step when the expression is written out in full.
Action window, click the Expand Animation button next to crossbar to open up the parameter channels. Click the X Rot parameter to make it active.
| Tip: This is the recommended way to enter Alias expressions that are likely to be very long. |
| Note: If you are reading this on-line you do not have to type out the expression. Simply copy the expression fragments from this document and paste them directly into your text editor. |
First, you want the rail crossbar to start opening when the car reaches X=-8. So you need a conditional that evaluates to True (1) after the car reaches the -8 point.
Enter, which creates a carriage return:
( ( (car:TX < -8)
Remember to include one space on either side of all brackets and operators.
| Note: The extra brackets at the beginning of this expression are in preparation for parts of the equation to follow. The proper placement of the brackets will be clearer when the equation is complete. |
Next, you look at what happens between X=-8 and -22. Because this conditional only turns on after X=-8, you need a line that reflects the value between -8 to -22 when the car is situated between these points.
* ( ( ( ( ( ( car:TX >= -22) * car:TX)
After the car passes -22 it needs to have a constant value of -22.
+ ( (car:TX < -22) * -22 ) )
As the car passes between -8 and -22, the crossbar rotates. This next line ensures that when the car is at -8, its value is (-8+8) / 14, which results in 0. When the car hits -22, its value is (-22 + 8) / 14, which results in 1. So the range is between 0 to 1 degrees.
+ 8 ) / 14 )
While the 0 to 1 range is very small, you can multiply it by the required angle (75) to perfect the rotation. This value means that the crossbar will rotate between 0 to 75 degrees, enough for the car to go through.
* 75 ) )
| Tip: Using this method, you could easily return later and change how far the crossbar opens by editing this multiplier. |
The second conditional starts to close the crossbar, so it evaluates to True (1) after the car reaches X=-50.
+ ( (car:TX < -50)
This next part details what happens between X=-50 and -64. By using 1 minus the conditional, you ensure that you start with a value of 1 at location
-50. The value becomes 0 when this second conditional becomes True and the car is at location -64.
In effect, using one minus the conditional is like creating a negative conditional. Since this conditional turns on after X=-50, you need a line that reflects a value between -50 and -64 when the car is situated between these two points.
* (1 - ( ( ( ( ( ( car:TX >= -64) * car:TX )
After the car passes -64 this next part returns a constant value of -64.
+ ( (car:TX < -64) * -64 ) )
Again, the crossbar has to rotate, but this time downwards. When the car reaches X=-50, its value is (-50 + 50) / - 14, which results in 0, then 1 - 0, resulting in 1. When the car reaches -64, its value is (-64 + 50) / - 14, resulting in 1, then 1 -1 resulting in 0. Now, as the car passes between -50 and -64, the crossbar rotates from
1 to 0.
+ 50 ) / -14 )
The crossbar has to rotate from 75 to 0 degrees. Multiplying by -75 closes the cross bar to match the opening of 75 degrees found in the first half of the conditional.
* - 75 ) ) ) )
| Note: The jot file shown has extra lines between parts of the expression. This is to improve readability. When the expression is saved, it returns to a single line of text. |
Enter. From the File menu of your text editor, select Save. If asked to add a new line, click the Yes button. Exit the text editor.
Now that the expressions have been set for the various objects, you are ready to set two keyframes on the top node of the car. Since you only need keyframes in the X_Translate channel, you can use the Parameter control window to limit the number of keyframes set.
X_Translate parameter.
 Select Xform Move. Enter
 10, 0, 0 and press Enter.
. In the Set Keyframe options, set the Parameters to Local and Frame to current.
Click Go to set a keyframe for frame 1.
100 to move to frame 100.
 Select Xform Move and enter
 -75, 0, 0.
play button.
With two keyframes set on the car, you can now see all the animations resulting from the expression.
Another method to control expressions and their various nodes is the Expression Control window. This window contains various tools for defining control nodes and setting keyframes. To illustrate the use of this important tool, two more keyframes are set on the car.
Nothing. Click the car TX node to highlight it in white.
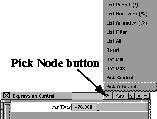
Pick Node button at the top of the Control window and choose Pick Effected. In the Modeling window all of the nodes that have expressions assigned to them are picked.
Nothing. Click the Pick Node button at the top of the Control window and choose Pick Control. Now the Car node has been chosen to show which node this is.
Nothing since it is not necessary for any nodes to be picked when setting keyframes with the control window.
car. Notice how you can only drag from 0 to 1.0 with the slider. When you are working with values outside of the 0 to 1.0 range you must enter the values.
| Tip: To make best use of the slider, you can create a new "control" node using a simple piece of geometry such as a circle. You can then link the car to the control node using an expression that converts the 0 to 1.0 range to a more desirable range. For example, since the car is going from -10 to 75, you would use the expression: |
(car:TX * 85) -10
For the car you do not need to use the node slider. Therefore, you do not need to create a control node.
car TX node in the Expression Control window to highlight it in white. Press the Key button to set a keyframe for the car node.
| Note: By using the Control window, you are setting keyframes only for the chosen channel of the chosen node. Therefore the Parameter control window is not needed. |
Key button in the Expression control window to set a second keyframe at frame 40.
and click the Save Wire button.
Expressions are a powerful tool for animating in Alias. When you start a new animation, always consider whether or not you could use expressions to link parameters and simplify your work.
In this lesson, you linked several object parameters to each other. You can also use expressions to animate parameters on lights and shaders and to animate CV positions. You can even animate time based expressions using the syntax: animate (node.TZ,frame_value). This means that you are referencing the node's Z Translate animation channel at a specified frame_value. You can learn more about this and other functions in the Action window section of Animating in Alias 9.0.
In this case, the reference node must have keyframes set and cannot reference a node that uses another expression.
Note that expressions have the following limitations: