Lesson 13 showed you how to create a photorealistic image of a wire file model by rendering it. This lesson shows you how to animate a model. Alias includes two types of animation - turntable and autofly - that designers can use to quickly visualize and evaluate their models. Turntable and autofly are easy to set up and perform.
While turntable lets you pick objects and rotate them around an axis, autofly moves the camera around the objects. You set up an autofly by assigning curve paths for the eye point, viewpoint and upwards camera direction. The motion of the camera around these paths creates the animation. Once prepared, these animations can be shown on screen, or stored as SDL (Scene Description Language) files for rendering.
You start this lesson by opening the fruit bowl.
From the File menu, select Open. In the File lister, select L14_Fruit5 from the CourseWare project (or myfruitbowl5 from your own directory) and click on Open.
In this section, you use turntable to rotate the scene.
 Select Pick
  Object Types All obj/lights to pick all the objects in the scene.
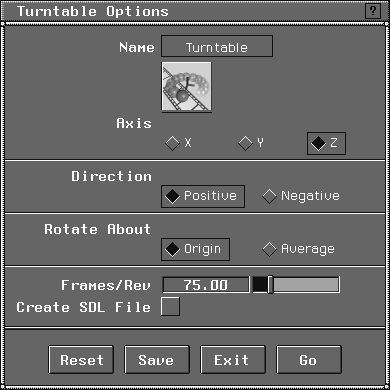
 , to open the Turntable Options box:
Axis option. This sets the axis around which the selected objects will rotate. (This assumes you are set up in a Z-up orientation.)
Positive for the turntable's direction. The Direction option determines if the objects rotate in a positive or negative direction around the chosen axis. For a Z-axis turntable in Z-up orientation, positive is counter-clockwise and negative is clockwise.
Origin for the Rotate About point. This option lets you choose between rotating about the world space origin (0,0,0) or the average of the objects' pivot point locations. Because the bowl was built at 0,0,0, you can leave the setting at Origin.
The Frames/Rev value determines the number of frames for each complete rotation. The higher the number, the slower the rotation.
Create SDL File option is turned Off (unchecked).
The Create SDL File option lets you write out an SDL file of the turntable animation that you can render later.
Note: When rendering an existing SDL file, set the Geometry Source to SDL File, instead of Modeler, in the Miscellaneous section of Render Globals.... Later in this lesson, you'll use this method to render an autofly. |
Esc key or click the mouse button anywhere on the screen.
Now animate the camera instead of the objects. Autofly lets you move the camera around the scene by assigning parts of the camera to follow curves designated as motion paths. You can create walk-through or "fly-by" sequences of your design scene. Autofly uses NURBS curves to describe how camera parts move over time.
All (Studio), to return to the four-window display.
File-. In the Import File options box, turn Keep Windows and Keep Camera to OFF. Click on Import File. In the File lister, click on the L14_fruit_cam icon. Click Retrieve.
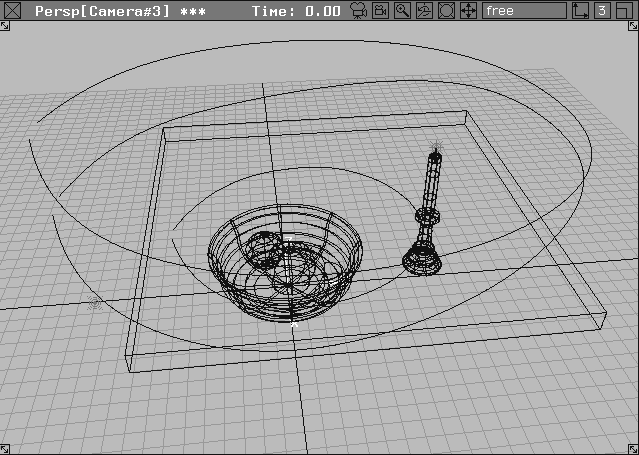
Three curves appear in the scene. These are standard NURBS curves, already created as camera guides.
| Note: The motion path curves are not visible when the animation is performed. |
The Perspective view now looks like this:
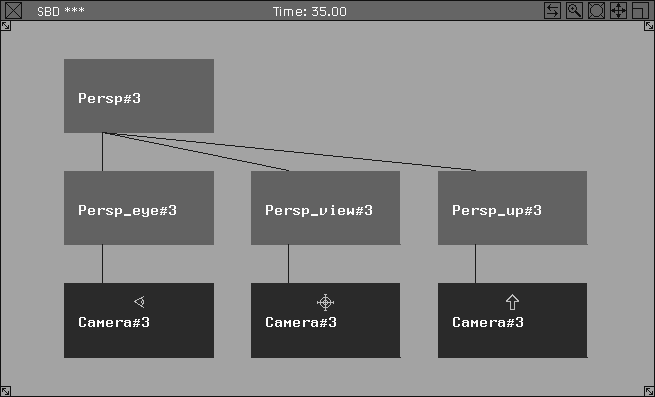
The camera group is located at the far right of the SBD. The SBD lists all elements of a scene, and shows the hierarchical structure of groupings. Some of the nodes (rectangles) represent the geometry information -others represent groupings and transformations. These are called DAG nodes.
The three camera components are grouped under a root dag node. Below is a brief overview of each of the camera components:
Eye - This is the node with the eye symbol. It represents the camera itself, or what you are looking through.
View - This node has a target symbol, and represents where the camera is looking.
Up Vector - This node has an up arrow and determines the camera angle.
Now you can set up and perform the autofly animation. First, you must set the size and the number of frames of your animation. Then, you save an SDL file with this animation to render later.
Image File Output to expand the menu. In the Predefined Resolutions section, select NTSC format.
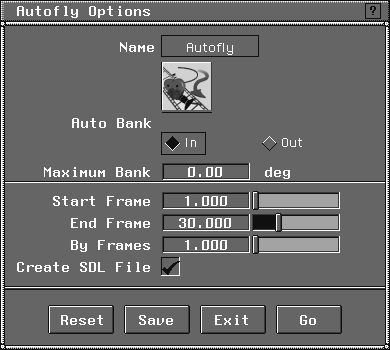
 select Anim Autofly-. The middle set of parameters are
 Start Frame, End Frame and By Frames. Set the autofly to begin at frame 1 (Start Frame), end at frame 30 (End Frame), and go by 1 frame increments (By Frames).
| Tip: The animation has been set to 30 frames to reduce the rendering time. The frame size and the number of frames both affect how long it takes to render an animation. For test renderings, you should try to reduce both these parameters. |
Maximum Bank to 0 degrees. The Auto Bank and Maximum Bank parameters determine whether the camera tilts into or away from the curve as it travels along the motion path, and the amount of the tilt. If Maximum Bank is 0, this function is disabled.
Create SDL File to toggle on a check mark. The resulting SDL file can be rendered later.
Select the motion path for the camera EYE to follow.
Select the motion path for the VIEW, or select the GO icon.
Select the motion path for the UP, or select the GO icon
Computing autofly animation appears at the prompt line.
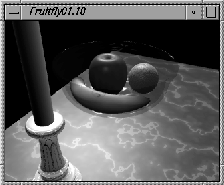
Fruitfly01. Click Save SDL.
A new camera is created for the rest of the animation and the perspective window shows the results. At the same time, the animation is saved as an SDL file. You can end the animation playback, at any time, by pressing the Esc key.
| Note: Unlike turntable, an autofly animation only appears in the Perspective view. This is because the Perspective window camera is the only object being animated. |
When the autofly animation is performed with the Create SDL File option turned on, an SDL file is saved. Alias uses this SDL file to create the final rendered animation. SDL files are created for both single images and entire animation sequences.
Animation button to ON.
Miscellaneous to expand this section and set the Geometry Source to SDL File. This ensures that an SDL file (and not the modeler) is used as the source for rendering.
. Set the renderer type to Raycaster. Click Test Render. Change the test resolution to 0.5. Click Go.
| Note: A common technique is to perform a test render first so you can preview and test your animation. Once you are comfortable with it, you can render it at full size. |
Fruitfly01) and click Render Sdl.
| Note: Once you start the renderer, it continues as an independent process. Even if you were to exit Alias and log out, the render continues until it is done. |
After all 30 frames have been rendered, you can use the Flipbook to view your animation.
FruitFly01.001 up to FruitFly01.030.
| Note: When Alias creates an animation, it generates one pix file for every frame of the animation. |
Fruitfly01.001. Click Show. This loads the animation files into the Flipbook.
close button of the Flipbook window when you are finished.
You have now animated the fruit bowl using both turntable and autofly animations. These techniques allow designers to visualize, evaluate and explore their work in 3D. While turntable and autofly can give animators a feel for how their models look in motion, they should not be confused with Alias' true animation capabilities.