Modeling is the act of creating 3D objects that resemble objects in the real world. Almost all of your work in Alias begins with the modeling process, where you create the geometry of objects that can later be animated and rendered. Modeling involves several main concepts that include using primitives, transforming objects, constructing curves, and creating surfaces.
Many of you have probably built a model by combining pieces of wood, or sculpting a form using clay. In Alias, you use similar techniques to create virtual models.
To build a model, you start by laying down points that define curves in 3D space. These curves are then combined to create surfaces that are in turn combined to create completed forms.
Because you can create and shape surfaces and then position them anywhere in 3D space, you can model any shape you want to. You can use basic shapes such as cubes and spheres or more complex curves and surfaces. Either way, you follow a similar process of iterative refinement to build a model that suits your design goals.
The most basic object type in Alias is the primitive. Primitives are pure shapes such as spheres, cubes, cones and cylinders that can be used as the basis of creating more complex models. By combining, stretching or cutting through primitives, you can create many things from everyday life.
Some primitives are made up of several smaller surfaces. For example, a cube is made up of six square surfaces while a cylinder is made up of two circular surfaces and a tubular surface. These surfaces are grouped so you can treat the primitive as a single object. If you need to, you can also open up the dag node structure of a primitive and pick the individual component surfaces.
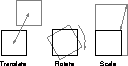
Once you have built objects, they need to be oriented in 3D space. Objects can be scaled, rotated and moved until they are placed in the desired location. To execute transformations or Xforms, you can enter accurate XYZ values with the keyboard, click-drag with the mouse, or use the manipulator attached to the primitive (for more information on using manipulators, see What's New in Alias).
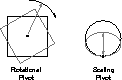
Objects are transformed based on a specific point in 3D space known as a pivot. When you move an object, the pivot point is moved; when you rotate, the pivot point represents the center of the rotation axis; and when you scale, the pivot point represents the fixed point around which scaling occurs. For primitives, the pivot is placed at the center of the object. For most other entities such as curves and surfaces, the pivot is placed at the origin (0, 0, 0). You can reset the position of the pivot at any time to best control your transformations using Xform  Local Set Pivot. In fact, you can even set the rotational and scale pivots separately (by setting these options in the option box).
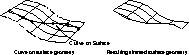
You create freeform shapes in Alias by placing points known as Control Vertices (CVs) in 3D space. CVs are then used to generate freeform curves known as splines.
The following is an example of a typical Alias curve with its most important parts labeled:
The shape of a curve is defined by two main types of control points.
Each span contains the mathematical description of that section of the curve. This means that a curve drawn with more spans contains more information and curves drawn with less spans are more efficient.
The direction of a curve is marked by two special CVs. A square box indicates the start of the curve and a small letter u indicates the direction.
Note: The u represents the first dimension of parameter space. Once a surface is created, the v direction is added. |
When building curves in Alias, you have the choice of constructing with either Uniform or Chord Knot spacing. The type of knot (Edit point) spacing, which is often referred to as parameterization, relates to how Alias marks the position of edit points along the length of the curve. These two methods give two different shapes to the curve.
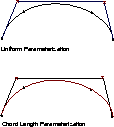
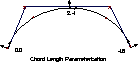
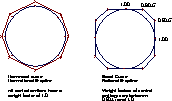
Consider the curves in the following illustration. One of these curves was created using Uniform parameterization and the other using Chord Length parameterization. The two curves look identical, but their parameterization makes them, in fact, very different.
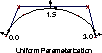
In the first example, which shows a curve with Uniform parameterization, the numerical values of the points (parameter values U) along the spline go from 0 to 3 since the curve is made up of 3 spans. Each curve span is assigned a whole unit of 1. The midpoint of this curve can be referenced by the value of 1.5. This ability to reference a point on the curve in relation to the number of Edit points makes Uniform curves very easy to work with.
The next example shows the same curve constructed with Chord Length (Non-uniform) parameterization. The numerical values of the points along this spline go from 0 to 4.8. The midpoint of this curve can be referenced by the value of 2.4.
The difference between the two splines is that the uniform spline has edit points that occur at regular parameter values, and the non-uniform chord length spline has parameter values that occur at irregular values.
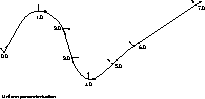
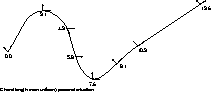
The following illustrations show the same principles of parameterization with a more complex multiple span curve.
For Uniform parameterization, Alias assigns parameter values by assigning a value of zero as the starting parameter, and incrementing this value by one for each edit point along the curve. On a Uniform curve with seven spans, as shown in the previous illustrations, the u parameters range from 0 to 7. The parameters of a Uniform curve always range from zero to the total number of spans on the curve.
For Chord Length or non-uniform parameterization, Alias assigns an initial parameter value of zero to the start of the curve, then increases the value proportionally to the chord length between successive edit points. Because of this proportioning, any value can be assigned to the first non-zero edit point, as long as the proportions are consistent from that point on. Alias uses the chordal length in centimeters as the value for edit point spacing.
Many designers end up using Uniform curves over Chord length curves because of the more straight forward parameterization. The Uniform parameters can be easily subdivided based on edit points and make it easier to use the Insert function if you need to add spans later.
You can determine the parameterization of a curve using the curve locator. For details on using the curve locator, see Tools for Evaluation in NURBS Modeling in Alias. The curve locator provides you with the numerical value of each point along the curve.
The Curve section of the tool palette contains several types of curves that use a third type of curve control known as Keypoints. A Keypoint curve is drawn with construction history that lets you edit the angle, length and arc radius of a line or arc. These tools offer a more "CAD-like" approach to drawing curves. When working with Keypoint curves, guidelines appear that help you place your next keypoint while drawing.
Once a Keypoint curve has been drawn, you can use the Information window to Edit the length, angle and radius information for the curve.
Keypoint curves create, by default, non-rational geometry that can be integrated with other curve types. In past versions of Alias, keypoint curves created Rational geometry. These rational curves were used to create more exact geometry for design purposes. In fact, Rational geometry can be sometimes incompatible with advanced surfacing tools and, in some cases, is not supported by CAD packages for file transfer. For this reason keypoint curves now create non-rational geometry by default, and you must turn on the Rational Flags in the Preferences Construction options... control window if you decide to use Rational geometry.
The difference between Rational and Non-rational geometry is outlined in the two diagrams below showing a circle drawn with both types of geometry.
The first circle is a non-rational curve with CVs that are all weighted equally. The second circle is a rational curve with different weights applied to the CVs. It is the weighted CVs that make rational geometry different and potentially incompatible with CAD systems and certain surfacing tools.
The Curve Edit Modify Adjust weight tool is used to modify the weight on individual CVs.
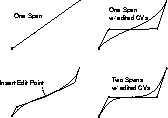
After a curve is drawn, you may need to modify its shape. You can edit a curve using one of the following methods:
CVs - Manipulating CVs gives localized, predictable modifications to curves.
Curve Edit Modify Curve editor - The Curve Editor lets you manipulate any point on a curve over a definable range. Although it appears as if you are editing the curve itself, the curve editor is actually editing the related CVs on the curve.
Object Edit Smooth - This tool is used to smooth part or all of a curve, interactively or in incremental steps. This is particularly useful if you originally drew the curve using the Sketch construction method.
| Tip: This tool may make radical changes to the original character of a curve. Be sure to watch how this tools changes the curve in case the adjustment is too strong. |
KeyPoints - This method is only available when working with Keypoint curves and the Drag KeyPoint tool. Editing Keypoints works best in conjunction with the Information window where radius, angle and length information can be entered. |
Edit Points - Manipulating edit points ensures smooth curvature properties, although they may appear difficult to control at first.
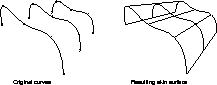
While curves create the basis for 3D geometry, they are only lines and therefore cannot be rendered. To create objects that can be rendered, you must generate curve meshes or surfaces from these curves. You can then create complex 3D objects by combining surfaces.
The previous descriptions of spline curves behavior also applies to surfaces. The most obvious difference between curves and surfaces is the extra dimension. A 3D curve extends through 3D space, but it has no area, only length. Therefore, curves have only a single dimension (U) in parameter space.
With surfaces, you have an extra dimension in parameter space. Where curves have a single parameter u, surfaces have the additional parameter v.
Just as the value of u varies along the length of a parametric curve, both u and v vary across a parametric surface.
Any point on a surface can be addressed by picking a value for both u and v.
This UV coordinate system is similar to the XYZ coordinate system used to position objects in space except that it applies to points that lie directly on the surface. In some ways, the u and v directions are akin to latitude and longitude. In the case of a spherical surface, this analogy is most clear. Understanding UV Parameter space is important when you are drawing curves on surface or when you are positioning textures on a surface.
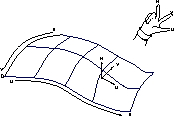
The direction of u and v on the surface determines the direction of the surface normals, using the "right-hand rule:" point your right thumb in the increasing u direction and your right forefinger in the increasing v direction. Point your middle finger perpendicular to these two and you have the surface normal direction, as shown in this illustration:
In some situations, you may need to reverse the direction of the surface normals. Alias has a Reverse Direction tool to do this (see Object Edit Reverse direction).
u or v reverses the surface normal direction.
u and v does not change the surface normal direction.
u and v reverses the surface normal direction.
Some situations require u and v to be aligned in specific directions. For example, when applying a parametric texture map, the mapping of the image to a surface depends on UV orientation. If a texture map appears inverted on the surface, reversing the UV direction of the surface is one way to correct the problem.
A parametric surface is typically criss-crossed with flow lines known as isoparmetric curves or isoparms. Isoparms are a display of constant u or v parameter value curves on a surface. The flow lines on a surface are drawn at parameter values that correspond to the locations of edit points on the surface's edge curves. The regions between isoparms are called patches. The number of patches on a surface is equal to the number of spans in u multiplied by the number of spans in v. The more isoparms on a surface, the more CVs are used to describe it.
Remember, however, that more CVs don't necessarily mean more control. You should try to keep the number of isoparms to a minimum while giving yourself enough control over your surfaces. As you work, you must find the right balance between control and efficiency.
There are five basic types of surface creation tools. Each uses a different method for turning curves into surfaces. In almost all cases the surfaces are created with U and V parameters, isoparms and patches.
When you use the Set planar function, one of the options is to create a planar face. Faces render like surfaces but do not have surface CVs and have no V dimension. You can only edit faces in a planar fashion. Faces are efficient geometry and render more quickly than NURBS patches. If possible, they can be used for completely flat surfaces in a scene.
If you create surfaces using construction history, the original curves remain linked to the new surface. This means that editing the original construction curves in turn edits the surface. You can connect surfaces with multiple levels of history, where an edit to one construction curve could affect several surfaces. Construction history only lasts until the surfaces are transformed. If they are, history is broken and the curves can no longer be used to edit the surfaces. Once history is broken, you have to edit the CVs on the surface itself.
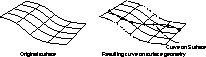
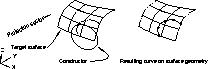
When you want to draw curves directly onto a surface, you use curves on surface. These special curves are created within the UV parameter space of a chosen surface and become a part of that surface. In general, you draw a curve on surface in preparation for the trimming of the surface or to create a curve for use in subsequent surface construction.
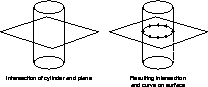
A curve on surface can be drawn directly on the chosen surface or it can be created using projections or intersections. A projection takes a constructor curve and projects it towards a target surface.
The intersect function calculates the lines of intersection of two surfaces and places a curve on surface on one or both of the participating surfaces. These two techniques are highly accurate (and common) methods of creating curves on surface.
Trimming uses a curve on surface as a guide to displaying and hiding parts of a surface. Trimming lets you visually cut or divide a surface so that it has holes. When you use this function to cut the surface, you are asked to choose which areas of the surface to keep or to throw away. The trimmed surface, however, is not actually cut-its exists in a hidden form that does not render. This way, trimmed surfaces can be easily untrimmed.
Trimming is a useful way of creating shapes that would be very difficult under different circumstances. You must remember that trimmed surfaces are very complex and can take longer to display and render. If possible, avoid relying solely on trimming as a modeling technique. If there is a way to model without trimming you may want to use the alternative method. If not, feel free to use trimming to achieve your modeling goals.
When creating surfaces that join, their edges can often appear hard and angular. If this is not the effect you are trying to achieve, Alias lets you fillet or round the edge. Fillet takes two surfaces and applies a circular fillet of a given radius.
Round gives you similar results, except that the two surfaces must share a common edge. A round lets you use multiple variable radii to create more complex edges. Round is also useful for dealing with corner conditions where several edges meet.
These modeling functions form the foundation of your ability to create surfaces and objects. With certain versions of Alias, advanced modeling tools are available for more complex surface creation. You will learn more about these tools later in this book.
Creating high quality surfaces is the goal of all 3D modelers. To create quality surfaces it is important that the underlying curves have been properly built. To ensure high quality curves you should follow a few general guidelines:
If there are not enough CVs to create the desired curve, you can insert edit points (and therefore CVs) to add complexity to the curve. This approach ensures that the curve started with as few CVs as possible.
| Note: When drawing Edit point curves with Uniform parameterization, the resulting CVs may be placed awkwardly. You can fix this by picking and moving the CVs afterwards to prevent crossing hulls. |
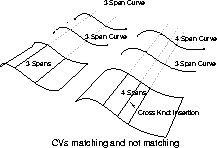
Try to use the same number of CVs in each opposing curve when building surfaces. This ensures that edit points will match in the two curves and avoids extra isoparms. Extra isoparms are known as cross knot insertion and will make the surface difficult to edit. Surfaces that are subsequently constructed off one of the edges will be more complex.
While it is not necessary to understand the mathematics behind how curves work, the following section is included if you want to know about the math underlying the curve geometry. If not, then feel free to skip over this section and begin the modeling lessons.
The equation ax + by = c describes a generalized expression for a straight line. The equation says that a series of mathematical terms (known as monomials) can be added up to equal a constant, c. All the values that make the expression true describe the points of a line.
A particular line might be written as:
The expression on the left, 3x + 2y, is known as a polynomial (poly meaning many) and the numbers in front of x and y are know as coefficients. A line in 3D space might be:
The degree of a polynomial equation is the same as the largest exponent present (exponent meaning "to the power of." For example, for x2 the exponent is 2). So an equation with a term of x2 is a degree 2 equation (also known as a quadratic equation), x3 is degree 3 (cubic). The generalized equation for a straight line, as used above, is a degree 1 equation (linear). These terms, quadratic, cubic, and linear, all refer to the type of curve created if the equation is plotted.
All Alias3D products offer degree 1 and 3 curves. The advanced modeling features included in Alias Studio offer degree 5 and 7 curves.
The equations used so far have been expressed in only general forms. They can also be expressed as parametric equations. A simple example for a 45-degree line might read as:
This parametric equation may be thought of as a formula or function that takes an input (the value of x), applies a process to it (adding 1 to it in this case), and outputs a result (the corresponding value of y). No matter how complex the process may be, the essential description of the process is the same.
This way of expressing the equation simply says that y may also be called a function, f, which takes a parameter, x. By supplying the value for x, you can calculate the corresponding value for y.
In a similar fashion, the curves and surfaces used in Alias are parametric. Alias uses parametric curves because simpler geometric elements cannot provide the necessary flexibility or control that is required in an interactive system.
The parameter used in Alias to establish any point of interest on a curve is know as U. The set of all such points is what the parametric curve function defines.
Along with the parametric functions in U, space points called CVs (Control Vertices) help define the shape of the curve. When you move a CV, you change the data controlling the curve's shape. Complex curves defined by the locations of controlling points are collectively known as Splines. The rules by which CV locations are translated into curve shape, distinguish the geometry type of the curve (Bezier curves, B-splines and NURBS).
Alias uses NURBS, Non-Uniform Rational B-Splines, as its geometry type. NURBS are a geometric form capable of representing any desired shape.
Mathematically straight lines are degree 1 geometric forms, while circles, parabolas, ellipses, and all conic sections are degree 2 (quadratic) forms.
The number of CVs used to control a given spline or spline segment is known as the order of the spline. The order of a spline is equal to the degree plus one. Polylines are second order curves (that is, they have up to degree 1 terms in the equation). Third-order splines can, at best, represent degree 2 curves (for example, the conic sections; circles, parabolas, and so on).
The NURBS used in Alias are of degree 1, 2, 3, 5 and 7 (note that some versions of Alias may only have degree 1 and 3 curves available). The degree of the curve must be at least 3 (cubic) before it can twist freely in 3D space. Moreover, such a curve will have a continuous curvature, which is essential for creative design applications.
Higher degree curves (5 and 7) have certain advantages such as smoother curvature variations and more "tension," which makes them very desirable, for example, in automotive design. Also, since they are controlled by more CVs, they are also more flexible in the shapes they can represent. These characteristics become more pronounced as the degree increases. However, for degrees higher than 7, the curves become subject to wide oscillations in their shape that make them impractical for interactive manipulation Very complex curves are created by attaching one end of a polynomial to another, which is why they are sometimes referred to as piece-wise polynomials.
The joining of multiple polynomials in the b-spline can be seen by the edit points (or knots, as they are sometimes called) that lie directly on the spline. Each curve segment between two edit points (or knots) is referred to as a span. The b-spline's mathematical algorithm takes into account such variables as the continuity at the two adjoining polynomial end points, allowing you to create very complex curves without ever being aware that the curve is broken up into multiple polynomials.
A span is a polynomial segment of the curve delimited by two edit points. The edit points (or knots) lie directly on the curve and are represented on the screen by small asterisks.
CVs (control vertices) are points that normally lie off the spline, and influence the shape of the curve. The CVs are attached by a mesh called the hull or control polygon. The first CV on any curve is represented by a small square-shaped icon that identifies the start point of any curve. The second CV on a curve is represented by the letter U and indicates the direction in which the curve is traveling. All other CVs are represented by a control character that resembles the lower case letter x.
Both edit points and CVs can be manipulated interactively to modify the shape of the curve.
You are now ready to begin modeling with the Alias system. As you work, take note of how a curve appears while it is being drawn and how the underlying curve affects the look of the resulting surface.