|
|
1
|
Installing Alias 9.0
|
|
This part includes the following sections to help you install your Alias|Wavefront product.
See Complementary Software and Peripherals on page 115 for information on installing and setting up complementary software and hardware.
You are advised to use the hardcopy version of this document: it will be more up-to-date than the online version.
Installation Overview
|
|
|
|
|
Installation Types
These installation instructions apply to the following products:
- Alias AutoStudio, Studio, DesignStudio and PowerAnimator 9.0
During installation you can load selection files to customize your installation. See the following sections for information on how to customize your respective product.
Studio|PowerAnimator
- Normal (server) installation. This is the default installation.
-
Base Software
Core Software and Renderers
Desktop Environment (icons and their catalog, etc.)
PowerToon Plugin Examples
Online Documentation
Common Software
Common Utilities
Explore Common Export
-
Total Diskspace: 410 MB
-
Desktop Environment (icons and their catalog, etc.)
Common Utilities
Common Software
-
Total Diskspace: 30 MB
- Render-only installation. Software Manager only installs the rendering software.
-
You can use the render-only installation to set up a
machine as a rendering server for client machines on the
network.
-
Core Software and Renderers
Desktop Environment
Common Utilities
-
Total Diskspace: 77 MB
SurfaceStudio 9.0
- Normal (server) installation.
-
Base Software
Desktop Environment (icons and their catalog, etc.)
Online Documentation
EvalViewer base software
EvalViewer documentation
Common software
Common utilities
-
Total Diskspace: 304 MB
-
Desktop Environment (icons and their catalog, etc.)
Common Utilities
Common Software
-
Total Diskspace: 30 MB
EvalViewer 9.0
- Normal (server) installation.
-
Base Software
Desktop Environment (icons and their catalog, etc.)
Online Documentation
-
Total Diskspace: 30 MB
-
Desktop Environment (icons and their catalog, etc.)
Common Utilities
Common Software
-
Total Diskspace: 30 MB
Note on Client Installations
If there is a full installation of the Alias software on the network, you have a fast network and NFS, you can act as a "client" of a "server" running the full package. See Installing Alias On Many Machines at Once on page 82.
For client installations, the server should contain all products that may be used by any client machine (including Studio, Power Animator, SurfaceStudio, and EvalViewer).
Optional and Specialized Software
In addition to the base installations, you can install the following software:
-
Open Digital Studio
A|W Alias CourseWare Material (Tutorials)
Follow the instructions under "Installing Optional and Specialized Software" to install these components.
Open Digital Studio
Consists of OpenAlias, OpenModel, OpenRender, and shared files.
OpenAlias
-
- allows you to add new functionality to Alias through a plug-in architecture.
OpenModel
-
- allows you to write applications that can read, write, and modify Alias wire files.
OpenRender
-
- allows you to write your own custom shaders, textures, and lights.
These packages are only useful to programmers. If you will not be creating custom plug-ins or modifications, you do not need to install these files.
If you install Open Digital Studio, you must also install Alias Common Software, which contains the Alias Common Libraries (N32).CourseWare
The Alias CourseWare is a set of tutorial files that are used in conjunction with the Learning Alias manual included with Alias 9.0. To install the CourseWare select the A|W Alias CourseWare Material (Tutorials) product which is a sub-product of the main Alias 9.0 distribution. If you are installing SurfaceStudio, its associated CourseWare will be installed by default.
To move the CourseWare material from the installed area
(/usr/aw/alias/CourseWare) into your account
(~/user_data/CourseWare), make sure you have installed the CourseWare product from the Alias |Wavefront CD-Rom. Run the Install_CourseWare script from /usr/aw/alias/bin. This copies all of the CourseWare material into to your account.
Before You Install
|
|
|
|
|
Installation Requirements
Before you install your new Alias|Wavefront software, check the following:
- Operating System version: you must have IRIX 6.2 or higher installed. Alias 9.0 will not install on machines with a version of IRIX lower than 6.2.
- If you do not have IRIX 6.2 or higher installed, install it before attempting to install Alias|Wavefront software. Make sure you install the correct version for your machine. Note that IRIX 6.5 is the current version for most SGI workstations.
>
|
Note:
|
Not all hardware configurations are qualified at this time.
Consult the qualification chart for details.
|
- IRIX 6.2 was first released in May 1996. If you have valid SGI software support and you have not received IRIX 6.2 yet, call the Technical Assistance Center at 1-800-800-4744. International customers should call their local SGI office.
- You must have 24-bit graphics.
- You must have a hardware Z-buffer except on the Indy and Indigo2 XL.
- You must have at least 96 MB of memory to run Alias 9.0. We recommend you have at least 128 MB. Increasing available memory will increase Alias 9.0 performance.
- You must have enough free space on your hard drive:
|
Base Software
|
166 MB
|
|
Renderers
|
77 MB
|
|
Online Documentation
|
115 MB
|
|
Open Digital Studio
|
78 MB (optional)
|
|
Total
|
488 MB
|
- If you need to make room for Alias 9.0, you can remove other software in the "Manage Installed Software" section of Software Manager.
- You must have access to a CD-ROM drive to install Alias 9.0.
- The Alias renderers require the following additional libraries:
c_eoe.sw32.lib

c++_eoe.sw32.lib

compiler_eoe.sw32.lib
-
(compiler_eoe.sw32.lib is not required on systems
with the 7.2 compiler software.)
-
If these libraries are not already installed, you will be
notified during installation and given instructions on how
to install them. The installation will not proceed until
these libraries are installed.
Preparing to Install
If you are installing to a filesystem other than /usr
To install Alias 9.0 in a directory other than /usr/aw/alias9.0, you must create a soft link (called /usr/aw/alias9.0) to the new location. When inst tries to install Alias 9.0 to /usr/aw/alias9.0, it will follow the link and install in the new location.
To install Studio|PowerAnimator 9.0 or SurfaceStudio to a filesystem mounted as /v, for example, use the following commands:
mkdir /v/alias9.0

mkdir /usr/aw (if it doesn't already exist)

ln -s /v/alias9.0 /usr/aw
To install EvalViewer 9.0 onto the same filesystem, use the following commands:
mkdir /v/evalviewer9.0

mkdir /usr/aw (if it doesn't already exist)

ln -s /v/evalviewer9.0 /usr/aw
Additionally, it is possible to install all Alias|Wavefront software onto a non-default filesystem by making /usr/aw a soft link to another filesystem. For example:
mkdir /v/aw

ln -s /v/aw /usr
Once you have created these links, any Alias|Wavefront software installation will be installed to the /v filesystem. However, if any other Alias|Wavefront software is currently installed on your system you will be unable to create the new /v/aw link.
In some cases, if /usr does not have enough space to install Alias, you will get a free space error, even though you are installing to a different filesystem.
>
|
Note:
|
To work around this, type the following into the command
line at the bottom of the Software Manager window (or on
the inst command line):
|
|
|
set override_space_check true
|
|
|
(If the command line is not visible in the Software Manager
window, choose it from the Panes menu.)
|
|
|
Make sure you have enough space to install Alias on the
new filesystem before using this command, since it disables
automatic space checking.
|
If you are performing a client installation
You must create a soft link (called /usr/aw) to the
/usr/aw/alias9.0
directory of the server machine.
For Studio, PowerAnimator, or SurfaceStudio, use the following command:
ln -s hostname:/usr/aw/alias9.0 /usr/aw


Where hostname is the name of the machine with the server
installation of Alias 9.0.
To install Evalviewer9.0, use the following command:
ln -s hostname:/usr/aw/evalviewer9.0 /usr/aw


Where hostname is the name of the machine with the server
installation of EvalViewer9.0.
>
|
Note:
|
Your site may use a different syntax for referring to NFS
volumes, such as hostname:/usr/aw/alias9.0, or
/nfs/hostname/usr/aw/alias9.0, or
/hostname/usr/aw/alias9.0. Consult your system
administrator.
|
Mounting the CD-ROM on a Local Machine
>
|
Note:
|
You need root access to your machine to perform the
installation. Ask your system administrator for assistance.
|
If your CD-ROM is already mounted as a filesystem, skip to the next section.
For information on loading and setting up your CD-ROM drive, see
- Your SGI workstation manual or the manual for your CD-ROM drive.
- SGI Insight online help. (Available in the Toolchest as Help > Online Books, or through the insight
command).
When using the Indigo Magic desktop
Insert the CD-ROM in the CD-ROM drive.
An icon labelled cdrom
will appear on your desktop.
When using a terminal
-
1
-
Insert the CD-ROM in the CD-ROM drive.
-
2
-
Check if the CD-ROM is already mounted. Type:
-
df -kl
-
The output of this command will be similar to:
|
Filesystem
|
Type
|
kbytes
|
use
|
avail
|
%use
|
Mounted on
|
|
/dev/root
|
efs
|
966304
|
919735
|
46569
|
96
|
/
|
|
/dev/dsk/dks0d4s7
|
efs
|
617520
|
572088
|
45432
|
93
|
CDROM
|
-
In the last line you can see that the CDROM filesystem is
already mounted. You can verify this by typing
ls /CDROM
.
-
If the CDROM filesystem is already mounted on your
machine, skip ahead to the installation procedure.
-
If the CDROM filesystem is not mounted, do the following
steps.
-
3
-
Find out the device controller and unit number of the CD-ROM drive. Type:
-
hinv | grep CD
-
The output of this command will be similar to:
-
CDROM: unit 4 on SCSI controller 0
-
In this case, the controller number is 0 and the unit
number is 4.
-
4
-
Use the controller number and unit number to work out the device name of the CD-ROM drive. The device name is in the form /dev/dsk/dks#d#s7, where the number following the s is the controller number, and the number following the d is the unit number.
-
In the example above, the device name would be /dev/dsk/
dks0d4s7.
-
5
-
Mount the CD-ROM drive as a directory. In this example, we use /CDROM.
-
If the directory does not exist, you must create it. Type
mkdir /CDROM.
-
To mount the CD, type
-
/etc/mount -r /dev/dsk/dks0d4s7 /CDROM
-
where /dev/dsk/dks0d4s7 is the device name you
worked out in the previous step and /CDROM is the
directory to which you are mounting the CD-ROM.
-
6
-
To allow other machines to install from this CD-ROM drive, add the filesystem to the exports list.
-
Use a text editor to add /CDROM to the /etc/exports file.
To allow other machines on the network to access the
filesystem, type:
-
/usr/etc/exportfs -a
-
(This requires that NFS is running at your site.)
Mounting the CD-ROM across a Network
To install Alias 9.0 on a machine without a CD-ROM drive, use the CD-ROM drive of a remote machine with the Alias|Wavefront CD-ROM already mounted (as described above).
>
|
Note:
|
You must have NFS on both machines to install over the
network.
|
-
1
-
Mount the Alias|Wavefront CD-ROM on the remote machine as described in Mounting the CD-ROM on a Local Machine on page 72.
-
2
-
Mount the CD-ROM drive as a directory. In this example, we use
/cdrom.
-
If the directory does not exist, you must create it. Type
mkdir /cdrom.
-
To mount the CD, type:
-
/etc/mount hostname:/CDROM /cdrom
-
where hostname is the name of the machine with the CD-
ROM drive.
-
Note that we use /cdrom (lowercase) as the local mount
directory instead of /CDROM (uppercase). This is
deliberate. Tests by Alias|Wavefront personnel indicate
that using /CDROM (uppercase) as the local mount
directory of a remote CD-ROM drive can cause serious
installation problems. Do not use uppercase /CDROM as a
local mount directory for a remote CD-ROM.
Installing Alias Using Software Manager
|
|
|
|
|
Starting Software Manager
On the local workstation
-
1
-
Log in as root.
-
2
-
Double-click the CD icon on the desktop.
-
3
-
The Software Manager window will appear.
Across a network
-
1
-
Log in as root.
-
2
-
In the Toolchest, choose System > Software Manager, or type swmgr in a shell.
-
3
-
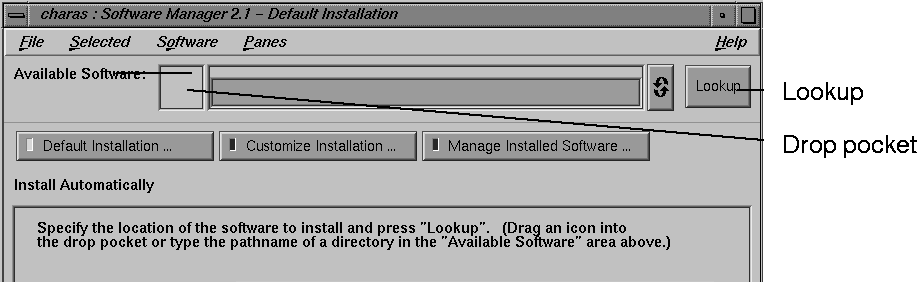
Use the IRIX desktop to find the Alias dist folder icon on the remote CD, and drag it into the "drop pocket" next to the Available Software text box in the Software Manager.
|
|
|
-
or
-
In the Available Software
text box, enter the path to the
Alias dist path on the remote CD. For example:
<remotehost>:/CDROM/dist or /<remotehost>/CDROM/
dist (depending on how NFS volumes are referenced at
your site).
-
Do not use File > Browse Directory to find the dist
directory.
Running the Startup Script
-
4
-
Click Lookup. The Installatio
n Startup Script window appears.
-
If your workstation has an irregular set-up, you may want
to check the script to make sure it won't break on your
machine. Click View
to read the script. The script performs
a large amount of housekeeping Behind the Scenes on
page 78.
-
5
-
Click OK in the Installation Startup Script window to begin the installation.
-
Click Cancel only if you want to quit the installation
completely. Do not click Cancel if you want to install the
Alias software. Cancelling the script will increase the
chance of conflicts during the installation.
To perform a normal (or server) installation:
Click Start to finish the installation.
Refer to Studio|PowerAnimator on page 66 for a list of the default software installed in a normal (or server) installation.
To perform a SurfaceStudio installation:
-
1
-
Choose File > Load Selections.
-
2
-
Browse to the dist directory on the CD-ROM (for example: /CDROM/dist).
-
3
-
Double-click the filename for surfacestudio.sel to load the selections for a SurfaceStudio install.
-
This will install only the files necessary to use the
SurfaceStudio software.
-
4
-
Refer to To install optional and/or specialized software: on page 78 to install optional and/or specialized software, or click Start to finish the installation.
To perform a client installation:
-
1
-
Choose File > Load Selections.
-
2
-
Browse to the dist
directory on the CD-ROM (for example: /CDROM/dist).
-
3
-
Double click alias_client.sel to load the selections for a client-only install.
-
4
-
This will install only the files necessary to use a remote copy of Alias 9.0 over the network.
-
5
-
Use the instructions below to install optional and/or specialized software, or click Start to finish the installation.
To perform a render-only installation:
-
1
-
Choose File > Load Selections.
-
2
-
Browse to the dist directory on the CD-ROM (for example: /CDROM/dist).
-
3
-
Double-click the filename for alias_render.sel to load the selections for a render-only install.
-
This will install only the files necessary to use the
rendering software.
-
4
-
Use the instructions below to install optional and/or specialized software, or click Start to finish the installation.
To perform an EvalViewer installation:
|
If you want to use either the CAI Translator and EvalViewer, you must install patch 3247, which is included in the October 1998 patchset. This does not apply to systems running IRIX 6.5.
|
-
1
-
Choose File > Load Selections.
-
2
-
Browse to the dist directory on the CD-ROM (for example: /CDROM/dist).
-
3
-
Double-click the filename for evalviewer.sel to load the selections for a EvalViewer-only installation.
-
This will install only the files necessary to use the
EvalViewer software.
-
4
-
Use the instructions below to install optional and/or specialized software, or click Start to finish the installation.
>
|
Note:
|
If you wish to install both Alias9.0 and Evalviewer9.0
together you can do so by loading the alias.sel file and
then going into Custom Installation and selecting the
EvalViewer9.0 product.
|
To install optional and/or specialized software:
...or to explore the available software, click Customize Installation.
|
To view or hide sub-components of the main products, click the fold arrow next to the product
name.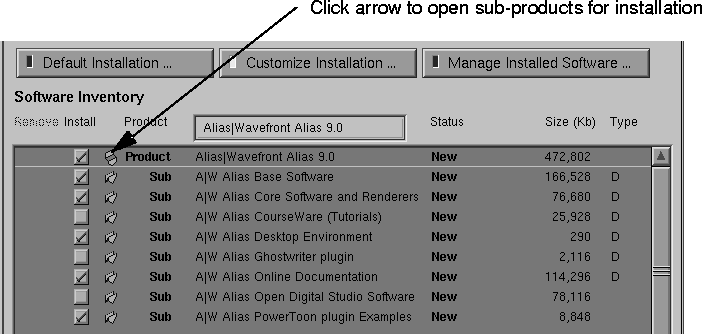
|
|
>
|
Note:
|
To get back to the default product selections, either reload
the alias.sel file or click on the Lookup button in Software
Manager to reload the Distribution Area.
|
Behind the Scenes
Software Manager performs the following steps automatically (for additional installation information refer to Appendix A: File Lists on page 108 and Appendix B: Inst exitops on page 112:)
- creates /usr/aw (the base location for all Alias|Wavefront software) if it does not already exist.
- creates/updates the symbolic link from /usr/aw/alias to the actual installation location. The default location is /usr/aw/alias9.0
- checks if you have the latest version of Licenser installed. If you do not, the version on the CD-ROM is marked for installation. (see Appendix A: File Lists on page 108 for complete file listings)
- checks for Alias common software (a collection of shared libraries and license related programs used by all Alias software) installed on your system. The common software is updated to work with the new version of Alias and is also backwardly compatible to work with older versions of Alias.
- checks whether your site is a pre-keyed licensed site. If you are an existing Alias customer, you may be in this file. If you are, Software Manager will search for your licenses in the file and update your license file (/var/flexlm/aw.dat).
- creates symbolic links from some of the files in the common software area (/usr/aw/COM) to the new Alias software (this is not done for a render-only installation). Links between the common OpenModel shared libraries and the Alias library directory are necessary for plugin development.
- enables and optimizes the size of the virtual swap space on your workstation. Alias makes extensive use of virtual swap space when writing data files and rendering.
- For information on virtual swap space, see the man page for swap, or search the Insight online documentation.
- adds Alias-related information to IRIX: creates an Alias|Wavefront software page in the Icon Catalog, adds Alias|Wavefront file types to the file database (/etc/magic), and adds imagery for minimized windows.
- (Note: different icons are installed depending on whether you use 4dwm or mwm).
- (server only) creates a world-writable render control directory (/usr/aw/alias/render_control)
to allow this installation to be used as a rendering engine.
If you want a demo account, you must set it up manually using setupacct
. See Preparing To Use the Alias Software on page 86.
Installing Alias Using inst (Advanced)
|
|
|
|
|
>
|
Note:
|
We recommend using Software Manager's graphical user
interface to install the Alias 9.0 software. Use inst only if
you are an expert IRIX user.
|
Starting inst
-
1
-
Log in as root.
-
2
-
In a shell, type inst
-
3
-
At the inst> prompt type from followed by the path to the Alias dist path on the local or remote CD.
-
For example:
-
from /CDROM/dist
-
or:
-
from remotehost:/CDROM/dist
-
(depending on NFS syntax at your site).
-
4
-
After starting inst as described above you will see the installation README file. At the end of the README file you will be prompted to run the installation startup script.
-
Select option 1 to run the startup script. For proper
installation you must run the startup script. The script
performs a large amount of housekeeping(see Behind the
Scenes on page 78).
-
Do not choose option 2 to ignore the startup script.
Installing Alias 9.0 Using inst
To perform a normal (or server) installation
Type go to finish the installation.
To perform a client installation
-
1
-
Type the following:
-
admin load /CDROM/dist/alias_client.sel
-
2
-
Type list to show the components.
-
3
-
Use the instructions below to install optional and/or specialized software, or type go to finish the installation. Products marked with an i will be installed.
To perform a render-only installation
-
1
-
Type the following:
-
admin load /CDROM/dist/alias_render.sel
-
2
-
Type list to show the components.
-
3
-
Use the instructions below to install optional and/or specialized software, or type go to finish the installation. Products marked with an i will be installed.
To install optional and/or specialized software
To install SurfaceStudio, type:
-
admin load /CDROM/dist/surfacestudio.sel
To install other optional and/or specialized software:
-
1
-
Type step to select additional software.
-
2
-
Each carriage return will show a separate product. Type i to mark a product component for installation.
-
3
-
When you are done, type go to finish the installation.
Installing Alias On Many Machines at Once
The inst
automatic mode is very useful for scripts and batch installations. However, before using it, you must make sure all prerequisite software is installed, there is enough disk space for the installation, and that there are no installation conflicts.
To install in automatic mode as root type:
/usr/sbin/inst -a -f dist -Vstartup_script:execute
where dist is the location of the dist directory (for example:
/CDROM/dist).
Writing a batch script
Automatic mode is best used for installing Alias on many machines at once. Here is a sample workflow to install Alias on multiple machines in batch mode:
-
1
-
Generate a file containing the list of hostnames you want to install Alias on, one hostname per line.
-
2
-
Ensure that the Alias distribution CD is accessible from each of the clients. NFS is the preferred method for doing this, but is not absolutely necessary.
-
3
-
Make sure that all the machines have the necessary IRIX prerequisites already installed.
-
4
-
If inst detects any missing prerequisites, the program will stop and your script will break.
-
5
-
Create a script that logs into each host and executes this command:
-
/usr/sbin/inst -a -fdist -Fdist/alias.sel
-Vstartup_script:execute
-
6
-
If you are using node locked licenses see the Licensing section for how to get all the licenses for your site at once. Then distribute this file to each machine that has Alias installed.
|
Tip:
|
This script installs with the alias.sel (normal or server)
selection file. You can substitute alias_client.sel or
alias_render.sel to install client or render-only
versions instead.
|
Licensing Alias|Wavefront Software
|
|
|
|
|
Authorizing Your Software
Use the following instructions to license your copy of Alias 9.0.
Running Licenser
To begin authorizing your new Alias|Wavefront software, type:
Licenser
in a shell to run the Alias|Wavefront Licenser program.
If you do not have a valid license yet
If you do not have Internet email, a fax, or a printer, use the blank printed SPAR form included with the software.
Otherwise, do the following:
-
1
-
Use your web browser to open /usr/aw/COM/html/spar/index.html.
-
2
-
Complete all information in the form. When filling out the form remember to:
-
Choose whether you want to receive your licenses by FAX
or e-mail.
-
Click the Products button and select all the products you
wish to license.
-
Choose Evaluation if you are requesting an evaluation
license. (Evaluation request forms are sent to your
regional sales office, rather than Alias|Wavefront
headquarters).
-
3
-
To fax or phone the information to us, click Print. Or click Save to File
to save it for later.
-
4
-
If you are sending your SPAR form to us using e-mail, click Send E-mail.
When we receive your SPAR form, we will send you a series of license strings.
To enter a single machine (nodelocked) license
-
1
-
Make sure you are logged on as root.
-
2
-
Enter the license string in the large text field. Press Enter at the end of each line.
-
3
-
Click Install Licenses.
To enter concurrent (floating) licenses.
-
1
-
Use the instructions for single machine license to enter the floating licenses only on the machine(s) that will serve licenses (the servers) to other machines (the clients).
-
2
-
After installing the licences, copy the server's license file to all client machines.
-
This file is called
-
/var/flexlm/aw_servername.dat
-
where servername is the host name of the license server.
Copy this file to the same directory (/var/flexlm/) on the
client machines.
-
3
-
Click OK to restart the server with the new licenses.
-
4
-
To set up your server to run the licensing software at each reboot, log in as root and type the following:
-
/etc/chkconfig -f aw_flexlm on
Findkey functionality for large customer site license installation
If you have many machines at your site licensed for Alias|Wavefront products you may be interested in taking advantage of a method to obtain all the licenses for your site at once. This way you can store the licenses in a single file and distribute that file to every machine instead of individually licensing each machine.
To do this follow these steps:
-
1
-
Locate your site code. Your site code can be found on your license letter OR on the packing slip that is included with your documentation boxed set. Your site code looks like `####/###' where the #
are digits. You can ignore the last three digits if there are six after the slash `/'.
-
2
-
Mount your Alias|Wavefront product CD by following the instructions in the CD booklet. Be sure that the machine that you use has a valid Alias|Wavefront license for it otherwise the findkey command will not be successful.
-
3
-
In a shell window type:
-
cd /CDROM/.data
-
where /CDROM is the mount point of the CD you
mounted in step 2.
-
4
-
Extract the nodelocked licenses for your site by typing in the shell window:
-
/usr/aw/COM/bin/findkey -nsd prereg/FLEX ####/
### > output_file
-
where ####/### is your site code as determined in step 1
and output_file is the name of the file you wish to save the
licenses to.
-
5
-
Now distribute the output file created in the previous step to each machine licensed for Alias|Wavefront software.
-
On each machine, add the contents of the output_file to
either the beginning or end of /var/flexlm/aw.dat on
that machine.
OCTANE Duo and Dual Configurations
-
Version 9.0 supports OCTANE Duo option. This is an
upgrade that allows one OCTANE workstation to support
two users. Special licensing is required for this upgrade.
Please call your local Alias |Wavefront sales
representative.
- OCTANE Dual Display Option
-
Version 9.0 supports the OCTANE Dual Display
configuration. This is an upgrade that allows a user to
display graphics and text on a second graphics monitor.
-
To set this option, set the environment variable
ALT_DISPLAY to the OCTANE secondary graphics
display name: (for example, type "setenv
ALT_DISPLAY :0.1").
-
Once this option has been set, you can move the main
window from the primary monitor to the secondary
monitor, and back again, using the Utilities >ChangeScreen
menu. All other windows can be moved from one monitor
to the other by click-dragging on the window's title bar to
drag the window between the two screens.
Limitation
The Alias Preferences window only opens on the primary monitor.
Workaround
Move the main window to the primary monitor, then
open the Alias Preferences window from the
Preferences > UserOptions > Alias_preferences menu.
|
|
|
|
|
This section assumes that you have already installed the Alias software. For information, see:
Setting Up User Accounts and Projects
The Alias software uses a shared location (/usr/aw/alias9.0) for files that do not change between projects or users, and individual directories (work areas) for files related to individual users or projects.
This structure has the following advantages:
- protects key software components from accidental damage
- allows users to customize their work areas
- allows several users to use the Alias software from protected accounts, without duplicating common files.
The central shared area /usr/aw/alias9.0 should not be used as a work area.
If you have many users or projects, each user should have his or her own UNIX account. All users can then have their own Alias work areas. If each job or project is the responsibility of an individual user, this is sufficient since it protects each project from accidental changes by other users, and allows each user to customize the Alias environment for each project.
Setting up an account
To use the Alias software, it is recommended that you first set up your account. Alias 9.0 contains a setupacct script that can be used to verify and update accounts using the Alias software. Setupacct has been modified from previous versions so that there is no removal or replacement of files at the account level. The following lists the new features of setupacct as well as changes to Alias.
-
1
-
Log in using the account you want to set up.
-
or
-
Log in as root to set up an account other than your own. If
the account does not exist (in NIS or /etc/passwd)
setupacct creates it.
-
2
-
Type /usr/aw/alias9.0/bin/setupacct
- When updating existing accounts setupacct will first check for the existence of the following files:
-
.4Dwmrc: IRIS Extended Motif Window Manager resource
file used to override the default 4Dwm window manager
settings. This file should contain a line that disables the
third mouse button which is normally used to post a
window menu when the Alt key is pressed. .4Dwmrc
should contain the following line:
- ! Meta<Btn3Down> window|icon f.post_wmenu
- Alias requires this setting to allow vertical grid snapping. The line therefore should be disabled as listed above. (The "!" symbol indicates that the line is disabled).
-
.Xresources: There are two lines that are important to
Alias:
-
*positionOnScreen and 4DWm*keyboardFocusPolicy.
-
*positionOnScreen is used so that when Alias is
launched all windows are drawn off screen until
everything is loaded. 4DWm*keyboardFocusPolicy is used
for proper mouse focus and allows you to type values into
text fields without first clicking in the cell. .Xresources
should contain the following lines:
- 4DWm*keyboardFocusPolicy: pointer
-
.cshrc: Cshell resource file that includes Alias specific
environment variables and path settings.
-
.login: login file that is sourced at login time
-
.mwmrc: Motif window manager resource file that
contains the same information as .4Dwmrc but is only used
in your account with the motif window manager.
-
If any of these files do not exist you will be prompted to
create each one (note that .4Dwmrc will only be needed if
.mwmrc does not exist. If .mwmrc does exist .4Dwmrc will
not be created as it is assumed that you are running under
the Motif Window Manager.)
-
3
-
If any of these files currently exist in your account but contain unsupported settings you will be notified by setupacct and be given the option for appropriate changes to be made to each file. This differs from the previous method where the files were automatically saved in a backup directory and replaced.
Changes to Alias
- You will no longer see error messages that indicate incorrect X11 settings which used to be posted if Alias detected unsupported settings in your .Xresources file. Even though this message has been suppressed we still encourage you to use the setupacct script to verify that your account is properly setup to run Alias.
- The IncreaseVswap warning has been turned off, however if Alias detects that you do not have enough vswap a warning message will be passed to the errlog.
- An Alias 9.0 shell is now available which you can run to set all appropriate environment variables to run Alias 9.0. All of your current settings are maintained, however, we add the following environment variables which are important for the correct operation of Alias and any of its standalone utilities:
-
setenv ALIAS_LOCATION /usr/aw/alias
-
LD_LIBRARY_PATH $ALIAS_LOCATION/
lib:$LD_LIBRARY_PATH
-
set PATH=($PATH $ALIAS_LOCATION/bin)
To run the Alias shell type the following in a shell:
/usr/aw/alias/bin/winterm_Alias9.0
or double click on the winterm_Alias9.0 icon in the Alias|Wavefront catalog.
Updating a work area from a previous version of Alias
In every project directory, Alias software saves two option files, Alias_options and user_options. These files are used to save menu and option settings and are very specific to the version of Alias software that created them.
To use a project with an updated version of Alias software, you must remove these files:
-
1
-
Change to your work area directory.
-
2
-
Type
-
rm user_data/<project name>/option/*
>
|
Note:
|
Other outdated option files may not be recognized either.
When you update your Alias software to a new version, it is
a good idea to use a new work area with the new software.
This ensures Alias will save new option files in the new
format.
|
Creating a new work area
Once your account is set up to use the Alias software, decide where the Alias software will put your output files (the work area).
If you want your output files saved to a user_data directory in your home directory ($HOME), you do not need to change anything: setupacct has already set this as your default work area.
If you want your output files saved to a user_data directory in a directory other than your home (such as a subdirectory or another directory entirely):
-
1
-
Load your shell startup file (~/.cshrc) into a text editor.
-
2
-
Find the line reading:
-
setenv ALIAS_WORKENV $HOME
-
3
-
Replace the text $HOME with the path of your work area directory.
-
4
-
Log out and log in again for the change to take effect, or type:
-
source ~/.cshrc
-
5
-
If the work area you just specified does not exist yet, create it by typing:
-
mkdir -p $ALIAS_WORKENV
If your work area directory does not contain a user_data sub-directory when Alias starts up, Alias will ask if you want to create it. Alias requires that the user_data directory exists.
Creating a new project directory
|
|
For information, see Basic
Tools in Alias.
|
To create a new project directory in you work area, choose File > New Project in Alias.
Setting Up Multiple Users On One Project
If two users are collaborating on a project, you can place the project in one of their work areas, and use the IRIX chmod command:
chmod -R g+rw user_data/project
to give other users in the same UNIX group permission to read and write the files in that project. Edit the .cshrc file to change umask 022 to umask 002. This ensures that new \xde les created are also writable by members of your group.
If you have a project that you want protected from alteration by other users, use this command:
chmod -R go-w user_data/project
This removes write permission for group members and other users; only the owner may then create or modify files in this project. Edit the .cshrc file to change umask 002
to
umask 022
(if you changed it earlier).
>
|
Note:
|
Other users may still read the files in your work area. See the
IRIX chmod
manual page for more details.
|
If you work on many projects for many clients, you may want to set up a shared, global area for project data. For example, you might create the following structure:
/usr/jobs/

	/client1/

		/user_data/

			/project1/

			/project2/

			...

	/client2/

		/user_data/

			/project1/

			/project2/

			...
Setting Up an Account for Remote Rendering
>
|
Note:
|
This section assumes that your site has a machine dedicated
to rendering (a "rendering engine"), and you have already
installed the Alias Render Software on that system.
|
To set up an account able to render on a remote rendering engine:
-
1
-
You need accounts on your local workstation and on the remote rendering engine. These accounts should have the same user ID and group ID numbers, and must have the same username. Both machines must have NFS.
-
2
-
Make sure the rendering engine has a world-writable directory called /usr/aw/alias9.0/render_control.
-
3
-
You can run the setupacct script to verify that the accounts are set up correctly. You can also create accounts using this script when it is invoked as root.
-
4
-
Log in to your account on the local workstation and run Alias. You will need to change some Alias preferences to allow remote rendering.
-
5
-
In Alias, choose Preferences > Edit Alias preferences. The following window is displayed:
-
6
-
Open the Render Options section. In the Render machine text field, type the host name of the rendering engine.
-
7
-
In the Render location
field, type the name of the project directory in which finished pix, mask and SDL files will be placed by the remote renderer.
-
For example, if you enter user_data/demo, the files will
be placed in the following directories:
-
If the Render location does not start with a slash (/), it is
assumed to begin at your home directory on the rendering
engine. For example, user_data/demo would become
~/user_data/demo.
-
Important: these directories must exist on the rendering
engine, or the render will fail.
-
8
-
To perform a remote render, choose Render > Render-
 , and turn the Remote
option box on. Then choose Render > Render to render on the remote rendering engine. , and turn the Remote
option box on. Then choose Render > Render to render on the remote rendering engine.
The rendering job runs on the remote machine. You can view the progress of the remote render with Render > Show render.
Once the rendering job is complete, the pix file is moved from the remote rendering engine to the project's pix directory on the local workstation.
Uninstalling Alias
|
|
|
|
|
Alias|Wavefront products are designed so that more that one version of a particular product can co-exist on the same system. This allows our customers to install and try newer versions of our software without risking impact to their production schedules.
At some point, you will want to remove your older version of software.
For example, after you are ready to switch to using Alias 9.0 and you decide that you no longer need Alias 8.5, follow the procedure outlined below to remove Alias 8.5.
>
|
Note:
|
In most cases, you may not be able to remove all the
software that you originally installed with Alias 8.5 because
some of it may be needed by other Alias|Wavefront
applications. You will know when other Alias|Wavefront
software requires software that you try to remove, because
you will get conflicts. Unless you are prepared to remove all
of the Alias|Wavefront software from your system you will
be unable to remove the awcommon, license_eoe and in
some cases alias8_5_common software.
|
To remove your old Alias 8.5 software:
-
1
-
Log in as root.
-
2
-
Start Software Manager.
-
3
-
Click on Manage Installed Software.
-
4
-
Select any Alias 8.5 software that you wish to remove.
Alias 8.5 Product Names
|
Long Product Names
|
Short Product Names
|
Alias|Wavefront Alias 8.5
|
alias8_5
|
A|W Alias Online Documentation
|
alias8_5.docs
|
A|W Alias Online Documentation
|
alias8_5.docs.base
|
A|W Alias Optional Plugins
|
alias8_5.plugin
|
A|W Alias PowerToon plugin Examples
|
alias8_5.plugin.powerToon_examp
les
|
Alias|Wavefront Alias Software
|
alias8_5.sw
|
A|W Alias Base Software
|
alias8_5.sw.base
|
A|W Alias Desktop Environment
|
alias8_5.sw.desktop
|
A|W Alias Core Software and Renderers
|
alias8_5.sw.render
|
Alias|Wavefront Alias, Common Software 8.5
|
alias8_5_common
|
A|W Alias, Common Software
|
alias8_5_common.sw
|
A|W Alias Common Libraries
|
alias8_5_common.sw.lib
|
Alias|Wavefront Common Utilities, 3.1
|
awcommon
|
Alias|Wavefront Awxfiles, 1.4.1
|
awxfiles
|
A|W Awxfiles 1.4 for Alias8.5/Explore4.3.4
|
awxfiles.sw.base1_4
|
A|W Explore Common Export
|
explore4_3_4.common.lib
|
Non-default Alias 8.5 Software
|
Long Product Names
|
Short Product Names
|
A|W Alias Open Digital Studio Software
|
alias8_5.sw.ods
|
A|W Studiopaint 4.0 8.5 Compatibility
Libraries
|
alias8_5.sw.sp4_0lib
|
Alias, Common Software (N32bit)
|
alias8_5_common.sw32
|
A|W Alias Common Libraries (N32)
|
alias8_5_common.sw32.lib
|
Alias|Wavefront Explore Professional, 4.3.4
|
explore4_3_4
|
Alias|Wavefront Dispatcher, 4.3.4
|
aw_dispatcher
|
Alias|Wavefront Evalviewer, 8.5
|
evalviewer8_5
|
Uninstalling Alias 8.5 using the versions command:
Another way that is commonly used to remove software is through the use of the versions command. If you wish to remove Alias 8.5 using this method do the following:
-
1
-
Log in as root.
-
2
-
type in a shell: versions remove alias8_5 alias8_5_common aw_dispatcher evalviewer8_5 awcommon awxfiles explore4_3_4 license_eoe
>
|
Note:
|
This will remove ALL software associated with Alias 8.5. If
you have already installed version 9.0 you will be unable to
remove awcommon and in some cases alias8_5_common
depending on other installed Alias|Wavefront software.
license_eoe is not specific to Alias|Wavefront applications
and may be required by other non-Alias|Wavefont
applications. In this case you will be unable to remove this
product.
|
Using the versions command on its own will list all software installed on your system. If there are any Alias|Wavefront products still installed they will show up.
Uninstalling Alias 9.0
The following lists the Alias 9.0 software products that can be removed using the above guidelines:
|
Long Product Names
|
Short Product Names
|
Alias|Wavefront Alias 9.0
|
alias9_0
|
A|W Alias Online Documentation
|
alias9_0.docs
|
A|W Alias Online Documentation
|
alias9_0.docs.base
|
A|W Alias Optional Plugins
|
alias9_0.plugin
|
A|W Alias PowerToon plugin Examples
|
alias9_0.plugin.powerToon_examp
les
|
Alias|Wavefront Alias Software
|
alias9_0.sw
|
A|W Alias Base Software
|
alias9_0.sw.base
|
A|W Alias Desktop Environment
|
alias9_0.sw.desktop
|
A|W Alias Core Software and Renderers
|
alias9_0.sw.render
|
Alias|Wavefront Alias, Common Software
9.0.1
|
alias9_0_common
|
A|W Alias, Awxfiles 1.5, Translater
Software
|
alias9_0_common.awxfiles
|
A|W Alias Awxfiles Base Software
|
alias9_0_common.awxfiles.base
|
A|W Alias Awxfiles Documentation
|
alias9_0_common.awxfiles.docs
|
A|W Alias, Common Software
|
alias9_0_common.sw
|
A|W Alias Common Libraries
|
alias9_0_common.sw.lib
|
Alias|Wavefront Common Utilities, 3.7
|
awcommon
|
A|W Common Software
|
awcommon.sw
|
A|W Common Software
|
awcommon.sw.base
|
A|W Common Desktop environment
|
awcommon.sw.desktop
|
Non-default Alias 9.0 Software
|
Long Product Names
|
Short Product Names
|
A|W Alias Open Digital Studio Software
|
alias9_0.sw.ods
|
A|W Alias CourseWare Material (Tutorials)
|
alias9_0.courseware
|
Alias|Wavefront SurfaceStudio 9.0
|
surfacestudio9_0
|
Alias|Wavefront Evalviewer, 9.0
|
evalviewer9_0
|
Alias, Common Software (N32bit)
|
alias9_0_common.sw32
|
A|W Alias Common Libraries (N32)
|
alias9_0_common.sw32.lib
|
Alias|Wavefront Explore Professional, 4.3.4
|
explore4_3_4
|
Alias|Wavefront Dispatcher, 4.3.4
|
aw_dispatcher
|
Uninstalling Alias 9.0 using the versions command:
To uninstall Alias 9.0 using the versions command do the following:
-
1
-
Log in as root.
-
2
-
type in a shell: versions remove alias9_0 alias9_0_common aw_dispatcher evalviewer9_0 awcommon explore4_3_4 license_eoe
>
|
Note:
|
This will remove ALL software associated with Alias 9.0. If
you still have Alias 8.5 installed you will be unable to
remove awcommon and in some cases alias9_0_common
depending on other installed Alias|Wavefront software.
license_eoe is not specific to Alias|Wavefront applications
and may be required by other non-Alias|Wavefont
applications. In this case you will be unable to remove this
product. If you installed SurfaceStudio 9.0 you will need to
remove the surfacestudio9_0 product instead of alias9_0.
|
Using the versions command on its own will list all software installed on your system. If there are any Alias|Wavefront products still installed they will show up.
Installation Troubleshooting
|
|
|
|
|
Common Problems and Solutions
|
Problem
|
Possible Cause
|
Solution
|
|---|
|
I've become lost in the installation procedure
|
|
Click Lookup in the Software Manager window to reload the dist file. Begin the installation again from the start.
|
|
An "Alias|Wavefront Installation Error" window appears.
|
You may be missing prerequisite IRIX software.
|
Follow the instructions given in the window before continuing with the installation.
|
|
Software Manager does not act like the instructions say it should.
|
Software Manager is very customizable. A site manager may have changed its behavior.
|
Delete or rename /var/inst/.swmgrrc. Software Manager will revert to its default behavior.
|
|
Software Manager reports a conflict.
|
There are many possible causes of software conflicts. Click the Conflict button to get more details.
|
To help prevent software conflicts:
Do not click Cancel in the Installation Software Script window.
Do not click the Default Installation button in the Software Manager window.
|
|
Software Manager tells me I don't have enough space on /usr even though I'm installing to a different filesystem.
|
This is a bug in Software Manager.
|
This work-around disables the space-checking function. Make sure you have enough room in the filesystem to hold Alias before proceeding.
From the Panes menu, choose Command. Type the following in the command line:
set override_space_check true
|
|
I get errors when I try to license or run my Alias software.
|
Common software is not installed.
|
See Checking Common Software on page 98.
|
|
Your account has not been properly set up.
|
Set up the account with the setupacct command. See Setting Up User Accounts and Projects on page 86.
|
|
Your license file is incorrect or corrupt.
|
See Checking Your Licenses on page 101.
|
Checking Common Software
From a Unix Shell, enter the command:
versions awcommon <enter>
The output from this command should read as follows:
I = Installed, R = Removed


   Name                 Date      Description


I  awcommon             10/14/98  Alias|Wavefront
Common Utilities, 3.7


I  awcommon.sw          10/14/98  A|W Common
Software


I  awcommon.sw.base     10/14/98  A|W Common
Software


I  awcommon.sw.desktop  10/14/98  A|W Common
Desktop environment
- The output must show a capital "I", which means the software is installed.
- To use Alias 9.0, Version 3.7 or higher of the Common Utilities must be installed.
If the versions awcommon command indicates that you do not have this subsystem installed then the Install procedure did not complete successfully. Try reinstalling the awcommon software from the Alias 9.0 installation CD.
Verification of other common subsystems
There are additional software subsystems that will cause problems if they are missing.
From a Unix Shell, enter the command:
versions alias9_0 alias9_0_common license_eoe
The output should be similar to the following for each subsystem:
|
I = Installed, R = Removed
|
|
|
|
|
|
|
|
|
|
Name
|
Date
|
Description
|
|
|
|
|
|
|
I
|
alias9_0
|
10/14/98
|
Alias|Wavefront Alias 9.0
|
|
I
|
alias9_0.docs
|
10/14/98
|
A|W Alias Online Docs
|
|
I
|
alias.docs.base
|
10/14/98
|
A|W Alias Online Docs
|
|
I
|
alias9_0.sw
|
10/14/98
|
A|W Alias Software
|
|
I
|
alias9_0.sw.base
|
10/14/98
|
A|W Alias Base Software
|
|
I
|
alias9_0.sw.desktop
|
10/14/98
|
A|W Alias Desktop Environment
|
|
I
|
alias9_0.sw.render
|
10/14/98
|
A|W Alias Core Software and Renderers
|
|
I
|
alias9_0_common
|
10/14/98
|
Alias|Wavefront Alias, Common Software 9.0.1
|
|
I
|
alias9_0_common.awxfiles
|
10/14/98
|
A|W Alias, Awxfiles 1.5, Translater Software
|
|
I
|
alias9_0_common.awxfiles.base
|
10/14/98
|
A|W Alias Awxfiles Base Software
|
|
I
|
alias9_0_common.awxfiles.docs
|
10/14/98
|
A|W Alias Awxfiles Documentation
|
|
I
|
alias9_0_common.sw
|
10/14/98
|
A|W Alias, Common Software
|
|
I
|
alias9_0_common.sw.lib
|
10/14/98
|
A|W Common Libraries
|
|
I
|
license_eoe
|
10/14/98
|
License Tools 3.3.1 for IRIX 6.2
|
|
I
|
license_eoe.man
|
10/14/98
|
License Tools 3.3.1 Manual Pages
|
|
I
|
license_eoe.man.flexlm_server
|
10/14/98
|
FLEXlm 5.12a Server Software Manual Pages
|
|
I
|
license_eoe.man.flexlm_utils
|
10/14/98
|
FLEXlm 5.12a Utilities Manual Pages
|
|
I
|
license_eoe.man.license_eoe
|
10/14/98
|
License Manager 3.3.1 Manual Pages
|
|
I
|
license_eoe.man.relnotes
|
10/14/98
|
License Tools 3.3.1 Release Notes
|
|
I
|
license_eoe.sw
|
10/14/98
|
License Tools 3.3.1 Software
|
|
I
|
license_eoe.sw.flexlm_server
|
10/14/98
|
FLEXlm 5.12a Server Software
|
|
I
|
license_eoe.sw.flexlm_utils
|
10/14/98
|
FLEXlm 5.12a Utilities
|
|
I
|
license_eoe.sw.license_eoe
|
10/14/98
|
License Manager 3.3.1 Software
|
The output must show a capital "I" next to each line, which means the software is installed.
If the versions command indicates that you do not have this subsystem installed then the Install procedure did not complete successfully. Try reinstalling the Alias software.
Checking Your Licenses
Make sure you have an up-to-date license
In a shell, type
cd /var/flexlm <enter>

jot aw.dat
to verify which version is currently installed on your system.
>
|
Note:
|
If you are using a floating license, the file will be called:
aw_servername.dat, where servername
is the host name
of your machine.
|
The file will be similar to the following:
FEATURE AW_A3D sgiawd 9.000 16-nov-1998 0 ACC060D1D021A63AB3A1
VENDOR_STRING=D3cG4ub5mf7QPIqFtdAMgUPefs4p3HSotd7oEE \
HOSTID=690a97b7 ck=3
The relevant information is the 9.000. This indicates the version of Alias for which you are licensed (9.000 is the same as 9.0).
Use FLEXlm tools to check for licensing conflicts
For Alias|Wavefront node-locked licenses, check the license file by typing:
/usr/sbin/lmdiag -c /var/flexlm/aw.dat <enter>
For Alias|Wavefront floating licenses, add the server name to the filename:
/usr/sbin/lmdiag -c /var/flexlm/aw_servername.dat
awinfo Utility
We have included a utility with Alias 9.0, called awinfo
(/usr/aw/COM/bin/awinfo), to help Alias|Wavefront Assist and field personnel gather system information from customer sites.
This utility is designed make it easier for Alias|Wavefront personnel to debug customer problems. You can run it at any time to see the output it generates and possibly detect correctable problems.
By default, awinfo creates an output file in /usr/tmp.
File Layout
|
|
|
|
|
There are two main layouts that may be created. The first is for the full complement of Alias software (Studio, Designer, PowerAnimator, Animator, and AutoStudio). The second is for the Alias Render software.
See the following pages for layouts and file descriptions.
Base Software File Layout
The following layout is created if the Studio, Designer, PowerAnimator, or AutoStudio product is installed:
>
|
Note:
|
Files and directories enclosed in square brackets ([ ]) are
optionally installed.
|
/usr/aw/alias9.0/


	/.Alias

	/.AliasPrefs

	/.cut


	/AliasHotkeys.scm

	/Anim/


	/Cloud/

	/Comlib/


	/Conductors/

	[/CourseWare/]

	/Extensions/

	/Fonts/

	/Gifts/

	[/Help/]

	/IGES.config/

	/Image/

	/Modeling/

	/ODS/[Common]


		/Games

		/OpenAlias/plugins/lib


powerToon.plugin

		/OpenModel

		/[OpenRender]

		[/PDL/]

	/Render/


	/STEP/

	/Scheme/

	/alt_bitmaps/

	/app-defaults/

	/bin/

	/bitmaps/

	/cel/

	/etc/

	/lib/


	/lib32/

	/pix/

	/plugins/

	/render_control/

	/statwins/

	/sys/NewFont

		/drivers/

		/install/

		/hp_gl.cfg

	/sys/option/
Render Software File Layout
The following layout is created if the Alias Render software is installed:
>
|
Note:
|
Files and directories enclosed in square brackets ([ ]) are
optionally installed.
|
/usr/aw/alias9.0/


	/.Alias

	/.cut

	/.AliasPrefs


	/AliasHotkeys.scm

	/bin/

		/IncreaseVSwap

		/alias_render_demon


		/alinfo

		/beep

		/convert

		/findit

		/fstats

		/gamma

		/get_alias_variable

		/getid

		/pixdiff

		/powercaster

		/powercaster.i6.4k

		/powercaster.i6.5k

		/powertracer

		/powertracer.i6.4k

		/powertracer.i6.5k

		/raytracer

		/raytracer.i6.4k

		/raytracer.i6.5k

		/renderer

		/renderer.i6.4k

		/renderer.i6.5k

		/renderit

		/setupacct

		/skd

	/etc/acct/

	/etc/skd

	/render_control/
Contents of /usr/aw/alias/
|
AliasHotkeys.scm
|
The default settings for keyboard shortcuts supported by the Alias|Wavefront software.
|
|
.AliasPrefs
|
The default values for a number of peripheral devices and other options (such as the default coordinate system). If you modify the default preferences for the Alias software, this file is copied to your home directory to reflect your personal preferences. If this file is not present, Alias will not launch.
|
|
.cut
|
Information identifying the version of Alias software.
|
|
Anim
Cloud
Comlib
Conductors
Extensions
Image
Modeling
Render
STEP
Scheme
alt_bitmaps
app-defaults
bitmaps
cel
lib
pix
plugins
statwins
|
Alias system directories
|
|
Fonts/
|
Contains fonts for use with the Text tool (Objects > Text) in Alias.
|
|
Gifts/
|
Contains a set of unsupported tools that users may find useful.
|
|
Help/
|
Contains files for Alias online help.
|
|
IGES.config/
|
Contains configuration files for IGES files.
|
|
ODS/
|
Contains files for OpenAlias, Alias OpenModel, Alias OpenRender, including example files.
|
|
bin/
|
Contains executable programs, including Alias, renderer, and other products that you have purchased.
The file layout above for Alias Render software indicates the installation of the R4000 (4k) and R5000/R10000 (5k) render products.
|
|
etc/
|
Contains other executable programs that you do not run directly. They are run when needed by the Alias software. This directory also contains a template of a typical Alias user account, which is used by setupacct.
|
|
install/
|
Includes files that control the configuration of your system. This directory contains hp_gl.cfg, a configuration file for Hewlett Packard plotters.
|
|
sys/
sys/install/
|
All the files in sys and sys/install are system-wide. They should not be changed, unless you are changing them for your workstation as a whole, since all users share them. If you wish to change the files, login as the owner of the Alias software (the superuser) and make the changes in /usr/aw/alias.
|
When you run the Alias package for the first time it will creating a default project called demo.
The demo project directory (and any other project directories you create) contains the following sub-directories:
|
anim/
|
contains scene description files for animation. This is in SDL-like format (see the File > Save anim documentation online for details).
|
|
canvas/
|
contains files for Alias 2D and 3D programs (for example, Alias StudioPaint 3D).
|
|
draw/
|
contains draw overlay information for Alias StudioPaint 3D.
|
|
environment/
|
contains environment shaders. Environment shaders are used to set the attributes of a model's surroundings when you render.
|
|
light/
|
contains lights as created from the Multi-lister.
|
|
mask/
|
contains matte files in texture and other mapping procedures.
|
|
misc_data/
|
contains usr_colors.12bit, files that define colors used in the interactive package.
|
|
option/
|
contains files that are used by the main Alias executable to remember menu and option settings.
|
|
pix/
|
contains rendered image files.
|
|
plot/
|
is used for plotter output.
|
|
rib/
|
if you select RIB (Renderman Interchange Bytestream) output the files will be placed in this directory.
|
|
rrfr/
|
is used for the ReallyReallyFastRender.
|
|
sdl/
|
contains SDL (Scene Description Language) files for rendering.
|
|
shader/
|
contains predefined shader information from the Render
and Multi-lister functions.
|
|
shelf/
|
contains data files used by Alias StudioPaint 3D.
|
|
sla/
|
contains data to be output to the Stereo Lithography Apparatus (SLA) which is made by 3D Systems Inc.
|
|
stencil/
|
contains data files used by Alias StudioPaint 3D.
|
|
texture/
|
contains predefined texture information suitable for browsing in Render
and Multi-lister
functions.
|
|
wire/
|
contains data \xde les from modeling and animation.
|
Appendix A: File Lists
|
|
|
|
|
The files listed in this section are installed into system level directories (that is, they are not part of the base Alias installation in /usr/aw).
The following products ...
|
Software File Name
|
Software Product Name
|
|---|
|
license_eoe
|
License Tools 3.3.1
|
|
license_eoe.books
|
IRIS InSight Books, Release 2.2
|
|
license_eoe.books.FLEXlm_EUM
|
FLEXlm End User Manual
|
|
license_eoe.man
|
License Tools 3.3.1 Manual Pages
|
|
license_eoe.man.flexlm_utils
|
FLEXlm 5.12a Utilities Manual Pages
|
|
license_eoe.man.license_eoe
|
License Manager 3.3.1 Manual Pages
|
|
license_eoe.man.relnotes
|
License Tools 3.3.1 Release Notes
|
|
license_eoe.sw
|
License Tools 3.3.1 Software
|
|
license_eoe.sw.flexlm_server
|
FLEXlm 5.12a Server Software
|
|
license_eoe.sw.flexlm_utils
|
FLEXlm 5.12a Utilities
|
|
license_eoe.sw.license_eoe
|
License Manager 3.3.1 Software
|
... install the following files:
/etc/config/flexlm
/etc/config/lmgrd.options
/etc/init.d/flexlm
/etc/rc0.d/K30flexlm
/etc/rc2.d/S45flexlm
/usr/etc/LicenseManager
/usr/etc/enterlicense
/usr/etc/lmgrd
/usr/etc/sgifd
/usr/lib/X11/app-defaults/LicenseManager
/usr/lib/X11/app-defaults/SaAddLicenseGuide
/usr/lib/X11/app-defaults/SaAddLicenseTask
/usr/lib/X11/app-defaults/SaDeleteLicenseGuide
/usr/lib/X11/app-defaults/SaDeleteLicenseTask
/usr/lib/X11/app-defaults/SaUpdateLicenseGuide
/usr/lib/X11/app-defaults/SaUpdateLicenseTask
/usr/lib/filetype/install/iconlib/licensemgr.closed.fti
/usr/lib/filetype/install/iconlib/licensemgr.open.fti
/usr/lib/filetype/install/iconlib/netls.nl.license.fti
/usr/lib/filetype/install/licensemgr.ftr
/usr/lib/images/LicenseManager.icon
/usr/relnotes/license_eoe/TC
/usr/relnotes/license_eoe/ch1.z
/usr/relnotes/license_eoe/ch2.z
/usr/relnotes/license_eoe/ch3.z
/usr/relnotes/license_eoe/ch4.z
/usr/relnotes/license_eoe/ch5.z
/usr/relnotes/license_eoe/ch6.z
/usr/relnotes/license_eoe/ch7.z
/usr/relnotes/license_eoe/ch8.z
/usr/sbin/lmcksum
/usr/sbin/lmdiag
/usr/sbin/lmdown
/usr/sbin/lmhostid
/usr/sbin/lmremove
/usr/sbin/lmreread
/usr/sbin/lmstat
/usr/sbin/lmutil
/usr/sbin/lmver
/usr/share/Insight/library/SGI_bookshelves/SGI_Admin/books/FLEXlm_EUM
/usr/share/Insight/library/SGI_bookshelves/SGI_Admin/books/FLEXlm_EUM/booklist.txt
/usr/share/Insight/library/SGI_bookshelves/SGI_Admin/books/FLEXlm_EUM/ebt
/usr/share/Insight/library/SGI_bookshelves/SGI_Admin/books/FLEXlm_EUM/ebt/FLEXlm_EUM.dat
/usr/share/Insight/library/SGI_bookshelves/SGI_Admin/books/FLEXlm_EUM/ebt/FLEXlm_EUM.edr
/usr/share/Insight/library/SGI_bookshelves/SGI_Admin/books/FLEXlm_EUM/ebt/FLEXlm_EUM.tag
/usr/share/Insight/library/SGI_bookshelves/SGI_Admin/books/FLEXlm_EUM/ebt/tables.tdr
/usr/share/Insight/library/SGI_bookshelves/SGI_Admin/books/FLEXlm_EUM/ebt/toc.tdr
/usr/share/Insight/library/SGI_bookshelves/SGI_Admin/books/FLEXlm_EUM/ebt/tochtml.tdr
/usr/share/Insight/library/SGI_bookshelves/SGI_Admin/books/FLEXlm_EUM/index
/usr/share/Insight/library/SGI_bookshelves/SGI_Admin/books/FLEXlm_EUM/index/index.dat
/usr/share/Insight/library/SGI_bookshelves/SGI_Admin/books/FLEXlm_EUM/index/vocab.dat
/usr/share/Insight/library/SGI_bookshelves/SGI_Admin/books/FLEXlm_EUM/styles
/usr/share/Insight/library/SGI_bookshelves/SGI_Admin/books/FLEXlm_EUM/styles/README
/usr/share/Insight/library/SGI_bookshelves/SGI_Admin/books/FLEXlm_EUM/styles/bobindex
/usr/share/Insight/library/SGI_bookshelves/SGI_Admin/books/FLEXlm_EUM/styles/examples.tv
/usr/share/Insight/library/SGI_bookshelves/SGI_Admin/books/FLEXlm_EUM/styles/figures.tv
/usr/share/Insight/library/SGI_bookshelves/SGI_Admin/books/FLEXlm_EUM/styles/frontmatter
/usr/share/Insight/library/SGI_bookshelves/SGI_Admin/books/FLEXlm_EUM/styles/fullhtml.v
/usr/share/Insight/library/SGI_bookshelves/SGI_Admin/books/FLEXlm_EUM/styles/fulltext.hlp
/usr/share/Insight/library/SGI_bookshelves/SGI_Admin/books/FLEXlm_EUM/styles/fulltext.pv
/usr/share/Insight/library/SGI_bookshelves/SGI_Admin/books/FLEXlm_EUM/styles/fulltext.rev
/usr/share/Insight/library/SGI_bookshelves/SGI_Admin/books/FLEXlm_EUM/styles/fulltext.v
/usr/share/Insight/library/SGI_bookshelves/SGI_Admin/books/FLEXlm_EUM/styles/media.tv
/usr/share/Insight/library/SGI_bookshelves/SGI_Admin/books/FLEXlm_EUM/styles/tables.tv
/usr/share/Insight/library/SGI_bookshelves/SGI_Admin/books/FLEXlm_EUM/styles/toc.pv
/usr/share/Insight/library/SGI_bookshelves/SGI_Admin/books/FLEXlm_EUM/styles/toc.tv
/usr/share/Insight/library/SGI_bookshelves/SGI_Admin/books/FLEXlm_EUM/styles/tochtml.tv
/usr/share/catman/p_man/cat5/license.dat.z
/usr/share/catman/p_man/cat5/license.opt.z
/usr/share/catman/p_man/cat5/license.options.z
/usr/share/catman/u_man/cat1/LicenseManager.z
/usr/share/catman/u_man/cat1/licensemanager.z
/usr/share/catman/u_man/cat1/lmdiag.z
/usr/share/catman/u_man/cat1/lmdown.z
/usr/share/catman/u_man/cat1/lmhostid.z
/usr/share/catman/u_man/cat1/lmremove.z
/usr/share/catman/u_man/cat1/lmreread.z
/usr/share/catman/u_man/cat1/lmstat.z
/usr/share/catman/u_man/cat1/lmswitchr.z
/usr/share/catman/u_man/cat1/lmutil.z
/usr/share/catman/u_man/cat1/lmver.z
/usr/sysadm/taskdf/SaAddLicenseTask.tdf
/usr/sysadm/taskdf/SaDeleteLicenseTask.tdf
/usr/sysadm/taskdf/SaLicenseManager.edf
/usr/sysadm/taskdf/SaUpdateLicenseTask.tdf
/usr/sysadm/taskdso/SaAddLicenseTask.so
/usr/sysadm/taskdso/SaDeleteLicenseTask.so
/usr/sysadm/taskdso/SaUpdateLicenseTask.so
/var/flexlm
/var/flexlm/license.dat
/var/flexlm/licensefile.db
/var/sysadmdesktop/sysmanapps/LicenseManager
The following products ...
|
Software File Name
|
Software Product Name
|
|---|
|
awcommon.sw.desktop
|
Alias|Wavefront Common Desktop environment
|
... install the following files:
/etc/config/aw_flexlm
/etc/init.d/aw_flexlm
/etc/rc2.d/S51aw_flexlm
/usr/lib/ImageVision/filefmt/libilALIAS.so
/usr/lib/ImageVision/filefmt/libilAliasCompress.so
/usr/lib/ImageVision/filefmt/libilAliasEclipse.so
/usr/lib/ImageVision/filefmt/libilEXPLORE.so
/usr/lib/ImageVision/filefmt/libilRLA.so
/usr/lib/X11/app-chests/aw.chest
/usr/lib/filetype/install/aw.common.ftr
/usr/lib/filetype/install/aw.ftr
/usr/lib/filetype/install/iconlib/aw.books.closed.fti
/usr/lib/filetype/install/iconlib/aw.books.open.fti
/usr/lib/filetype/install/iconlib/aw.device.FBD.fti
/usr/lib/filetype/install/iconlib/aw.device.VTR.fti
/usr/lib/filetype/install/iconlib/aw.dso.Audio.fti
/usr/lib/filetype/install/iconlib/aw.dso.Font.fti
/usr/lib/filetype/install/iconlib/aw.dso.Image.fti
/usr/lib/filetype/install/iconlib/aw.dso.Outlet.fti
/usr/lib/filetype/install/iconlib/aw.dso.PlugIn.fti
/usr/lib/filetype/install/iconlib/aw.dso.Spark.fti
/usr/lib/filetype/install/iconlib/aw.folder.closed.fti
/usr/lib/filetype/install/iconlib/aw.folder.open.fti
/usr/lib/filetype/install/iconlib/aw.installer.dist.closed.fti}
/usr/lib/filetype/install/iconlib/aw.installer.dist.open.fti
/usr/lib/filetype/install/iconlib/aw.installer.exec.fti
/usr/lib/filetype/install/iconlib/aw.license.fti
/usr/lib/filetype/install/iconlib/aw.licenser.closed.fti
/usr/lib/filetype/install/iconlib/aw.licenser.open.fti
/usr/lib/filetype/install/iconlib/awkeys.folder.closed.fti
/usr/lib/filetype/install/iconlib/awkeys.folder.open.fti
/usr/local
/usr/local/aw
/usr/sbin/Licenser
/usr/sbin/di
/usr/sbin/fcheck
/usr/sbin/imgcvt
/usr/sbin/toimg
The following products ...
|
Software File Name
|
Software Product Name
|
|---|
|
alias9_0.sw.desktop
|
Alias|Wavefront Alias Desktop Environment
|
... install the following files:
/usr/lib/X11/input/config/wacom
/usr/lib/filetype
/usr/lib/filetype/install
/usr/lib/filetype/install/Alias3D.ftr
/usr/lib/filetype/install/iconlib/Alias3D.MS3.closed.fti
/usr/lib/filetype/install/iconlib/Alias3D.MS3.open.fti
/usr/lib/filetype/install/iconlib/Alias3D.RRFR.closed.fti
/usr/lib/filetype/install/iconlib/Alias3D.RRFR.open.fti
/usr/lib/filetype/install/iconlib/Alias3D.SoundSync.closed.fti
/usr/lib/filetype/install/iconlib/Alias3D.SoundSync.open.fti
/usr/lib/filetype/install/iconlib/Alias3D.anim.fti
/usr/lib/filetype/install/iconlib/Alias3D.environment.fti
/usr/lib/filetype/install/iconlib/Alias3D.flipbook.closed.fti
/usr/lib/filetype/install/iconlib/Alias3D.flipbook.fti
/usr/lib/filetype/install/iconlib/Alias3D.flipbook.open.fti
/usr/lib/filetype/install/iconlib/Alias3D.light.fti
/usr/lib/filetype/install/iconlib/Alias3D.mask.fti
/usr/lib/filetype/install/iconlib/Alias3D.oldlight.fti
/usr/lib/filetype/install/iconlib/Alias3D.oldsdl.closed.fti
/usr/lib/filetype/install/iconlib/Alias3D.oldsdl.open.fti
/usr/lib/filetype/install/iconlib/Alias3D.oldwire.closed.fti
/usr/lib/filetype/install/iconlib/Alias3D.oldwire.open.fti
/usr/lib/filetype/install/iconlib/Alias3D.oldwire.top.fti
/usr/lib/filetype/install/iconlib/Alias3D.pix.fti
/usr/lib/filetype/install/iconlib/Alias3D.qmexec.bottom.fti
/usr/lib/filetype/install/iconlib/Alias3D.qmexec.closed.fti
/usr/lib/filetype/install/iconlib/Alias3D.qmexec.open.fti
/usr/lib/filetype/install/iconlib/Alias3D.qmfile.bottom.fti
/usr/lib/filetype/install/iconlib/Alias3D.qmfile.closed.fti
/usr/lib/filetype/install/iconlib/Alias3D.qmfile.open.fti
/usr/lib/filetype/install/iconlib/Alias3D.qpexec.bottom.fti
/usr/lib/filetype/install/iconlib/Alias3D.qpfile.bottom.fti
/usr/lib/filetype/install/iconlib/Alias3D.rrfr.fti
/usr/lib/filetype/install/iconlib/Alias3D.sdl.fti
/usr/lib/filetype/install/iconlib/Alias3D.shader.fti
/usr/lib/filetype/install/iconlib/Alias3D.sset.fti
/usr/lib/filetype/install/iconlib/Alias3D.texture.fti
/usr/lib/filetype/install/iconlib/Alias3D.wire.fti
/usr/lib/filetype/install/iconlib/Alias3D_V7.exec.closed.fti
/usr/lib/filetype/install/iconlib/Alias3D_V7.exec.open.fti
/usr/lib/filetype/install/iconlib/Alias3D_preV7.exec.bottom.fti
/usr/lib/filetype/install/iconlib/Alias3D_preV7.exec.closed.fti
/usr/lib/filetype/install/iconlib/Alias3D_preV7.exec.open.fti
/usr/lib/images
/usr/lib/images/Alias.icon
/usr/lib/images/DataBrowser.icon
/usr/lib/images/FlipBook.icon
/usr/lib/images/RRFR.icon
/usr/lib/images/livewire.icon
/usr/lib/images/soundsync.icon
Appendix B: Inst exitops
|
|
|
|
|
The following commands are run before Software Manager finalizes its installation routine. These operations are called exitops and are performed at the end of the installation.
I. Magic File Addition
-
magic file created at /etc/magic which is used to identify
Alias|Wavefront filetypes.
Commands:
(chroot $rbase /sbin/sh -c "cd /etc; if [ -f magic ]
; then mv -f magic magic.O; awk /Alias.Wavefront\\
Alias\\ files.\\ begin/\\{p=1\\}\\ /
Alias.Wavefront\\ Alias\\ files.\\ end/\\{p=0\\}\\
\\{if\\(p==0\\)print\\} magic.O | grep -v
Alias.Wavefront\\ Alias\\ files > magic; fi; cat /
tmp/magic.alias >> magic; chmod 644 magic; rm /tmp/
magic.alias")


II.  Iconbook Additions
-
A new entry is added to the Icon Catalog with Alias|Wavefront
applications
Commands:
(if [ -x $rbase/usr/sbin/iconbookedit ]; then
chroot $rbase /usr/sbin/iconbookedit -remove
"Category:File Name:/usr/aw/COM2.0/doc/
awxfiles_html/Awxfiles.doc" -syspage
AliasWavefront; chroot $rbase /usr/sbin/
iconbookedit -add "Category:File Name:/usr/aw/
COM2.0/doc/awxfiles_html/Awxfiles.doc" -syspage
AliasWavefront; fi;)


(if [ -x $rbase/usr/sbin/iconbookedit ]; then
chroot $rbase /usr/sbin/iconbookedit -add
"Category:File Name:/usr/aw/COM2.0/bin/Licenser" -
syspage AliasWavefront; fi;)


(if [ -x $rbase/usr/sbin/iconbookedit ]; then
chroot $rbase /usr/sbin/iconbookedit -add
"Category:File Name:/usr/aw/COM2.0/html/spar/
AW_License_Request" -syspage AliasWavefront; fi;)


(cd /usr/local/aw ; $rbase/usr/aw/COM/html/spar/
getsparinfo)


(if test -r $rbase/usr/lib/filetype/Makefile ; then
chroot $rbase /sbin/sh -c "cd /usr/lib/filetype;
make > /dev/null" ; fi)


(if test -x $rbase/usr/sbin/iconbookedit; then
chroot $rbase /usr/sbin/iconbookedit -remove
"Category:File Name:/usr/aw/alias9.0/bin/ms3" -
syspage AliasWavefront >/dev/null 2>&1; chroot
$rbase /usr/sbin/iconbookedit -add "Category:File
Name:/usr/aw/alias9.0/bin/ms3" -syspage
AliasWavefront >/dev/null 2>&1; fi)


(if test -x $rbase/usr/sbin/iconbookedit; then
chroot $rbase /usr/sbin/iconbookedit -remove
"Category:File Name:/usr/aw/alias9.0/bin/soundsync"
-syspage AliasWavefront >/dev/null 2>&1; chroot
$rbase /usr/sbin/iconbookedit -add "Category:File
Name:/usr/aw/alias9.0/bin/soundsync" -syspage
AliasWavefront >/dev/null 2>&1; fi)


(chroot $rbase /usr/sbin/iconbookedit -remove
"Category:File Name:/usr/aw/evalviewer9.0/bin/
evalview9.0" -syspage AliasWavefront >/dev/null
2>&1;chroot $rbase /usr/sbin/iconbookedit -add
"Category:File Name:/usr/aw/evalviewer9.0/bin/
evalview9.0" -syspage AliasWavefront >/dev/null
2>&1;chroot $rbase /usr/sbin/iconbookedit -remove
"Category:File Name:/usr/aw/evalviewer9.0/bin/
evdocs" -syspage AliasWavefront >/dev/null
2>&1;chroot $rbase /usr/sbin/iconbookedit -add
"Category:File Name:/usr/aw/evalviewer9.0/bin/
evdocs" -syspage AliasWavefront >/dev/null 2>&1)


III.  Findkey
-
Findkey command is run which searches the prekey database for
license information based on the getid output of the local
workstation. If an entry exists a new license will be installed into
the /var/flexlm/aw.dat file.
Commands:
(chroot $rbase /sbin/sh -c "cd /usr/aw/alias9.0;
bin/getid -v >/dev/null 2>&1 || /usr/aw/COM/bin/
findkey -l -i .data/Alias.master; rm -rf .data")
IV. IncreaseVswap
-
IncreaseVswap is run to verify that virtual swap settings are
correct based on the physical amount of memory on your
machine. vswap is necessary to save large files or launch other
utilities such as renderers, wrl etc.
Commands:
(chroot $rbase /usr/aw/alias9.0/bin/IncreaseVSwap -
i)
|


