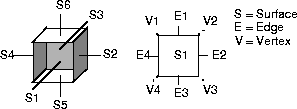
The edges are used to connect two loops from adjacent surfaces. The vertices are used to connect two or more edges.
This solid box consists of six surfaces, twelve edges, and eight vertices that form the geometrical and topological information required to define it as a solid model. For example, if a hole is placed in the box through S1 and S6, S1 and S6 would each have a loopset containing two loops.
Modeling for Successful Data Transfer to a Solid Modeler
When you import an Alias model into a solid modeler, you provide the geometric and topological information of the model. When creating a solid model, the solid modeler system creates a valid data base from the supplied data, and the supplied data must satisfy the solid modeler's rules for topological and geometric data.
Getting the Geometry Right
To achieve the tolerance required by solid modeling, it is important to manage the modeling units and tolerances when creating your model. The mm (millimeter) or inch is generally used as the base linear unit. Standards for tolerances have been developed as they apply to engineering-based CAD systems.
|
Tip:
|
If you are not sure of the standards your companies or
clients use, ask your CAD system manager. Set up your
units and tolerances at the beginning of your modeling
session and save them as a preset in the Construction
Options box. The next time Alias is opened, the preset that
was in use when Alias was last exited, will be in effect.
|
To successfully join surfaces, the maximum distance or gap between the surfaces of your model must be less than the accuracy defined within the solid modeler. You can lower the part accuracy when the gap exceeds the required tolerance, but that may preclude the model from being used in other downstream CAD processes. It is preferable to construct Alias models within the accuracy defined by the engineering requirements of the environment or project you are working on.
You can specify various tolerances in the Construction Options window in Alias (found under the Preferences menu).

The Curve Fit Distance is the tolerance value in Alias which most closely corresponds to the Point Coincidence tolerance in Master Series. For example, the default tolerance in I-DEAS Master Series is 0.01 mm. You should create Alias geometry at a Curve Fit Distance tolerance of 0.005 mm or lower if you plan to perform post transfer processes, such as stitching, after transferring the geometry to I-DEAS Master Series. Since the stitching tool is driven by the Maximum Gap Distance tolerance, this value should be set to the same value as the Curve Fit Distance tolerance (0.005 mm).
|
Tip:
|
A tolerance of 0.005 mm should be adequate for the majority
of cases. When a tolerance of 0.005 mm is still not sufficient
to meet the requirements of post-import operations in I-
DEAS Master Series, you should experiment to get the
necessary tolerance. The
Curve Fit Distance should not need
to be set less than 0.001 mm.
|
Rational and Non-rational Geometry
In the Construction Options window, you can specify whether or not the new geometry being created will contain the rational or non-rational component. Rational geometry contains CVs that do not have a uniform weight, while the CVs of non-rational geometry all have the same weight. Some CAD systems that do not support rational geometry will rebuild the rational element of geometry upon import. This will change the intended design and therefore the user should know ahead of time whether rational geometry is supported by the target CAD system.
Rational fillets are created with fewer isoparms and the tangency to the adjacent surface can be up to ten times more accurate. While this is an advantage in Alias, it is even more apparent when the geometry has been transferred to a solid modeler. The closer adjacent surfaces are to exact tangency, the further the geometry can be offset during the shelling operation.
Once the above conditions have been met, you should try several sample translations to verify that the geometry is being passed from Alias successfully. Before modeling a project in Alias that is intended for export, you should model several sample pieces of geometry in mock modeling situations, then transfer them and attempt the stitching operation in the target CADS system. This will confirm that the model, when completed, will transfer successfully.
Whether you are creating a model, verifying a model, or debugging a translation, there are a number of Alias tools you can use to check the quality of the geometry you have created. The most useful tools are the surface continuity checker (Evaluate > Continuity > Surface Continuity) and the Min/Max measurement tool (Locators > Deviation Measures > Min/Max Deviation). Use these tools to check the maximum distance between surface boundaries in Alias to confirm the integrity of the model before transferring it to the target CAD system.
Getting the Topology Right
The topology of a model defines how each surface relates to all other surfaces in the model. The important element of topology for data exchange to solid modelers is that an edge on one surface must have a "twin" edge on the adjacent surface. Edges are defined by natural surface boundaries or trimmed surface boundaries.
Using "Stitch" in Alias
The Surface Edit > Stitch tool in Alias creates a valid solid model topology within the Alias modeling environment. Stitching surfaces in Alias can greatly improve the robustness of the interface to a solid modeler. The stitching process also identifies surface boundaries that exceed the prescribed tolerances. These problems can then be corrected prior to translating the data to the solid modeling system.
In addition, the stitching process identifies the duplicate surfaces in the model and orients the surface normals of the completed shell.
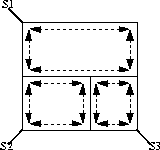
The following illustration represents an Alias surface model comprised of three individual surfaces (labeled S1, S2 and S3). The edges of each surface are represented by dashed lines.
When models are constructed using the Alias advanced surface tools (Swept,
Birail, and Square), it is common to create a number of smaller surfaces along the edge of one larger surface. This modeling technique does not create the twin edges required for a solid model. The stitching feature automatically creates the twin edge topology required by the solid modeler.
Notes
- Some modeling techniques, such as Trim,
Intersect and Round, create twin edges.
- If you are not successful in stitching the entire object, return to the Alias model and re-investigate the boundary conditions.
Meeting Geometry Requirements
All surface edges must be topologically matched before the geometry meets the requirements of topologically described geometry in CAD system.
In general, edges fail to match because of a mismatch in the topology of two or more adjacent faces, or because the maximum distance between two adjacent edges is greater then the current accuracy defined in the CAD system. There may be a gap existing between the adjacent surface edges, or the edges may overlap to the extent that they are unable to be stitched.
You can fix this problem by lowering tolerances in Alias and recreating the Alias geometry before re-importing the file into the CAD system.
Creating Shells in Alias for Export
Creating solid geometry from imported Alias models is a common workflow when integrating Alias and CAD systems. When exporting the model from Alias, you must ensure that the geometry is built to the correct tolerance and that it can also be stitched. The stitching process in Alias identifies gaps between surfaces so that you can repair the appropriate geometry before writing out the export file.
During stitching, the surfaces are twinned. This means that the surface boundaries may be split to accommodate adjacent surfaces, and periodic geometry is detached into multiple surfaces. For this reason, you should save the Alias wire file before stitching so that if further modifications are required to be made to the Studio model, the construction history will be intact. (Stitched geometry saved to an Alias wire file cannot be unstitched to its original state.)
A typical workflow for stitching is:
-
1
-
Stitch the surfaces to perform a visual check to confirm there are no gaps.
-
2
-
Undo the stitch operation.
-
3
-
Save the Alias wire file.
-
4
-
Stitch the surfaces again.
-
5
-
Export the stitched shell as an exportable file.
|