|
-
2
-
Click the Show List button to open the File Lister to display the list of images you can use.
-
3
-
Click on the filename or icon in the File Lister. If you prefer, you can also type a name and/or a path from scratch without selecting anything in the File Lister.
-
The filename and its UNIX path appear in the File
Requestor.
-
4
-
Click the Show button.
Tips:
- Another way of accessing the file is to double-click on its icon. The Alias File Requestor takes the selected file and displays the pix file.
- Only one pix can be shown at a time. If you want to display multiple pix files, open the File Lister (click the Show List button) and Shift-click on each pix file that you want to display. Once the pix files have been selected, click the Show button in the File Requestor.
Notes:
- Animations cannot be shown with this operation.
- This option uses the Alias standalone wrl.
To view or change these options, select File > Show > Pix - to open the Show Display Options window. to open the Show Display Options window.
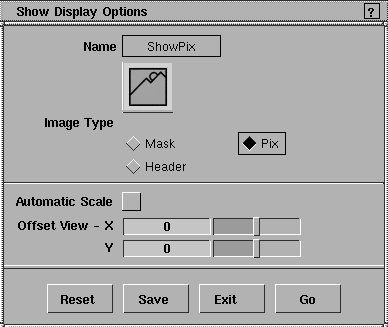
Image Type
-
- Lets you choose what to view:
- Mask, to choose images from the mask directory
- Pix, to choose images from the pix directory
- Header, to view the header of a file. Header information contains the image resolution, offset, and number of bitplanes (8 or 24).
Automatic Scale
-
- Check this option ON to scale the image to a resolution greater or smaller than the screen.
-
- The default is OFF.
- OFF - the outline of a window appears that you can move anywhere on the screen by moving the mouse. Pressing a mouse button places the PIX or MASK file on screen in the window.
- ON - the PIX or MASK file fills the screen. You can scale up to the maximum size that can be represented on the screen.
Offset View
-
- Lets you specify where the lower left corner of the image is placed, measured in pixels. You can offset the image placement by entering numerical values for the X and Y coordinates.
-
- The default values are 0, 0.
Notes
- Images are represented at actual resolution unless the image is larger than the screen. In this case, the lower left corner of the image is shown if Automatic Scale is set to OFF.
- The Offset View coordinates must be smaller than the image size.
|


