
|
|
|||
|
|||
|
|||
|
|||
|
Family Portraits
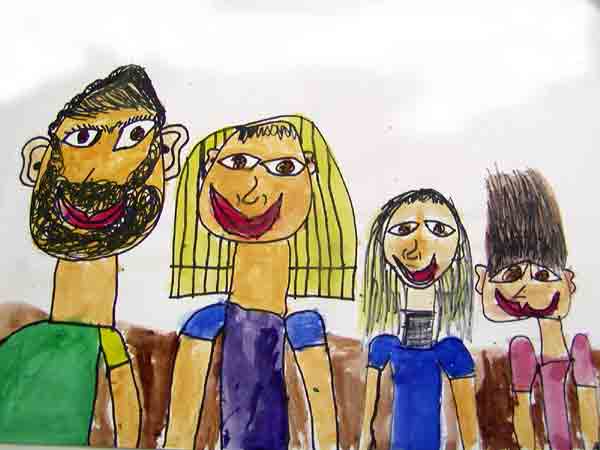 |
Family Portrait by Anthony -- Hair straight up!! that's him!
|
Project: Family Portrait Family Portrait Gallery by 2nd Graders Grade: 2nd Grade Materials: Water colors (Prang oval set of 8) ** Note, I use Prang oval water colors because I like the pigment colors for student work. References to Drawing on the Right side of the Brain -- see resource
section. Objectives of lesson:
Eslar Targets: #3 Understanding Our importance in God's creation and how we are fearfully and wonderfully Made. Importance in God's plan for each student in their family, as part of God's plan. Scriptural Inspiration: Psalm 139: 13-15 Activity: Discuss this artist History of Artist: Pierre Renoir, the genius and traditionalist of the Impressionist movement, was born in Limoges France, the son of a tailor. Renoir began his career by painting porcelain plates, fans and window blinds, before entering the Academie Gleyre in 1862. He soon met with Monet and other Impressionists. These artist greatly influenced him to paint from nature and brought him into the heart of the Impressionist movement, although his paintings before 1870 were in the classical tradition. Between 1870 and 1880, Renoir was a pure Impressionist, painting with the characteristic touches of broken color and beautiful hues. He preferred figure painting to landscapes, unlike his companions. He created portraits and scenes of social life in a manner that is at once very alive and tender. In 1881, he went to Italy to study the frescos in Venice and Rome. He returned to France after this. His final style, in his latter years combines line and color and light. He had an optimistic outlook on life. His paintings show his love of women, their beauty, their gentleness, their laughter and their tenderness. This same understanding applies to his painting of children whom he painted with an eye for naturalness and simplicity. "The Girl and Watering Can" is a good example of this. Renoir's love of painting was so great that even in his final years, confined to bed and with brushes bound to his crippled arthritic wrist, he painted beautiful canvases of color. Lesson on drawing faces: 1. Using scratch paper, we will begin to draw our faces. We begin
by looking in the mirror before each step. I also have the students
use permanent markers to eliminate the need to erase everything.
2. Now we observe that the nose is in the middle of the face (measure this if needed), and demonstrate drawing a nose for the students. Have them repeat this step. 3. Eyes are located at the top of the nose -- observe this with the students-- and centered between the nose and temple. Draw shape of eye, "football " shape. Talk about the structure of the eye and draw in pupil, eyelid and lashes. (Kindergartners tend to put the eyes at the top of the head) 4. Mouth-- observe shape of mouth. Draw this shape open or closed (it's easier closed) The mouth is located half way between nose and chin. 5. Ears-- ears are located by following the eye around to the top of the ear. (Kindergartners tend to put ears all over the head) 6. Hair-- drawn in according to the individual. 7. Now we can add the neck, body, arms, legs,. . Many times the pictures have come out so large, that the students do not have room to draw these in. In this case, we draw the shoulders, or what ever would be most accurate for the size of paper and the size of the student's drawn picture. 8. Each student, using the principles learned, draws his own family. The students can focus on the whole body type, or just portraits with everyone's faces. I leave this up to each student. 9. After the student's family portrait is complete, we review the use of water colors. Usually the water color lesson is on another day. The students complete their self portrait with watercolors. You may choose a different medium, as their teacher.
|
|