
|
|
|||
|
|||
|
|||
|
|||
|


Noah's Ark
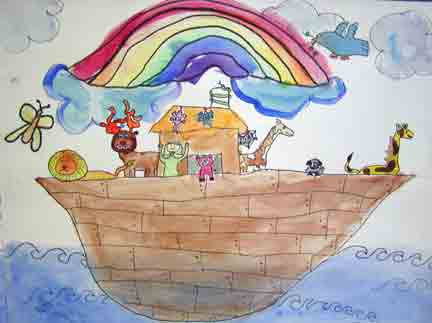 |
by Katie Kinsella -- 3rd Grade
|
Grade: 3rd Grade Noah's Ark Art Gallery by 3rdn graders Spring 2002 Materials: Water colors (Prang oval set of 8) Black permanent markers to outline picture -- Extra fine tip Sharpie Objectives: Sample Questions to ask students: What do you see in this picture? What animals do you see ? What is in the background? Who is this child? What colors do you see in the picture? Do you see warm or cool colors? Compare this picture to the Noah's ark picture by Jan Brueghel. What is the difference between the pictures? (hint: one is primitive style and one is realistic) What animals do you see in this picture? What is in the background of this picture? Which painting is older? Scriptural Inspiration: Isaiah 11:6 Activity: Discussion of Art work by Edward Hicks, and Bruegel,
if time. History of Artist: Edward Hicks was born in Attleboro, Pennsylvania.
He was the son of a farmer, and left the land to become an apprentice
to a coach maker. He showed ability in painting coaches and signs
of being an artist. Eventually he left this trade and became a Quaker.
He again bought a farm. His farm did not prosper and he then turned
to preaching in the northern part of the United States and Canada.
He became renown as a preacher. As a Quaker, he felt he must continue
to earn his living with his hands. Since his only skill was painting
he went back to art and put on canvas his sincere beliefs in the
Bible. His sincerity shines through his paintings. His animals have
human expressions. His children and human figures are stiff, doll
like, and distinctive. He was self taught as an artist, and this
shows in his primitive style. Lesson on Noah's Ark. This picture by Edward Hicks gives us lots of ideas for animals and painting a Noah's Ark. Directions: 2. Using a pencil, draw a simple ark for the students to follow. This can be done on scratch paper first. Go slowly step by step, letting the students follow you. The sample below is of a student's work. Then ask the student to draw their sketch again on the BIG paper. Talk about composition, and the placement of the ark on the paper. Are they going to include water, land, animals? What will be their focus? 3. After the Ark is sketched onto the student's paper, the student can begin to be creative about the animals they want to include on the ark. Many students will want help with the animals, others will not. At this time I will randomly draw different animals unto the sample that I have to display. Encourage the students to draw at least 10 animals. (Many 3rd graders would only make Noah and about 3 animals). Talk about Noah's ark and what it might have been like to gather the animals, to live with the animals, what the rain was like....etc. 4. When the student's work is completed, have them outline the main shapes with a Sharpie PERMANENT fine tip or extra fine tip pen. 5. Watercolor: I suggest to students to begin with the animals,
Noah, and then the ark to color. 6. Demonstrate these two techniques: Wet on Dry would be used on the animals, and smaller details. Wet on WET technique is best for larger areas as the background sky, ocean, ground, or the Ark. Definitions: ** WET on DRY technique: Water is added to the paint. Paint is applied directly onto the paper.
2nd grade version of this lesson: Concentrate on the Lion only in the Edward Hicks picture of the Peaceable Kingdom. Draw a step by step Lion, with the students following your direction. Have the students add the background. Draw in pencil, outline in sharpie pen, and watercolor same as above lesson.
|
|