 Previous Page |
Page 2 |
 Next Page |
| ||
Previous Page |
Page 2 |
Next Page |
| ||
On computers that use the Recycle Bin (which is most computers), files and folders go to the Recycle Bin when you delete them. This is so that they can be "put back" (restored) if they are deleted in error. They are not permanently deleted from the computer until you "empty the Recycle Bin." After emptying the Recycle Bin, the files and folders cannot be recovered.
It can be confusing because to move a file or folder to the Recycle Bin you use the Delete command. However, the file or folder is not actually deleted permanently (erased) from the computer until the Recycle Bin is emptied. Therefore, in this lesson the word "delete" means to temporarily move files and folders to the Recycle Bin. The term "empty the Recycle Bin" means to permanently delete (erase) those files and folders completely from the computer.
Moving Files & Folders to the Recycle Bin
There are two ways to delete files and folders (move them to the Recycle Bin). The first way is to right-click on the icon and select Delete from the shortcut menu. This will place the file or folder in the Recycle Bin.
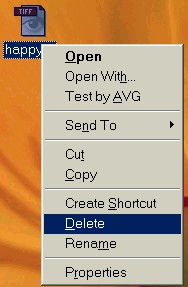
The second way is to drag-and-drop the icon into the Recycle Bin. These are the steps to do that:
| Step 1: | Left-click on the icon and drag it until it is over the Recycle Bin. |  |
| Step 2: | When the file is dragged over the Recycle Bin, the Recycle Bin darkens in color. |  |
| Step 3: | Release the left mouse button when the Recycle Bin darkens in color. The file or folder will now be inside the Recycle Bin. If the Recycle Bin was empty before, the icon will change to look full. If there were already other files or folders in the Recycle Bin before, the icon will stay the same, looking full. |  |
Practice:
Read all instructions before starting.
| 1. | Resize this lesson window again so that the Desktop is showing underneath it. |
| 2. | Create a new folder on the Desktop: Move the mouse pointer to an area on the screen that has no files or folders and right-click, then go to the New submenu and select Folder. You do not need to rename it. |
| 3. | Drag the new folder into the Recycle Bin: Left-click on the icon of the new folder, hold down the left mouse button, move the mouse pointer (and folder) until it is over the Recycle Bin and the Recycle Bin darkens in color, then release the left mouse button. If you can still see the new folder on the Desktop, repeat this step until it is inside the Recycle Bin and can no longer be seen on the Desktop. |
| 4. | Create another new folder by using the instructions in Step 2 above. |
| 5. | Right-click on the icon of the new folder and select Delete from the shortcut menu. Notice how the folder disappears from the screen because it is now in the Recycle Bin. |
| 6. | Return to this lesson window either by clicking on the lesson window or by clicking on its Taskbar button. Click on the Maximize button in the upper right-hand corner (the middle button of the three) if you want the window to fill the screen again. |
Previous Page |
Next Page |