|
|


 |
Mapping Dive SitesMapping dive sites can be an important part of diving. In it's simplest form a dive site map is nothing more then a bearing from a known object. More complex maps can consists of a cross bearing (for high-accuracy marking of a dive site), to a set of bearings (to "tour" a dive site), to complex and highly accurate maps of a dive location. For 99% of the diving most people do a map need not have more then a few bearings and landmarks to work from. The main techniques of this types of mapping is covered in this article. Index:
Equipment: Underwater
Compass: Slate: Land
Compass: Marker
Buoy's: GPS: Mapping from the
Water:
Single
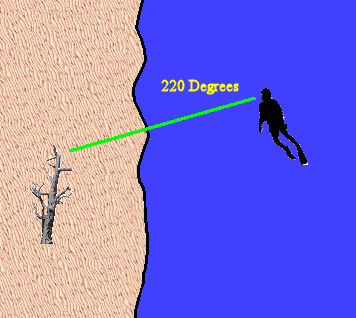
Bearing: There are two main problems with this first technique. First, you have no idea how far from shore you are. Secondly wind and current can carry you away from the dive site before you take your bearing. The first problem isn't much of an issue - all you have to do is swim underwater along your bearing and eventually you'll reach your site. Of course you can estimate the distance, either by guessing when you surface, or by swimming underwater and counting kick-cycles. Current is a little harder to deal with. The best way to deal with current is to use a marker buoy. While taking your bearing you simply remain near the buoy. This will allow you to measure the bearing accurately without having to worry about the current.
Figure 1: Diver surfaces from his dive. In order to find the dive site the next time he takes a bearing to an object on shore. Note: This method does not allow the diver to measure distance to shore, so to find the site in the future the diver will have to enter the water and swim the reciprocal bearing.
Cross
Bearings:
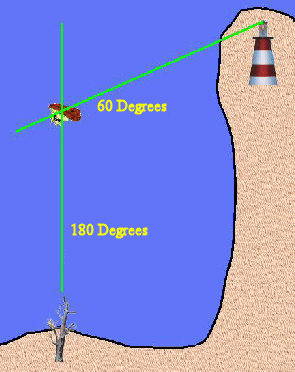
Figure 2: Cross bearings accurately identify the location of a site. Important
Note: Mapping From Shore: There are two types of maps usually made from shore - single bearing and cross bearing maps. Just like the maps you make from the water! The difference is that you must first mark the dive site so you can see it from shore - a marker buoy is the best way to do this. Once the dive site is marked you must then identify one or more landmarks you will be able to see from the water - a map based on landmarks a diver can't see is useless. For mapping form shore you want landmarks located close to the dive site - ideally you should be able to stand by the object and see the dive site. As such hill tops, or far away objects are not useful. Instead trees, signs, buildings, lampposts and other objects located immediately next to the dive site are preferred. To make your map go to your landmark(s) and take a bearing to the buoy marking the dive site. If designing a map with cross bearings go to your second site and take the bearing from there to your dive site. That's it - you now have a bearing, or cross bearings, to the dive site! Single
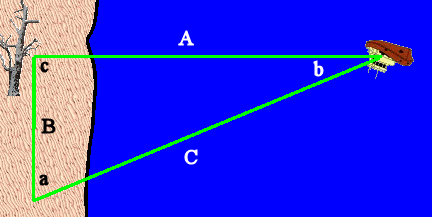
Bearing + Distance: The first step in this procedure is to take a single bearing to the dive site, as you would for a single bearing map. Once this is done take the bearing and add (or subtract) 90 degrees from it. Stretch out your rope on this new bearing. From the end of the rope measure the bearing to the dive site - it should be different then the original bearing. Ideally you want the new bearing to be at least 10 degrees different then the first bearing - if it is not you need a longer rope. Once you have the two bearings you have all you need to determine the distance to the dive site. Do you remember your high school trigonometry? I'm sure when you took that class you didn't think you would ever use that little bit of knowledge, but you will!!! Those measurements you've taken are enough to reproduce all of the sides and angles within a triangle. Now one of those sides happens to be the distance from you landmark to the dive site, which is all we are really interested in. Below is a picture of what we're doing. We know B (this is the length of the rope), as well as angle c (90 degrees). We can calculate the rest - although all we are interested in is A - the distance to the dive site.
Here's how it is done:
Here's and example: You attach a buoy to your favorite wreck and return to shore. From the weird dead tree in the dive sites' parking lot you measure a bearing to your buoy of 100 degrees. You then attach you 30m (100') rope to the tree and stretch it out at a bearing of 190 degrees (this is 90 degrees from your initial bearing). From the end of your rope you take a second bearing to your buoy - this time it is 85 degrees. Now we start calculating:
That's it - the dive site is located approximately 100m (330') from our landmark at a bearing of 100 degrees.
|
This Page, and all other pages in the http://www.geocities.com/k_o_dionysus/ directory copyright (2004), Bryan Heit & the Knights of Dionysus