Step 1: Show Size & Position Window
|
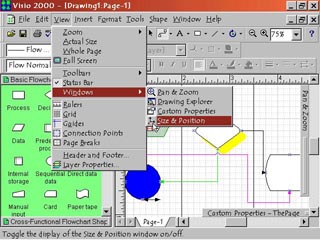
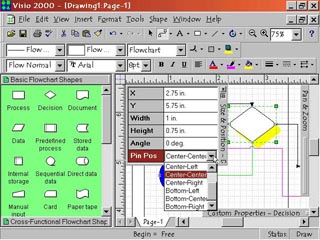
1. To display the Size & Position window, select View > Windows > Size & Position. The window will appear in the drawing workspace. To display in the window the size and position of any shape, simply select the shape. With the Size & Position window open, you can modify a shape's position, rotation and its Pin Position that defines where it is measured in relation to the rulers. |
Step 2: Pin Pos and Rotation Fields |
2. Pin Pos represents the ?pin position' of the shape. This point defines where the entire shape is measured from the rulers. By default this is in the center of the shape. To change the Pin Pos, select the Pin Pos field. A pop down menu arrow will appear, click it to access and select the Pin Position options. To change to angle of rotation of a shape, click in the Angle field, type in the desired angle of rotation. The object will rotate around its Pin Position. As if it had a pin stuck through it there. |
Step 3: Shape Position
|
3. The X field in the Size & Position window gives the horizontal ruler measurement of the selected shape's Pin Pos. The Y field gives the vertical ruler measurement of the Pin Pos. To change the position of the shape on the page click inside the X (horizontal) and or Y (vertical) fields. Then type in the position you want the shape to move to. This will place the shape's Pin Pos at the selected coordinates. |
Step 4: Shape Size |
4. A shape's size can also be measured or changed in the Size & Position window. The Height field gives a shape's overall height measured from its bottom edge. To change the shape's height, click in the Height field. Then type in the height desired. The Width field gives a shape's overall width from the left to right. To change the shape's width, click in the Width field. Then type in the width desired. |