Step 1: Displaying Grids |
1. To display a grid across the drawing page, select View > Grids. This displays a light blue grid of lines across the drawing page. The size of the grids can be adjusted and the grid can be fixed so it doesn't change apparent size when the drawing is zoomed. The grid can also be subdivided like the ruler. Grid subdivisions are scaled from the ruler unit size. |
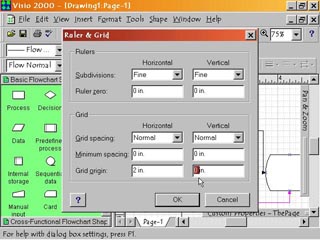
Step 2: Changing Subdivisions
|
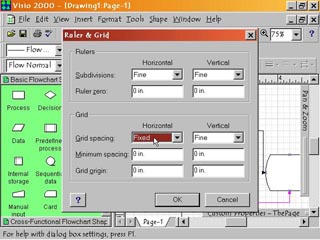
2. To change the scale the grid is subdivided into, select Tools > Ruler & Grid. This opens the Ruler & Grid dialog box. At the bottom is the Grid section, split into two columns, one for vertical settings, and another for horizontal. Click the pop down menu arrowhead in the Subdivisions fields to access the four choice menu. Select Fine for 1/8" subdivisions. Select Normal for 1/4" subdivisions. Select Coarse for 1/2" subdivisions. Select Fixed to set grid at a constant size no matter the page magnification. |
Step 3: Minimum Spacing and Origin
|
3. To set minimum grid spacing, select Tools > Ruler & Grid to open the Ruler & Grid dialog box. In the Grid section click inside the Minimum Spacing field. Type in the minimum size allowable. When the Grid Subdivisions field is set to Fixed, the Minimum Spacing sets the actual size the grid will remain at. By default the grid origin is at the bottom left corner. To change the grid origin click inside the Grid Origin field and type in the distance from the bottom and left desired for the origin. |
Step 4: Changing Grid Units |
4. Grid units are dependent on the ruler units. To change these, select File > Page Setup. In the Page Setup dialog box click the pop down menu arrowhead in the Measurement Units field. Select the measurement unit desired. Then click either Apply or OK to change the measurement units used by the rulers and the grids. |