A 44 Gallon Drum Forge.
Back to the main blacksmithing page
Background.
As mentioned on previous page I served my apprenticeship with the State rail Authorit of New South Wales (SRA of NSW). One of their requirements was that apprentices were transferred to a different workshop every 6 months so that they could gain a wider variety of work experiences.
At one of the workshops I was stationed at, the tradesman that I was working with (Len Richards) told me of a simple but effective forge that used a 44-gallon drum and a vacuum cleaner. At the time I thought nothing of it but recently I had the need for a small forge, so remembering what Len had told me I set out building one of these drum forges.
In its original form the forge was simply a drum filled with firebricks and and sand, with a steel tube that allowed the vacuum cleaner to be attached. It had no clinker breaker, ash release or hood. My forge is a little different, in that it has a clinker breaker, ash release and all steel fire pot.
The fire pot I used is an adaptation of one designed by Bill Franchini. Details for the fire pot can be found here, essentially mine is the same as Bills just shorter so it works with the drum.
Consruction Notes.
The entire forge is easy and cheap to construct with many of the parts being scrounged from the local recycling centre. The only parts that I had to buy new were the refractory bricks, these were only AU $1.56 each anyway. What you will need to build the forge:-
- A 44 gallon drum - You could probably get one of these for free from most factories etc. but I wouldn't pay more than AU$15.00 if I had to buy one.
- An old bed frame that is made from angle iron. Look for one with the legs still attached, they will be the feet for the forge - AU $6.00.
- 4 off 8mm thick plates (thicker if you can afford it) about 200mm square - AU $40.00. **
- 1 off 115mm square plates 8mm thick - AU $5.00. **
- A hinge - AU $1.50.
- Some M10 x 25mm bolts, nuts and spring washers - AU $1.50 if you need to buy them, but you should be able to salvage aenough from the bed frame.
- 1 piece of 100mm SHS 290mm long - AU $10.00 **
- 1 piece of 100mm pipe 300mm long - AU $10.00. **
- 2 pieces of 12mm round bar at 1000mm long - AU $5.00.
- 1 off 1500mm long 6mm round bar - AU $5.00.
- Something heavy to act as a counter weight for the ash trap - Cost depends on what you will use.
- A vacuum cleaner - Price will depend on condition but shouldn�t cost any more that say AU $20.00. I stole mine from my wife, but shhh don't tell her.
Basic hand tools is all that is required to construct the forge, however a stick welder and a 100mm angle grinder with both cutting and grinding disks will be needed.
- First of all, you must ensure that the drum is clean and does not contain any residue of its previous contents - particularly if it was thinners of some other flammable liquid.
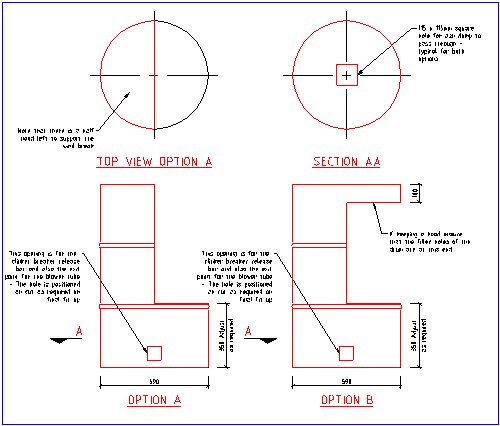
- Once you are satisfied that the drum is safe to work with mark out the area to be cut out as per drawing below. Note that at this point you have two options
- You can cut the drum in half having no hood only a wind break (as in option A)
- Or you can cut the drum so that it has a wind break and a hood (as in option B) Note that if you do this, your view of the fire will be obscured.
- Using an angle grinder with a cutting disk attached, cut the drum down as explained above. The hole shown in the side of the drum will have to be cut later when you are ready to install the fire pot assembly.
- Attach the legs you salvaged from the bed frame to the bottom of the drum with bolts, flattening then out a bit so that the follow the curve of the drum.
I have found that the bed of the fire should be about the same as the anvil, that way you don't really need to do any lifting when moving from fire to anvil.
- Install the fire pot and mark the correct positions for the blow pipe and ash release.
- Remove the firepot and cut out the hole(s) as required. At this point the fire pot can be re-installed and secured in position using some of the angle iron stock salvaged from the bed frame for support.
- Brick in the firepot ensuring that the fire bricks are a tight fit.
- Attach the vacuum cleaner, shovel in some coal/ coke and away you go.
Click here for the AutoCAD R14 file.
You might like to install a reostat or some kind of shut off cock for the air blast to aid with controling the fire.
As a point of interest I am currently working on simple hand cranked blower, this should prove to be much quieter than the vacuum cleaner and give greater control over the fire. I hope to publish it here once I have it sorted.
Click here
Home |
About Us |
Amateur Radio |
Bikes |
Blacksmithing |
Books |
Downloads
ICQ Me |
Site Info |
Links |
The Loaded Dog
Get your Free Email account here!
Sign Guestbook | View Guestbook
A web page is only as good as its weakest link. If you find a dead link please e-mail me at [email protected]
All information contained on these pages is copyright ©. Please ask the respective author if you want to reproduce anything.