Build a Fire Pot.
Back to the main blacksmithing page
Credits.
I am not the original designer of this firebox, I am told that it is fairly standard. I first saw it in Nova Scotia and merely sketched it on my pad with the intention of building one in the distant future. More credit should go to the members of this group who provided me with much needed dimensions and hints so, lets call it a community effort.
Comments.
Now that it is built and I have had the occasion of doing a couple of quickie welds (if there is such a thing!) I find that it works quite well and the clinker breaker saves a lot of time in cleaning the fire though it also drops a lot of coal down the tuyere. Perhaps I am not using it at the right time? Any suggestions out there?
The steep sides keep the pot very clean and the molten slag tends to drip into the ash trap without even having to use the clinker breaker. The result is almost no clinker at the bottom. An additional benefit of the steep sides is that the cavity caused by spent fuel almost refills itself by gravity, so I always have a bottom.
Welding heat is reached a lot faster with a slower blast and the fire stays quite clean so I am very happy! For instances where a shallower fire might be desirable (this is 7" deep) you may want to consider making a removable false bottom or a basket with a �" plate. This way the fire can be adjusted to your needs and, for smaller jobs, you will not use up as much fuel.
Construction Notes.
As you can see from the drawing below, the box is very simple. It consists of an inverted pyramid, 13" x 14" x 7" deep made of �" iron or very mild steel. If you have thicker stock it would be a bonus but not a necessity.
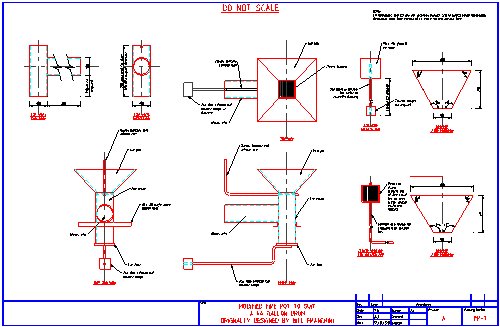
Click here for the AutoCAD R14 file
The tuyere should have been made with 4" pipe but, since I could not find any I used 18 gauge cold rolled plate instead. Making a square cross section was easier than making a round one so this is what I did!
The clinker breaker is made of �" square stock and �" round shaft then fitted into the two slots at the top of the tuyere. Then the whole contraption is welded to the bottom of the fire pot.
The trap door at the bottom must be carefully fitted so as to ensure a fairly airtight joint so as not to loose any pressure.
Installation.
I have a 4� x 4� loose brick table with a wooden frame, I merely welded a 4" lip around the top and dropped it into an opening in the brick surface. I don�t suggest mortaring it in place as you may want to remove it for maintenance reasons. The orientation of the air intake, clinker breaker and the bottom gate handle depends on the placement of your foge, so is the height of the tuyere.
If you have any questions feel free to write me. I haven�t worked it for very long but the results so far are extremely satisfactory and way better than my old conventional fire pot.
If you have problems with the file (I am a Mac user) I can send it to you in other formats including Photoshop.
Good Luck.
P.S. I welcome any suggestions and comments from old timers who have used this contraption before.
Bill Franchini
Argyle And BroadStreet
Click here
Home |
About Us |
Amateur Radio |
Bikes |
Blacksmithing |
Books |
Downloads
ICQ Me |
Site Info |
Links |
The Loaded Dog
Get your Free Email account here!
Sign Guestbook | View Guestbook
A web page is only as good as its weakest link. If you find a dead link please e-mail me at [email protected]
All information contained on these pages is copyright ©. Please ask the respective author if you want to reproduce anything.