"I Share For The Better"
Lesson 3: You Make Me Feel Like a Beauty Queen
-
Steps:
- Open Adobe Photoshop Cs 3 or any version will do such as Cs 3, Cs 4, Cs 5 or Cs 6.
- Create a new canvas. Go to the Application bar.You can see first the "File" button. Click the button file then there will be a pop-up menu.When the pop-up menu appears click the button "New".
- After clicking the button New, the customizing canvas will appear use 72pixels as your resolution and the size will be width="4" height="5". Name it as You Make Me Feel Like a Beauty Queen. Then click "OK".
- To open the images that you will need, again got to the Application bar then click the button file. When the pop-up menu appears click the button "Open".Open the neccessary image such as the finished Product and the original image.
Before and After Before
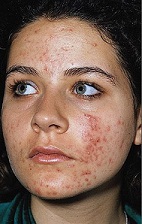
- Go to your new canvas then using the move tool, drag the original image of the woman from its canvas which she had pimple into your own canvas.
- To fit the "before" image into your canvas,use transform (Ctrl + T) to enlarge or decrease the size of the image or another way is to save the before image as your file (eg. Before_gen.png, pimples_gen.png) so that you will not need any transformations.
- Focus on your own canvas. In the toolbox you can see the healing brush tool click it the there will appear a pop-up menu then click the pattool. To use patch tool, you will need a source so that the source will be the one that will be copy and patch to the wrinkles of the old man. Alt + Click to the target source so that you can start cliking into the unwnted areas which are the pimples by the use of the healing brush tool (tip:click into the pimples detail by detail so that the healed pats are uniform. Don't use large size of brush to avoid different complexion unless the whole image have the same details)
- Use the dodge tool in order to softens and when the healed surface in order for the edited image to have uniform complexion.You may also use burn tool to make the face of the woman as a normal face since when you use the burn tool it creates a reddish complexion to the image.
- Save your work as Youmakemefeellikeabeautyqueen_(your name).psd. the you can also save it as a jpeg file or png file (eg.Youmakemefeellikeabeautyqueen_(your name).jpg,
Youmakemefeellikeabeautyqueen_(your name).png) - Congratulations now you have learn another use of Adobe Photoshop!
uction
(Peeled Sticker)
(Futuristic Grunge)
(T-shirt)
(Hair Color)