 |
 |
 |
 |
 |
| 2005 Progress # 9 |
| 11/29/05
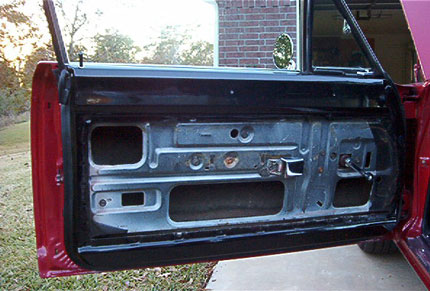
Fabricated a cover for the fresh air intake located on the passenger side of the car up under the dash. In the process a piece of razor blade thin aluminum being used to over the hole got loose and hit RHM, Jr. in the eye. Unfortunately, he wasn't wearing safety glasses so now he has a cut on his eye ball and a blood shot eye. It doesn't seem to have hurt his vision but it does point out the need to be careful and to wear protective gear. Determined it will be necessary replace either the window crank assembly or the entire regulator on the passenger door window after reading the service manual and examining the regulator assembly. The passenger door would not lock. While removing the window regulator RHM,Jr. elected correct the problem. Past repairs to the door had moved the door latch assembly about 1/16 of an inch higher than it should be. Doing this caused a rod that ran from the door handle push button to the door latch to be too long. The rod length caused the door latch mechanism to be partly engaged all the time. This prevented the push / pull door lock lever and the outside key operated lock from engaging the lock mechanism. Elongating one of the holes in the rod solved the problem. While the door was apart RHM, Jr. fixed another problem. When opening the door from the inside it sounded as if a file was being drug across a steel drum. RHM,Jr. found that the rod from the inside handle to the door latch mechanism was binding on a clip it passed through. |
| 11/30/05 - 12/1/05 - Trouble Shooting Door Regulator Issues Located and obtained a passenger door window regulator. The regulator was the part needed but was rusted and bent up because it came out of a wrecked car. RHM,Jr. removed the gear assembly from the regulator and installed it in the regulator from our car. The window rolled up and down fine but would not stay up. Removed the regulator from the door and the gear assembly from the regulator. Compared the old and new gear assemblies. Determined that the crank spine just obtained was not working correctly. Inside the housing for the gears is a spring. This spring connects to the crank spine assembly. The crank spine assembly consists of two parts. The part to which the crank attaches must be able to move freely inside the other piece. Doing so allows the part to which the crank attaches to rotate slightly. This rotation engages the spring mentioned earlier which in turn keeps the window mechanism from moving other than when the crank is turned. While trying to loosen the two pieces of the crank spine assembly RHM,Jr. managed to twist off the shaft that connects the two pieces. As a result he ended up reinstalling the old crank spine assembly until he could find a replacement. He then raced to the airport to pick up RHM,III, Shannon and RHM,IV. |
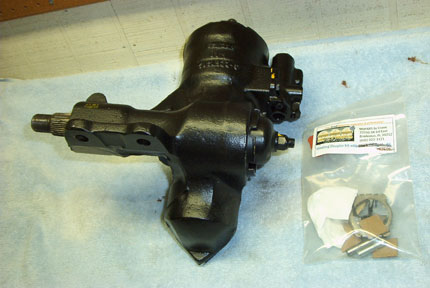
| 11/27/05 - Attempt to Replace Steering Box & Miscellaneous Repairs Project Notes: Delivered the car to a local garage to have steering box replaced. After looked at the Coronet Service Manual instructions then at the actual placement of the gear box the proprietor announced he couldn't do the work. The service manual calls for the driver side engine mount to be taken loose and the motor jacked up to remove the gear box. We could have done that but the headers on the car eat up all the room that would normally be available for removing the gear box. It appears the engine will have to be pulled to replace the gear box. That job has been put on hold while we investigate further. St |
| 12/2/05 - Window Regulator Salvaged in Parts Car RHM, Jr. and RHM,III returned to the locally located parts car to find another window regulator mechanism. We obtained the one from the passenger door plus the one in the rear passenger window. While there we also gather up a number of other parts we need or thought we may need to include a chrome ring insert for the door panel where the door lock lever exits the panel. Removed the gear assembly from the rear window regulator we had just acquired and installed it in the window regulator assembly from our car. Once the regulator was reinstalled the window worked perfectly. We are keeping the passenger door regulator as a spare. While re-installing the window regulator RHM,Jr. replaced the rod between the inside door handle and the latch assembly with one from the parts car. The one in our car had been bent when the door had been damaged earlier in its life. The door no longer makes a screeching sound when opened. |
 |
| Project Notes: * Reattached and adjusted the transmission step-down linkage. * Adjusted carburetor choke. It was pumping to much gas into the engine when the choke was operating (during startup). * We also found the fluid leaks we have been concerned about. The engine oil pan and the bottom pan on the transmission were leaking. We couldn't do anything for the engine oil pan but we did find loose nuts on the transmission pan. If and when we pull the motor we'll put a new gasket on the oil pan. The transmission gasket can be changed from under the car but it might not need to be changed since we tightened the loose bolts. * Reattached the first two letters in the DODGE name located on the rear of the car. RHMJr then hand polished the rear bumper. While the car was at Dennis�s shop a misting of white paint some how got on the rear bumper. It took a lot of elbow grease but I got it off. * Stripped paint from bottom piece of the trunk latch. It is now bare metal as we believe it was when it came from the factory. Will strip upper part of the trunk latch at a later time. Reinstalled the bottom latch and adjusted the entire mechanism. The trunk now locks shut much easier. * RHMJr tried to remove a broken screw from the driver�s side window crank mechanism by drilling out the center of the screw then using an "easy out" to remove the screw from the threaded stud. In the process he broke off the �easy out� tool in the hole he had drilled in the screw. The easy out is harder than the screw so it can not be drilled. Bottom line.... RHMJr. will need to find a new window crank assembly then disassemble the door and install it. |
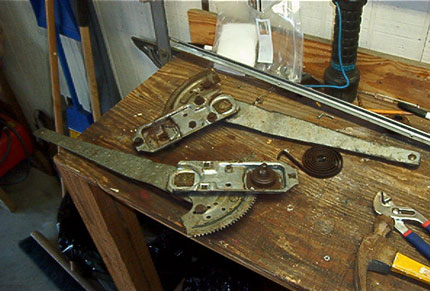 |
| The Salvaged Regulator |
 |
| To Be Installed Steering Gear Box |