 |
|
|
|
|
|
|
|
|
|
|
|
|
|
|
|
|
|
|
|
|
|
|
|
|
|
|
|
|
|
|
|
|
|
|
|
|
|
| <<BACK |
|
|
MPI w/ 2.2L TI Manifold |
|
|
|
| <<HOME>> |
|
|
|
|
| Vacuum Diagr |
|
|
|
|
This page will chronicle my personal procedure for making your *91* Daytona base model (ie 2.5L TBI) into an MPI vehicle. I have seen this done w/ later style 2-piece or one piece TII style manifolds, but as there were few of them around, i decided to try to use a much-more-plentiful 2.2L TI manifold, and get it to work. yes i know performance will not be as high as w/ a *standard* blow-through manifold, but concessions must be made, and new areas must be explored. Just call me Napoleon... |
|
|
|
| MPI wiring diag |
|
|
|
|
|
Throttle Body changes |
|
|
|
|
|
Page One |
|
|
|
|
|
|
Problem Number One - The Manifold |
|
|
|
This problem was a simple one to fix, as I knew the local yard man. He sold me a TI manifold w/ fuel rail, harness ends, injectors, and TB for $70. Not too bad a deal, but I would have liked to get it for cheaper... |
|
|
|
Problem Number Two - The Pre-op |
|
|
|
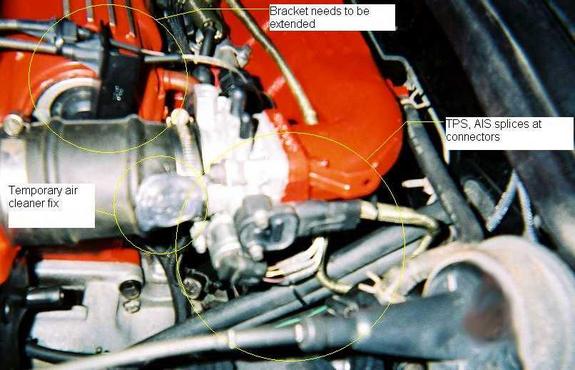
The next step was to answer myself one question. As i was doing this entire exercise to keep the price down, would i (1) keep the TB bolted to the intake as is, or use a "Baker Manifold design?" I couldn't for the life of me think of a piece of rubber hose that i could rework/even find that could connect the odd-angles created by the turbo-to-manifold and TB-to-turbo tubes of aluminum. I decided to go for the BAKER. I could use the actual Manifold design, and wouldn't need to worry about the Turbo/related components. Just a hose from the TB and a K&N filter orsomething on the end and it's thru. |
|
|
|
Problem Number Three - The Electrical Connections |
|
|
|
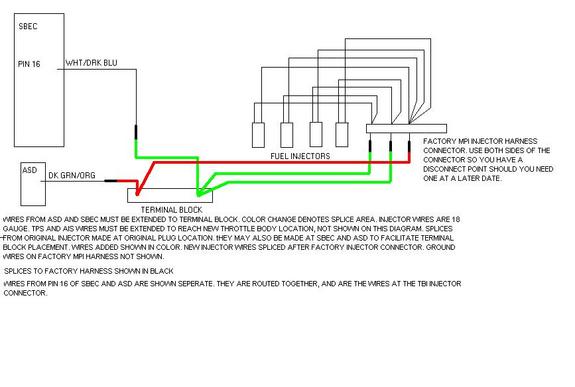
After i had the Baker created, i needed to find a plan on how to convert my 91 electronics and sensor connections/throttle cables to the OLD STYLE TI ones. Bob from the yard gave me all the connections i would need and related parts for replacement if they were bad, when i bought the manifold itself. Converting the AIS (two wire canister type) and TB throttle cable connections (slider type) to my 91-style (three-wire AIS and "slide-pin" throttle cable.)
The AIS is plugged and then bypassed w/ the throttle adjustment screw.
The TPS was rewired as follows: The dark wire from both the TI TPS and the carside were connected, Center wires together, and Lighter colored wires connected. I belive it turned out to be the opposite way that the TBI sensor was connected, IE locknotch was on the "bottom" instead of the "top."
The wiring of the injectors and related circuitry as explained on the BAKER Manifolds page, as 91-93 are similar, could be used on my vehicle without modification. The two wires from the original injector will be split at the terminal block and connected to the carside of the MPI-harness's injector-control wires. The wires on my harness were 2-GRN/YLW (for the Light-colored TBI-injector-wire, connect these three wires to the first stud on your terminal block.) Also, 1-WHT (injectors3/4 control wire) and 1-BRN (injectors1/2 control wire.) The WHT and BRN wires will be connected together at the second stud on the terminal block, together with the BLK/GRN wire to the TBI.
**NOTE: There are also a couple ground wires coming from the harness that i ran to a third stud on the terminal block. From there the ground strap that originally connected to the TBI intake was bolted to the fuel rail, and a smaller strap ran to the third stud on the terminal block. The harness's ground wires now ground to the body and the fuel rail. |
|
|
|
Problem Number Four - Throttle Cables |
|
|
|
My 91 has the newer style cables, with the metal canisters on the ends, that slide into the black plastic carrier on the TBI unit. The 2.2LTI uses the older "blade style" throttle cables, that slide onto the ends of the throttle cable carrier, and are held w/ a small clip. THESE WOULD OBVIOUSLY NOT CONNECT WITHOUT MODIFICATIONS. We pulled the carrier from the TI ThrottleBody, and the one from the TBI unit. When placed onto the TI carrier mount, it would be pulling the throttle closed farther when you mashed it to the floor, IE IT'S Backwards!
(1) We cut the plastic connecting the black plastic carrier to the metal bracketon the TBI carrier assembly,
(2) pulled the plastic piece off,
(3) flipped it over/reversed it (so the throttle cables pulled it the right direction,)
(4) JB welded it together,
(5) set the NEW carrier assembly in a position where it would fully open the throttle when you mashed it to the floor,
(6) and put the retainer nut back on, however it was rather loose, so as not to bind up the throttle.
This way we can now use the original cables/bracket (the bracket mount holes are the same!!)
Since we used a opposite-facing carrier, the Throttle stop screw no longer worked. We drilled and tapped an aluminum "tab" piece on the top of the ThrottleBody to hold a light gauge steel bracket w/ a long bolt/nut to act as a throttle stop. |
|
|
|
Problem Number Five - A Broken Piece? |
|
|
|
My Manifold, being from a junkyard, was not perfect... I had not expected a perfect manifold for the price, but i did realize that i needed a new vacuum tee from the top of the manifold, because mine broken Being as the yard man told me $70 for all the parts i neded, i went anad tried to get myself a different vacuum tee. All they had were broken. We found, at my friend's house, an 83 Ford Pickup, w/ a 300 |6, and a huge vacuum tower that had the exact same thread as my TI intake. Now threaded in, the vacuum tower operates my Fuel Pressure Regulator, Brake Booster, MAP sensor, and soon my emissions crap that i never removed! Some vacuum caps to cover the three open barbs, and all is well. |
|
|
|
Problem Number Six - The EGR |
|
|
|
Not a big one, but one to be dealt with. The old manifold had an EGR tube on the bottom, the new one doesn't. At the exhaust manifold (driver's side) there is a place where the tube connects. Remove the bolts and then the tube, but keep the little steel piece that held it in. Put a light guage steel, or thicker-aluminum plate in there w/ two bolt holes drilled, and put the plate back on w/ gasket sealer or another gasket. Exhaust leak fixed. |
|
|
|
Problem Number Seven - The Fuel System |
|
|
|
The factory fuel lines on 91+vehicles, consists of stainless lines up until the passenger strut tower, where they pressure clamp onto standard braided EFI/rubber hose, and then to more stianless-and-threaded connections up to the TBI/(FPR and rail on MPI vehicles.) We cut the fuel lines in the middle of the rubber section, installed a Fuel Filter on the Inlet side, and added fuel line to connect the input-to-rail and Rail-to-FPR-to-return lines. |
|
|
|
We have since put on a Late-TI or TII manifold, see the whole story HERE!! |
|