Most would not think of using the TBI computer until they read a section on Derek Beland's web site. It definitely makes sense. It would work like this. We use the pulse that originally fired the TBI injector to fire the 4 MPI injectors. Instead of firing each injector individually, they are all fired at once. This is what is known as "Batch Firing" the injectors. This is how most older systems worked. There are a couple trade-offs with this method. Idle quality might be slightly worse, but power production is pretty much the same.
Equipment
*The injector driver is very sensitive to total resistance in the injector. There are 2 types of injectors in use. Saturated, and Peak and Hold. A Saturated injector has in the range of 12-14 ohms resistance. Peak and Hold injectors run about 1-3 ohms resistance.*
- The first step in coming up with how to do this was to see what kind of injector the TBI has. The injector resistance checked right at 1 ohm, so we can use saturated injectors as a way to get around burning up the injector driver circuit by having too low of a resistance, with a resultant high current flow. The turbo, and V6 Chrysler injectors were quickly ruled out, they have 2 ohms resistance, which when set up in a parallel circuit would have resulted in only .5 ohms resistance, causing twice the amount of current flow, blowing the injector driver. Bosch style injectors are all pretty much interchangeable between car manufacturers, so this was in no means a roadblock.Grab a set of Ford 19 PPH injectors , as they check out at 13 ohms resistance. This is perfect for what we want to do. Connected in parallel, you end up with 3.25 ohms resistance for the injector circuit. This is higher than the original 1 ohm, which is OK. This will result in less current flow than before, allowing the injector driver to run cooler. These injectors are extremely easy to find at the junkyard. They were used in the 3.8L V6?s, and any of the fuelie 5.0's. The 5.0 engine is not just found in Mustangs, but also in everything from T-Birds to Crown Vic's, and Lincolns from 1986 and up. If you get lucky, and find a 4.6L V8, the injectors are the same. The 19 PPH injectors have an orange color band on them to make them easier to identify.*
- Finally, I checked the TPS, and AIS for compatibility. The AIS is specific to the throttle body that you will use. Your TBI unit will not work. The TPS sensor will also need to be changed. Use the one that is installed on the 3.3L V6's that have the 52mm throttle body. The ones installed on the 3.0L V6's, and turbo fours won't work. Other than that, all of the turbo MPI equipment is used. It is a bolt on, and I did it in a Saturday, albeit a long one.
Preparation
Get your parts, and clean them up before you start. Do not install crusty parts! Do not wait, and clean them as you go along, it will be much more frustrating that way. Put a list together and follow it. You will need:
The Intake Manifold - Some say the 87 TII unit is the best. My personal favorite is the 2.5 TI.
The fuel rail - 87 TII requires its same-year fuel rail, however any 88+ year manifold will work with any 88+ yr. fuel rail (exc. TIII either way.)
Fuel Injectors - Any saturated injector can be used, make sure it is a Bosch style, with 12-14 ohms resistance. The 4 cyl. Fords came with 14PPH injectors, use these if your engine is stock. Modified engines can use the 19 PPH units, or 24 PPH units if you can find them. You are not limited to Ford injectors, I used them because I have worked with them in the past, and know how to identify them.
Fuel Injector Wiring Harness - Get the one off the car you get the fuel rail from. Get BOTH sides of the connector; you do not want to cut the wires if you have to pull the harness after you install it for whatever reason. Make your splices onto the car side of the connector. This way you have a means to just pull the injector harness if necessary.
Throttle body - You have a couple choices here. You can keep the 46mm one that will be attached to your manifold. Next step up is the 52mm TB. This is easy to find, and will allow a little more air into the engine. Early Mini Van 3.0's had them, but they are hard to find. You will find them all day long on the 3.3L V6's found in the early 90's big FWD Chryslers. I got mine from a 91 New Yorker. There is also a 58mm TB out there. I am not sure this would be worth the effort. You will have to open up the inlet on the manifold to put the 52mm TB on, and I am not sure there will be enough material there to safely open it up big enough to put the 58mm one on there.
Note: You will need a different fuel pump if your car has the low pressure fuel system. Use the turbo part for your year. My 91 has the 39 PSI setup, it could probably be used as is with no problems. The low pressure systems were used until ~90, i think. It operates at 14.5 PSI, and will not be enough pressure for the MPI injectors.
- First is a new intake gasket. Get a TB gasket too. The exhaust manifold will be very easy to get off once you have the original intake off. You will need new fuel injector-to-manifold O-Rings, and fuel pressure regulator.
The regulator uses the same O-ring as the injectors do, so don't even try to have the parts store try to look it up, they will not have it listed, or they will tell you they have to special order it. Just get an extra fuel injector O-ring.
- You will need a 1' section of 1/4", and 5/16" fuel-injection-rated fuel hose. DO NOT USE REGULAR FUEL HOSE, IT WILL BURST, AND CAUSE A FIRE!
- Get correct size fuel injection hose clamps too, they are different from normal clamps.
- You will need to find an air cleaner. You can clamp a K&N cone filter right to the TB, but it is noisy, and sucks in HOT underhood-air! I suggest running a hose from the TB towards the radiator, and having the filter sit between the radiator fan and the battery tray. The best setup requires a relocated battery, and having the filter sit right in front of where the battery used to sit, next to the computer (ie. coolest air.)
- You will need an assortment of vacuum lines, and plastic/rubber vacuum caps/plugs. There are some connections that are not used, and you will want to replace all of the vacuum hose that is currently in there anyway.
- You will need about 20' of high quality 18 gauge wire, and 15' of 20 gauge wire to make your extensions, and injector harness. You will also need butt splices, and ring terminals. Get some "Round it" or factory-style plastic wiring coversto protect the wiring after it is run.
- You will need a terminal block. You can get one at Radio Shack, or just make one. You will need one with 2 terminals.
Installation
- Step one is to remove the negative lead from the battery.
- Step two is to remove the TBI/Intake Manifold. The intake can be removed w/ TB, but stuck head-to-intake bolts, etc... may make it difficult.
- Step three is to remove the exhaust manifold.
- Other than the EGR tube from the intake, it can all be removed from the top. You will probably have to use �" drive sockets, anything bigger than that will not fit into some of the spaces. You will need some extensions also, but it is not that bad.
Some of the exhaust manifold studs may try to come out when you wrench on the nuts, so be ready with a drain pan to catch the coolant. To get the exhaust manifold off, you will have to pull the power steering pump belt, remove the top adjustment bolt, and rotate the pump all the way towards the firewall.
Step five is to pull the intake/exhaust gasket, clean the mating surfaces, and reinstall the exhaust manifold with the new gasket.
- At this point, you will have to modify the EGR tube coming from the exhaust manifold. Unbolt the tube. You have 2 choices now. You can either (1)make a steel block-off plate, or (2)cut the tube, and close it off.
Step six - you can install the new intake manifold. It goes on much easier than the old one came off, you have plenty of room to just get you hand behind it and tighten the bolts. A word of caution: when you get your intake, get the bolts with it. The TBI manifold bolts are longer, and will not work. Use the torque specs from the manual when you tighten it up.
Step seven - Assemble your injectors and fuel rail. Install the retaining clips before you install the assembly onto the manifold. After you get this on, install the fuel pressure regulator, then the injector harness. Install the retaining clips on the harness before you connect the leads to the injectors, it will be almost impossible to install them at that point.
Step eight is to modify your existing fuel lines. It will be easier on early TBI cars, as they are connected with hoses and clamps already. Just connect the old hoses up. On newer models (ie pre-91,) you will have to cut the hard lines. After you get the lines cut, you need to add a flare at the end of them so the hoses cannot pop off. I used a brake line flaring tool, you do not have to make a full flare, just enough so a bulb is made at the end of the line. After this is done, connect the fuel lines.
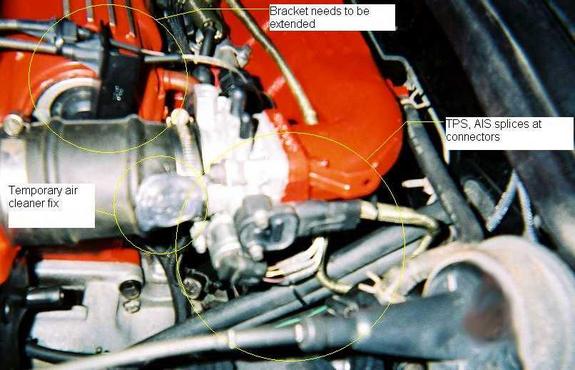
Step nine - You can do the wiring work next. Extend your TPS and AIS wiring. Cut the plugs off the current wiring, and install them to their new connectors. You will have to remove the alignment tab inside the connector of the TPS; just break it out. Make sure when you connect it, the lock tab on the outside lines up, and you will be OK. Cut your 20 gauge wires to length, and splice them in. You do not want the wires too tight, or with too much slack. Route the wires before you cut them to check for length, and cut them all at the same time.
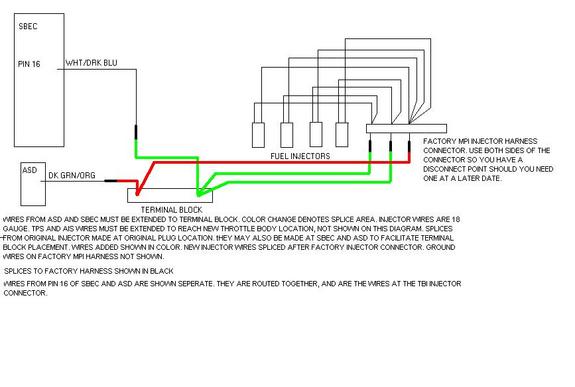
- Connect the injectors. You first have to determine where you are going to mount your terminal block. This will determine the wire length needed. It really doesn't matter where you put it, just somewhere accessible. Cut the connector from the original TBI injector lead. Extend these 2 wires to your terminal block using the 18 gauge wire, add ring terminals to the end of them, and connect them to 2 separate terminals on the block. Now, you need to extend the wires from the injector connector you cut off the donor car's harness to your terminal block. There are 5 leads coming from this connector. You do not have to extend the black leads, as they attach to the intake as ground wires. I have 3 terminals on my block, so I extended mine, and attach them to the terminal block on a stud not used by the injectors. This is a good grounding point for other things added later on, or to use during troubleshooting.
- Now, the green wire is the wire that connects to the ASD. Extend this wire to your terminal block, add the ring terminal, and connect it with the green wire with the orange tracer you extended there previously from the TBI injector lead.
- Next, you have 2 tan leads coming from the new connector, extend these to the block, add the ring terminals, and attach them with the white wire with the dark blue tracer you extended from the TBI injector lead earlier. It is a good idea to check all of your wiring, and positively ensure that all your connections are correct. Do not ass/u/me that they are all correct.
- Next, add the vacuum lines. Use the vacuum diagram for the 94 FFV cars. This is exactly how yours needs to be connected. (You will not have EGR lines however, as that system is now gone.)
- Now, test fire the engine. It may take just a little longer than normal to start the first time. The air will purge itself from the lines, and injectors, which is why it will take a little longer. You will hear a loud hissing noise as you rev it up, and close the throttle. This is probably the AIS, and should be normal. If it doesn't fire up, you should only need to recheck your connections.
- If all goes well, protect all of your wiring. I used Nomex "Round It" designed for aircraft. This is easy for me to come by, but you can get the original looking "Round It" at the parts store.
- The last step is the air cleaner. When using the old style TI Housing, if you use the original base, the TB and air cleaner outlet will not line up very well at all. You may have to ditch the base, and just attach it to the TB without any support. The hose outlet is also bigger than the TB inlet. You can cut a "V" section from the TB end, and clamp it on. If this method is used, be sure to seal up the cut area. A setup like an aftermarket K&N Cold-air-intake and filter-kit could be manufactured as well.
Problems Encountered
"I had a couple problems while installing all of this. My intake bolts came off pretty easily. I rebuilt my engine about a year ago, and used the correct torque putting it back together. The car my intake came off of was a different story. I broke two 10mm sockets trying to get the intake off. It looked like someone was in there before, and really cranked them in there. Hopefully yours will not be like this. Next, when I took my EGR tube off of the exhaust manifold, one of the bolts broke off. They have never been removed. Luckily, I had the tools to fix this on hand. Before you start, it would be a good idea to spray these with some penetrating oil everyday for about a week to make sure you don"t have this problem. Next, while flaring the 5/16" fuel line, the flaring die fell off the tube and slid down the passenger side motor mount, and into the timing cover. I had to pull both the upper and lower covers off, and fish it out. This added close to 2 hours to the project, as you have to pull the A/C compressor mount bracket to get the lower cover off. If something falls in there, YOU MUST GET IT OUT. It WILL damage the timing belt, and sprockets. Lesson learned: cover any openings you don"t want stuff in while working on your engine. This goes for any project, I have dropped screws down carburetors, and radiators forcing me to take apart stuff I really didn"t want to. If you get your injectors from the junkyard, have them tested before you install them. This does not cost very much to do, and you will be sure that they are going to work properly once installed. I need to alter the throttle cable bracket. To use the existing cables, it must mount about an inch further out from the throttle body. I will add a plate at the bottom edge to do this. If you don"t want to go this route, you can take the cable from the car you get the intake from. I do not want to go back out and find one at the junkyard however, and the addition of the plate will not be noticeable when you are finished.
Drivability
I have quite a bit more power now! This really helped get all the power available from all the work I performed when I rebuilt the engine. The bottom end is *slightly* softer, but the rush after the engine gets to 3000 RPM is incredible. Shifting at 5500 RPM now, I get a huge second gear scratch, and now the tires will chirp on the 2-3 shift also. There is still more power in there with my current setup. It will take a little while to get it tuned to make the most power, but it won"t be too hard.
This is an easy mod, IF you have experience working on cars. It is straight forward, and simple. There are steps that will cause inexperienced people to have problems. I have tried to spell it out as best I can, but I work on this type of thing everyday.
I have TOTAL cash outlay of maybe $150.00 into this, but I scrounge the junkyards regularly. It took an entire Saturday for me to put it together, but I would tell anyone to expect 2 full days to complete. This is after I had everything ready to install. I premade my wire runs, and bundled them into harnesses a couple days before I started. I made sure I had everything I needed on hand, so I didn"t have to make trips to the parts store. It all went pretty smoothly. Just make out the plan ahead of time, and try to think through any potential problem areas.The results are definitely worth your time