|
How to
Create Mouseover Navigation
We're
going to make some buttons at FlamingText.com
for our mouseover navigation graphics. Along with
these graphics, we'll use the Rollover Images Element
from the Elements Palette which makes this process
easy.
1)
First, go to FlamingText.com or to any graphics-making
website to make two buttons for each page. One button
will be for the "on" button and one button
will be for the "off" button. Or if you have
a graphics software program, make buttons with that. I
think with a graphics program you have more
flexibility, but you can still make reasonable
mouseover buttons online, too. If you make your own,
be sure it has either a transparent background or a
background that matches your webpage.
2)
At FlamingText.com, choose a button. If the button you
choose allows you to change the background color, then
use two different background colors for the
"on" and "off" buttons for each
page and keep the text color the same for both
buttons. If you choose a button where only the text
color can be changed, use two different text colors
for the "on" and "off" buttons. I
chose a button using two different text colors for
this demo as shown below:
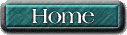
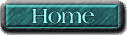
Off Button with White ---
On Button with Aqua
To
keep it simple, I used white for the "off" text
and aqua for the "on" text. Remember, you need
two buttons for each page of your website.
3)
After you create the first button and when you save the
button, make sure you type the name of the button and add
"on" or "off" to the name so you know
which is which AND type ".gif" or "jpg"
depending on what type of graphic it is. The reason why is
explained on my page
about saving graphics at FlamingText and CoolText. Do the
same for all of the buttons you make.
4)
Now open Sitebuilder and the page you want to start
putting the menu. In the Elements Palette select the
Rollover Images element from either the "Pictures
& Sound" section or the "Imported Files
& HTML" section.
5)
Select the Initial Image from your hard drive. This would
be the "off" button. Select the Rollover Image.
That would be the "on" button. Select the page
link where the navigation button will take your visitor.
If it's not an existing page, then type in the name of the
page you will create later. Then type in the Alt
text.
Click
OK and you're done with the first one. Continue with the
other page buttons until you're done. Note: for the page
you're working on, you don't have to make the mouseover
button because it'll only bring you back to the same page.
You can just put the "off" button on the page
with no link. But if you use the method I explain below to
streamline your putting mouseovers on the other pages, it
would make sense to do the mouseovers for all of the
pages.
|
How-tos Continued
6)
Now you can arrange the buttons in the order and shape you
want, lined up vertically or lined up horizontally. My
mouseover button for the "Home" page is
complete. Mouseover it! If you click on the button, it'll
just bring you back here, so go ahead. (Note: Since this
demo is created with FrontPage, I've used the standard
JavaScript for mouseovers/rollovers here. But the SB
element is the same thing, only easier!)
7)
Be sure to save and publish the page (you can publish
all of the pages at once later, if you wish - offline
Sitebuilder users only.) Rather than doing this
whole process of creating the mouseovers again on the
other pages, use the Edit - Copy Element command from
Sitebuilder's toolbar and Paste into the next page. This
saves a lot of time.
Button Alternatives
Another
cool alternative to graphical buttons like above are
simply text graphics using different colored text or text
of different sizes. You can do that at FlamingText.com as
well. Just use the same font for design consideration.
Make sure to use a fairly small font size like 14 points
or so. Test out the sizes several times until you come up
with something you can be happy with.
Other
Button Sources
JustKissMe.com.
You can take these buttons to GifWorks
to put the text on the buttons or use your own paint or
graphics program. Make sure the button you choose is in a
.gif format not .jpg for this resource. Otherwise, go to MyImager.com
for adding text to buttons in either .gif or .jpg formats.
Still
more buttons from ProDraw
Graphics.
They also have some 3D graphics that you can use on your
webpages.
|