Before we start I think that I need to make it clear that you can put your dark and light "sills" in any position and on any side of your "window" fabric. You don't have to make them only this way! |
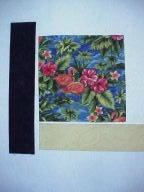
Cut your square for the center whatever size you want
it to be.
Determine how wide you want your strips to be. For the length to cut your strips: Add the length of the center block plus the width of the strips, plus add 1.5 inches or more for extra measure. For example... if your block is 8 inches, and your strips are cut 3 inches wide, (finish 2.5) that is 11 inches... then add some extra... say 1.5" to 2"... so your strips will be 12.5 - 13" inches long. Trust me, add the extra! |
 |
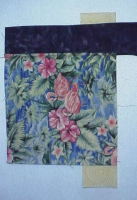
Flip the center block over onto the dark strip.
You gave yourself extra length in the strip, so use it to overlap at the top edge too. You can then trim it off even later. The bottom edge has to extend at least the width of your strips. |
 |
Start sewing at the top edge all the way to the bottom.
Yes, I know most instructions will tell you to stop 1/4" away, but I like this way because it helps you line up the next stitching line. (If you are mitering four corners you do it a little different and the directions for mitering all four corners will follow.) |
 |
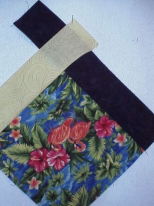
Place the light strip under the dark one, making sure
that the light strip sticks out a little beyond the dark one at the top.
This assures that you have enough fabric for your miter.
Line up the right edges. If you cut your strips longer like recommended you will also have some sticking out at the bottom. |
 |
Now here is where that stitching to the first edge comes
in handy.
Push the seam allowance UP. Now you will start to sew the seam 1/4" in from the right side EXACTLY where the stitching is. I do this by setting my stitch length to zero and taking several stitches in one place. Then slowly increase the stitch length while sewing till it is normal. Or you could just take one backstitch, whatever you are comfortable with. |
 |
Start to sew 1/4" inch from the right side and put the
needle into the fabric exactly at the stitching from the dark strip.
Sew to the end for the attic windows. (PS: If you are mitering all four sides instead of just two you will do this a little differently, and that lesson will follow as mitered quilts borders.) |
 |
Now press the seams toward the strips. They will overlap and should extend beyond each other. |
 ... ... |
Place the strip on top that you DIDN'T sew all the way to the edge
on. This will be the light one for this attic window.
Fold the light strip under and line up the edge with the dark strip. This is why you want extra fabric in the length. Press the crease. This is your 45 degree angle. |
 |
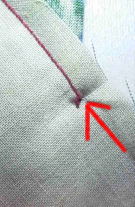
Fold the block on the diagonal and smooth out the strips
so they lay flat. (See next photo if you are not sure how to
do this)
You want to be sure that the under and top seams of the strips are pointing toward the block. Squiggle in the point area with your finger to make sure the fabrics are snug in the corner and one seam isn't higher than the other. Pull it, tug it, squiggle it... make it snug. This is probably the most critical step for a good miter!! You can see the crease. That crease is your sewing line. |
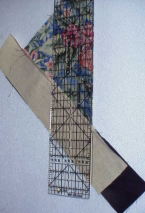 |
An alternate way to make the 45 degree seam line is
to fold your block on the diagonal and line up a ruler with the diagonal
fold and extend the ruler into the strips. Draw your sewing line
with a very sharp pencil as close to the ruler as you can get it.
That will be your seam line. |
 |
You want to start sewing exactly where the stitching
ends and follow your crease or pencil line on the 45 degree crease or pencil
line.
You want to be sure that the under and top seams are pointing ** away ** from the strips. Squiggle in the point area with your finger to make sure the fabrics are snug in the corner and one isn't higher than the other. |
 |
You want the strip on TOP that you * did not * sew all
the way to the end on. If you have the seam on top that you sewed all the
way to the end on, you will starting to sew too far over. If you
followed these steps in the order here, you want the light strip on top!
As before, put your needle down into the fabric exactly where the stitching from sewing on the strips ends. Take several stitches on zero stitch length, then increase the stitch length as you sew until it is normal. You can take one back stitch but I always seem to stitch into the strips and you DO NOT want to stitch into the seam allowance of the strips. Your miter will be goofed up if you do. Sew to the outside edge of the strips on the 45 degree angle made by the crease or pencil line. |
 |
Trim seam 1/4" away from the stitching. |
 |
Press the seams toward the strips and press the miter in one direction
or open, which ever you prefer.
Square up and trim your block. Now, just try to tell me that is hard to do! Hugh, hard or easy??? |
 |
And through the magic of computer art, I can turn one
little finished block into a whole quilt...
Miters are easy as can can be... do not be afraid... do not be afraid!!! |
| Want to know how I made the "quilt"? I opened a new WWW page and picked the single quilt block above, tiled it for my "background" and then took a "screen shot" using a graphic program. It tiled it like a quilt. You could do the same by right clicking in windows on the single block graphic and in the drop down menu, click, "set as wallpaper". Set it to "tile" and you will have quilted wallpaper for your widows desktop! |  How
about a rectangle block instead of a square... easy to do, just cut center
square to a rectangle and adjust the side and bottom strip lengths. How
about a rectangle block instead of a square... easy to do, just cut center
square to a rectangle and adjust the side and bottom strip lengths.
Now, go and miter some attic window blocks... don't tell me you "can't"... I don't even want to hear it... |
| Perspective attic windows from Compuquilt. |