| Basic, Simple Pants Tutorial | ||||||||||||||||||||||||||||||||||
| These are basic basic basic pants. Lounge pants. you may want to make them tighter, or looser. The measurements are just a guide, not an exact science. this is just the basic pants shape. | ||||||||||||||||||||||||||||||||||
![]() |
||||||||||||||||||||||||||||||||||
| First things first, you gotta measure yourself. 
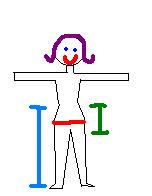
1. Measure around the fullest part of your butt for your HIP measurement. 2. Measure from your waist to the floor for your OUTSEAM 3. Measure from your waist to your crotch (or start tape at your belly button, run it down your belly, thru your legs, and up around to your waist on the back side of you and have someone tell you that measurement, then divide by 2) for your RISE. |
||||||||||||||||||||||||||||||||||
![]() |
||||||||||||||||||||||||||||||||||
| Now you use your measurements to draw out your basic pant shape. 
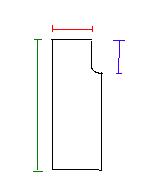
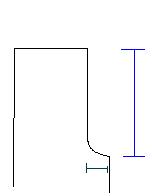
1. HIP--take the measurement you took before and divide it by 4. That is the absolute smallest you can make the pants and have them fit. These are not designed to be tight pants, however, so you will: a) take the hip measurement b) add 6 inches to it c) divide it by 4 d) use that number as your waist/hip measurement, or the RED line on the pic to the left. (example--my hip measurement is 38, so i add 6 inches, make it 44 inches, divide by 4, and get 11 inches for the waist measurement (red line on the pants pattern) 2. OUTSEAM--this is the length the side of the pants (green line), with no allowance for hem or waist band. so to the outseam measurement, add 3 inches at the top, 3 inches at the bottom. 3. RISE--this is the tougher part. Your rise measurement is the absolute least you can allow for in your seat to be comfortable, you should add at least 3 inches to this measurement, more if you want MC Hammer pants. So take the rise measurement, add 3, for ease. Then add 3 more for the waistband. Use this measurement for the length on the blue (vertical) line at left. The curve at the bottom of the crotch is not any particular curve, just make the part that will go between your legs about 3 inches wide. |
||||||||||||||||||||||||||||||||||
![]() |
||||||||||||||||||||||||||||||||||
| Now, you want to cut 4 of this shape. Two fronts, and two backs. so fold your fabric right sides together, and cut one set, then cut another set. then you will have 4. | ||||||||||||||||||||||||||||||||||
![]() |
||||||||||||||||||||||||||||||||||
| Take the two fronts (like 2 and 3 on the pic at left) and put them right side together, and sew along the curved crotch seam. use a 1/2 inch seam allowance. 
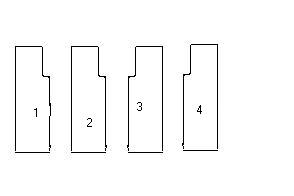
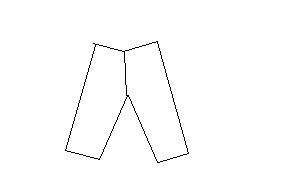
then do the same thing for the two backs (shapes 1 and 4). right sides together, sew around curved crotch seam. |
||||||||||||||||||||||||||||||||||
![]() |
||||||||||||||||||||||||||||||||||
| Then you should have a front and a back piece that basically look like the pic at the left. next place the front and the back right sides together, and starting at the inside crotch seam, sew the inner legs together. then sew up both sides. | ||||||||||||||||||||||||||||||||||
| And you got yourself some pants!!!! | ||||||||||||||||||||||||||||||||||
| You can hem the legs, or cuff them. or burn them. not my concern. For the waist, fold down about 2 inches, stitch about 1.5 inches down, leave a hole at the front and you can either put elastic in or a drawstring. or open up the crotch seam, put in a zipper, and make darts or pleats to take in the waist. | ||||||||||||||||||||||||||||||||||
| any questions, email at [email protected] | ||||||||||||||||||||||||||||||||||
| basic fabric purse | ||||||||||||||||||||||||||||||||||
| home | ||||||||||||||||||||||||||||||||||
| tshirt to hoodie | ||||||||||||||||||||||||||||||||||