IDE interface - IDE Interface circuit
 Introduction | Register selection | IDE interface | Commands |

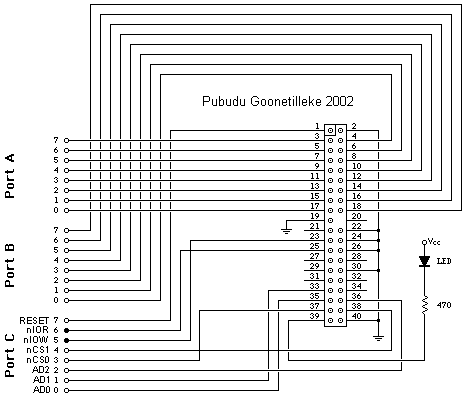
This is a very simple interface. PORT A & PORT B are bi-directional and PORT C is unidirectional. PORT A and PORT B are used to send data and commands while PORT C is used to send the control signals to the hard disk. See the pin outs for PORT C connections. LED shows the hard disk activity.

I will put the interface circuitry that I have implemented for the PC parallel port later since I don't have it at the moment.

Before connecting your interface to the IDE cable, make sure that your circuit is exactly as above and no short circuit connections. Otherwise your hard disk may get damaged.......!. Use a computer power supply to power up your hard disk, so you don't have to worry about the current ratings......!.

Power up your interface and write 255 (8-bit bus) to PORT C (all pins are at logic 1). Make sure that nIOR , nIOW ,CS0 ,CS1 and nRESET pins should be at logic 1 always at the beginning.

Switch on the hard disk and see the LED on the interface circuitry that you have built. If it lits (disk busy) for several seconds, your first attempt is succesfull. After few seconds it should off. This means the Hard disk interface is ready to accept commands. (not all the time).

OK, we will first try out the simple command 'Spin down hard disk'.. With my experience, this is the first command that should be used to test the hard disk activity and its interface circuitry. This is a very simple command since it does not have additional parameters.

The procedure to send the 'Spin down Command'.

1. First RESET the hard disk by writing logic 0 to pin 1 on the hard disk.

          PORT C = 0b11111XXX - (msb . .. . . lsb)
          PORT C = 0b01111XXX - Resets


 nRESET = 0 ; nIOR = 1 ; nIOW = 1 ; nCS1 = 1 ; nCS0 ; AD2 = X ; AD1 = X ; AD0 = X.

          PORT C = 0b11111XXX - Should be at logic 1 again.

    LED should lit and go after few seconds. (some times instantly).
    Anyway wait until the LED goes.

2. Now select the command register by writing the correct values to PORT C.

          PORT C = 0b11101111 - Command register. - See register selection table.


          nRESET = 1 ; nIOR = 1 ; nIOW = 1 ; nCS1 = 0 ; nCS0 = 1 ; AD2 = 1 ; AD1 = 1 ; AD0 = 1.

          LED should remain at off. If it lits, check the nRESET pin. Make sure nRESET pin never get 0 pulses at
          any time without writing any value to that bit. (bit 7).

3. Now write the command code (E0 h- Spin down hard disk) to PORT A. (low order byte).
    I will give you the command set later but at the moment use it ....

          PORT A = 0b11100000 (E0 h)

4. Now write that command to the Command register by using nIOW.

          PORT A = 0b11100000 (E0 h) - Current value on the Data bus.
          PORT C = 0b11101111 - Current value on PORT C.


 nRESET = 0 ; nIOR = 1 ; nIOW = 0 ; nCS1 = 1 ; nCS0 ; AD2 = X ; AD1 = X ; AD0 = X.

          PORT C = 0b11001111 - make nIOW pin low - Command will be written to the command register.
          Make sure that the selected register values are in order. (command register)

    
     PORT C = 0b11101111 - Put nIOW again at logic 1.  

5. This completes the command. Ass soon as the command is written to the command register (at step 5)
     the hard disk should spin down the disks. You should here a sound clearly. Modern hard disks have a
     good 'tic' sound when parking the heads.

So if you here that, its all about the hard disk interface controlling. This means that you hard disk interface  is correct. I said that, this is the first instruction that you should use because you can see and feel its activity     but not easily in other cases.

So isn't it really fun ..... ?.
    
So would you like to Spin up the hard disk right now ?. You must want that !.

So follow the same instructions as above except step 1. Here you should use 'Spin up hard disk command'
E1 h instead of E0. Try it and play around it.

How ever hard disk is for data storing. So reading and writing data is not that much simple as this. But, still it is not hard as well since it involves couple of register activities instead of one in the previous case.

Now I will give you other commands that you can use with this interface. This list shows you most frequently used commands and not all the commands. You can read the complete documentation for that.
 

Next  > >


18th January 2003 - Pubudu Goonetilleke

  Home | Science & Research


Hosted by www.Geocities.ws

1