| continued from page 1...... |
| And so it began. I paid nearly the asking price for my new Z, and the owner said what almost turned into a tearful goodbye to a sports car he had owned and enjoyed for going on 27 years. (The original owner had actually turned down previous offers on the car from people who told him up front they only wanted the car for daily transportation. When I told him I wanted to restore his Z, he finally felt like he could let her go. I promised him I would keep him updated on the car's progress and send pictures whenever possible. This is the kind of power these cars have. If you've never owned one, you probably can't understand it.) Although I had promised my wife I would drive the car for a year or so before beginning the restoration, it was only three months before my new toy was parked in the garage and undergoing a four month long disassembly. Oh, yeah, I almost forgot the "if only I had known part"... If only I had known how much this restoration was going to cost, how much time it would eat up, how many aggravating nights I would spend cussing and swearing in my garage into the wee hours of the morn', and how many problems I would run across at every stage of the job, I probably would have saved my pennies and purchased someone else's restored Z. Nah, not really. |
| Enough story-telling... let's talk about restoring Z's! |
| Disassembly |
| Pages HOME Disassembly Body Brakes Underbody Suspension Engine Driveline Interior Modifications Z-related links & resources |
 |
 |
 |
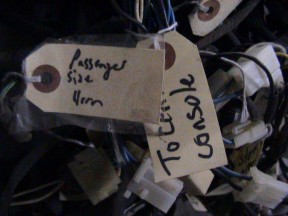 |
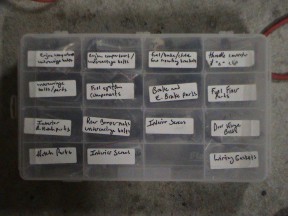
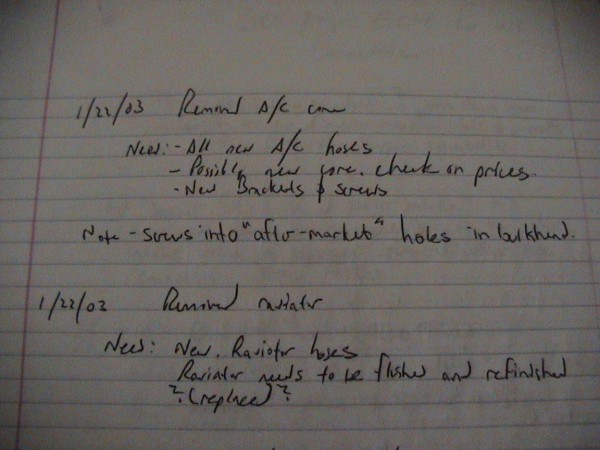
| The disassembly process I used for this car is the direct result of my previous experience with taking a car apart. That past experience was a disaster, to be kind. And I was determined to prevent a repeat.. For starters, before I turned the first wrench on this vehicle, I went to the local Wal-Mart and purchased a Mead notebook for use as my disassembly log. Then, each and every time I removed a part from this vehicle, I logged it in the book. Looking back, this tedious and seemingly ridiculous process will probably save my butt on re-assembly. I made dozens of notes on how certain assemblies fit, where strange bolts went, and how an odd looking piece attached to another equally unidentifiable part. Because there's no way I'll be able to count on my memory when putting this car back together over the next several years, the log will prove invaluable I'm sure. I also made sure that I purchased several parts storage bins prior to beginning disassembly. Each and every bolt, screw and nut from this car is contained in plastic bins like the one to the right of this text. In addition, each piece is contained in its own tiny ziploc bag which is labeled with the exact location or part from which the nut/screw/bolt came from. In other words, a ziploc bag may say "heater controls" on it, and that ziploc bag would be placed in the plastic box under the label "dashboard". Using this system, I "SHOULD" be able to find and replace every piece that came off of this car. And finally, I labeled each and every connection on the car as I was disassembling her. I know with absolute certainty that the hundreds of electrical connections on this car would be lost forever if I hadn't labled them. As it is, I "SHOULD" be able to simply plug the connections into the part with little or no guess work. In short, no matter what system you use for disassembly, just make sure you have one... and be thorough! A little time spent here will save a ton of time down the road. |