 |
| page 3 |
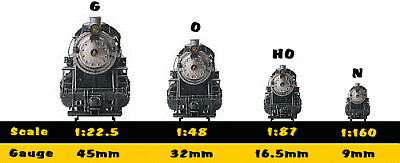
| Here's how to build a HO scale layout in 5 minutes! Not really, but if you want to get up and running reasonably quickly, and don't consider yourself an artist or craftsman, here's something you can do easily. Only rule: this is YOUR layout! Don't copy mine (this one wasn't 'all that' anyway!), and don't try for perfection. Nature isn't perfect. When it comes to scenery, you dont have to be either! This layout does show that simple, basic, and a personal touch can look good, and be fun! Stay tuned, my next layout is starting soon, and it's either going to be N scale, HO scale, or O scale, 30" narrow gauge, or On30. I'm getting closer to a decision. Problem is, I have quite a collection of all three, feeding my indecision! Once I know what size area I'm dealing with for sure, then I'll know. At any rate, I'm not going to, and you shouldn't, do it alone. Get a buddy or even your spouse involved! You can even let the kids play along, and promote the hobby for future generations! Have fun, It's a hobby!!! |
| Most people start with a 4'X8' layout. It's convienient. It's how plywood is mainly sold. Some lumberyards are now selling 4'X9' sheets for some more room. Build a light frame under it with 1X4's, and use 2X2's for legs. Common table heights are 35" to 45", again, whatever your comfortable with. Once the table is set up. lay your track on it in whatever configuration you want. You may want to run two separate loops of track to run two independent trains. I could go into blocks and DCC (Digital Command Control), but if this is your first, or just don't want to be bothered... Just keep it simple, and grow into the more complex systems. You'll thank yourself later! For easy inspiration, go to your nearest hobby shop. Talk to the people there. Almost all the people who work in a hobby shop aren't there purely for the paycheck. They love the the hobby, and are a valuable resource to get started with! Best of all, you can get quality items there, not the toy-like toy store stuff. Starting with quality equipment will ensure that the layout won't be hindered by frustrating derailments, stalls, and the other gremlins which kill the joy and the hobby itself for most newcomers. "Pay now, or pay later!" If you need a track plan, Atlas, Model Railroader magazine, and a wealth of other books and videos can give you plenty of ideas. You should subscribe to Model Railroader. It inspires monthly! |
 |
 |
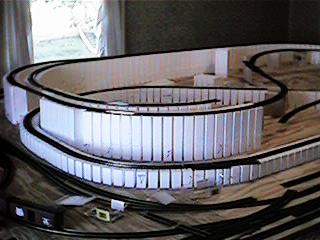
| Below is the first step to turning tracks-on-a-table into a layout! Most hobby shops sell Woodland Scenics products. Shown below is their riser system. Especially good if you're doing this in an apartment, where they might not appreciate constant sawing of wood, or anywhere for that matter. It's an easy way to get track up, down, and over. And, since you're maintaining the plywood's integrity, it's easier to move, if necessary. |
 |
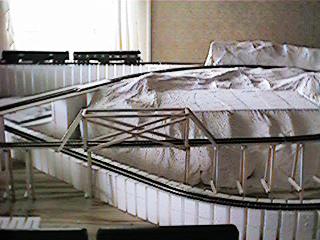 |
| When that's done, and you're happy with it (you gotta run some trains around it just to make sure!), then you can start building the scenery. Scenery scares alot of people, but it's suprisingly simple. Now that your track is set, take a big wad of paper (any kind), and place it where you want hills or mountains (as high as you want). Remember to leave flat areas for buildings and roads. You may also want to remove some sections of risers and replace them with bridges (see pictures). When all that is set, remove all the track (you didn't nail it down yet, did you?). Then the fun begins. make a wet plaster solution in a large bucket. The solution should be soupy. Then, dip paper towels in the soup and drape them over everything, making sure the track surfaces and roads and such are flat and smooth (your hand works well). After the paper towels start to dry (abt. 20 min.), put more soaked paper towels in areas around the edges to reinforce (people WILL poke it when done!) |
 |
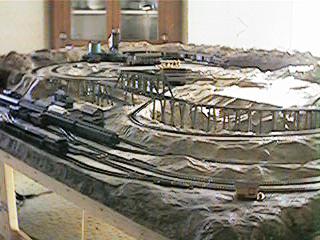 |
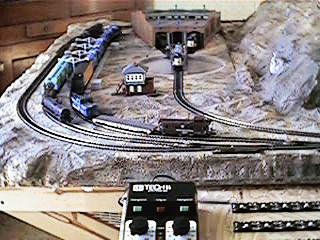
| After you have a terrain you find acceptable, (and nothing is permanent, you can modify anytime) you can start coloring. Woodland Scenics makes water-soluable dyes that you can spray right on the plaster, and works well. Look right out your window, or at pictures to determine the coloring. You can even brush on latex interior house paint, alot of model railroaders do! (there's certainly enough color choices.) As a guidepoint, use earth-tones for areas representing dirt, with a little red mixed in if you want clay. You should really use the watered-down color in a spray bottle to color rocks. Start with diluted black spray. It will find low spots to represent shadow. then, a less diluted spray of gray with yellow mixed in. It may sound odd, but it works! Most important, use flat colors only! No gloss. |
| We'll get this thing looking like a layout! |

|
 |
| I swear in the near future, I'll be starting my new layout. Space restrictions aren't the problem they once were, but indecisiveness on scale still haunts me, I haven't started just yet. I will post progress for the world to see! |
 |
 |
 |
 |
| Model RR decals, advice, great information. I recommend this site! |
| click here |
 |
 |
| Everyone needs to get behind this one! |
| Lionel pics and stuff |
| The HO scale Layout |
| Or go back to the history of the hobby. |
| Train, plane, and car links! |
| A rare and special Lionel set! |