Styrofoam Incubator
The
following paragraphs and illustrations are designed to guide
the reader through the construction of a small, inexpensive
incubator made from a styrofoam ice chest. A minimum number
of hand tools are required and include a sharp knife,
screwdriver, metal shears, and a pair of pliers. Gather all
equipment and supplies listed below together before starting
construction. The construction should take no longer than
about two hours.
List of Materials
Styrofoam ice chest (12-16" x 20-24" x 12"-15")
Heating cable
Micro-switch assembly (thermostat)
Glass (approx. 10"x14")
¼" welded wire - hardware cloth (24"x36")
Cake tin (9"x14"x1½")
Thermometer
Masking tape
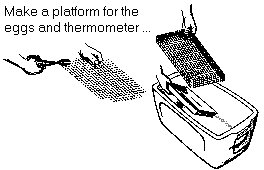
Begin
construction on the platform for the eggs. Cut the welded
wire or hardware cloth so it is six inches wider than the
inside bottom of the ice chest. Cut a three-inch square from
each corner and bend the projecting pieces at right angles
to form legs for the platform. Remove any rough edges and
cover the cut edges with tape. Install the cake pan and the
platform in the bottom of the chest. (Step
1)

Then
install the heating element and micro-switch assembly.
Protect the styrofoam sides from the heating element by
placing masking tape or similar material around the interior
of the chest. Place one strip of tape 2½-inches from
the top. One strip is located one inch above the platform,
and another strip is placed midway between the top and
bottom strips.
Position
the micro-switch assembly on one of the end walls so the
center hole is about five inches below the top of the chest.
With a pencil or other sharp pointed tool, make three holes
in the chest for the temperature control bolt and two
mounting bolts. Mount the switch by inserting the mounting
bolt, add the washers, and tighten the nuts until the unit
is firmly attached (Step 2). Insert the heating cable
plug and the pilot light into the switch assembly before
plugging in the lead cord. Check the unit to see if the
pilot light glows and the heating cable warms up when the
switch is activated. Both should be off when the switch is
turned off. After checking the unit, remove the lead cord
from the electrical outlet.
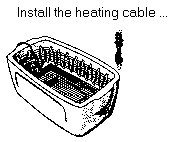
Fasten
the midpoint of the cable to the top strip of tape at the
opposite end of the chest. Using tape, fasten the remainder
of the cable to the top and bottom strips of tape
alternately while forming serpentine loops (Step 3).
The cable does not need to be fastened to the middle strip
of tape. The heating element can also be attached to the
sides of the ice chest using loops of heat-resistant
strapping that raises the cable away from the styrofoam
surface. The attachment loops can be fastened using small
bolts with washers that extend through the ice chest. Do not
allow the cable loops to touch each other.
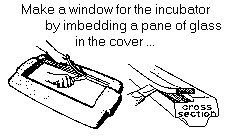
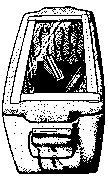
A
window may be installed in the lid of the chest so you can
see the eggs and chicks as they hatch. Center the piece of
glass on the top of the lid and trace its outline with a
marker. Remove the glass and draw a smaller rectangle inside
the first with all sides parallel and 3/4 inch inside the
traced glass rectangle. With a sharp knife, cleanly cut out
the smaller rectangle and discard it. Then carefully cut
around the outline of the glass on top of the lid to a depth
of only one-fourth inch. Do not cut through the
top.
On the
cut edge made when the rectangle was removed, mark a line ¼-inch
from the top of the lid. With a sharp knife or razor, cut
along the line until it meets with the cut made earlier. The
strip should lift out easily to form a recessed ridge around
the rectangular hole (Step 4). Place the glass in the
recessed area and secure it with tape.
Proper
ventilation is provided by sixteen ¼-inch holes in the
sides of the chest. Make the holes with a pencil or other
sharp instrument. On each of the large sides of the chest,
make a row of four holes two-inches from the bottom, and
another row of four holes located three-inches from the top.
The holes in each row should be four-inches
apart.
Test
the incubator by placing a shallow layer of warm water
(100oF.) in the pan. Place the thermometer on the
wire platform, put the lid on the chest, and plug in the
lead cord. Turn the temperature control bolt until the pilot
light goes on. Frequently readjust the control bolt until
the desired temperature is reached. The pilot light and
heating cable should shut off. Allow the unit to operate
several hours before placing the eggs in it. This allows
time to see how well the unit maintains a constant
temperature.