![]() |
||||||||||||||||||||||||||||||||||||||||||||||||||||||||||||||
![]() |
||||||||||||||||||||||||||||||||||||||||||||||||||||||||||||||
![]() |
||||||||||||||||||||||||||||||||||||||||||||||||||||||||||||||
| BASIC NEEDLE TATTING Copyright Oct. 2000 THE SPLIT RING and SPLIT CHAIN |
||||||||||||||||||||||||||||||||||||||||||||||||||||||||||||||
| PART 3 THE SPLIT RING and SPLIT CHAIN | ||||||||||||||||||||||||||||||||||||||||||||||||||||||||||||||
| ABBREV: RING-----------R CHAIN---------CH DOUBLE STITCH---------DS PICOT---------------P or " - " JOIN--------------- J or " + " SPLIT RING......./ CLOSE RING------CL R REPEAT FROM * TO ** |
||||||||||||||||||||||||||||||||||||||||||||||||||||||||||||||
| Pattern | ||||||||||||||||||||||||||||||||||||||||||||||||||||||||||||||
| ring: 5 - 5 / 5 - 5 cl ch: * 3 - 3 - 3 ring: 5 + 5 - 5 - 5 cl r ** |
||||||||||||||||||||||||||||||||||||||||||||||||||||||||||||||
| Instructions | ||||||||||||||||||||||||||||||||||||||||||||||||||||||||||||||
| THE SPLIT RING | ||||||||||||||||||||||||||||||||||||||||||||||||||||||||||||||
| The split ring is a ring where you don't need chains in between each ring. And is 
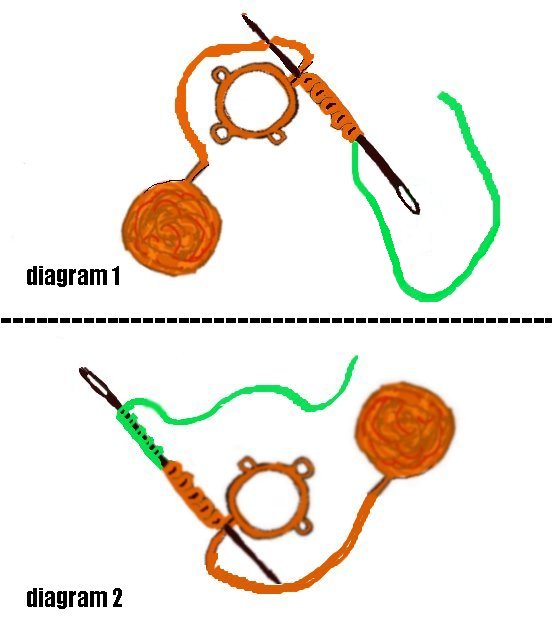
done with the NEEDLE thread as well as the BALL thread. 
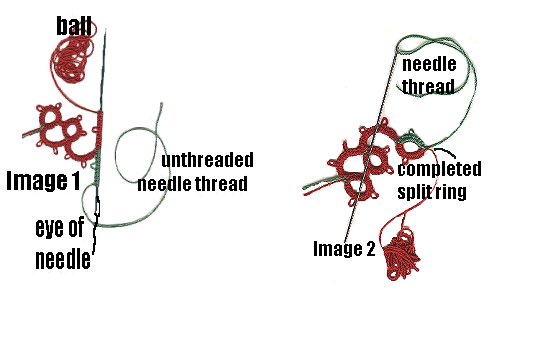
You start off by doing the same as you did for the normal ring...5 ds p 5 ds, with the BALL thread.......Then you UN-THREAD your needle and turn your work around. So the EYE of the needle is now going to be used as the point. you use the NEEDLE THREAD to do the stitches on the eye end of your needle. 5 ds p 5 ds When you have done the stitches with the needle thread, RE-THREAD your needle with the needle thread and close the split ring. 
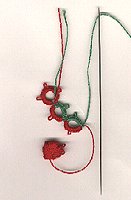
as you did for the normal ring....in this demo I used two colors. so you can see what is happening. 
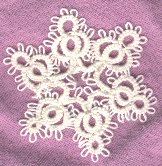
This will give you a string of rings like this....oooo |
||||||||||||||||||||||||||||||||||||||||||||||||||||||||||||||
| Shows you what you have done previously, with another chain added. It also shows the stitches (in RED being the BALL thread) and the stitches (in GREEN being the NEEDLE thread) |
||||||||||||||||||||||||||||||||||||||||||||||||||||||||||||||
| IMAGE 1 | ||||||||||||||||||||||||||||||||||||||||||||||||||||||||||||||
| IMAGE 2 | ||||||||||||||||||||||||||||||||||||||||||||||||||||||||||||||
| Shows the completed split ring | ||||||||||||||||||||||||||||||||||||||||||||||||||||||||||||||
| IMAGE 3 | ||||||||||||||||||||||||||||||||||||||||||||||||||||||||||||||
| Shows a string of split rings...the first ring is a normal one. | ||||||||||||||||||||||||||||||||||||||||||||||||||||||||||||||
| IMAGE 3 | ||||||||||||||||||||||||||||||||||||||||||||||||||||||||||||||
![]() |
||||||||||||||||||||||||||||||||||||||||||||||||||||||||||||||
![]() |
||||||||||||||||||||||||||||||||||||||||||||||||||||||||||||||
![]() |
||||||||||||||||||||||||||||||||||||||||||||||||||||||||||||||
| These diagrams may help to explain the split ring, and how to do it | ||||||||||||||||||||||||||||||||||||||||||||||||||||||||||||||
| THE SPLIT CHAIN | ||||||||||||||||||||||||||||||||||||||||||||||||||||||||||||||
| The split chain is worked similar to the split ring. 
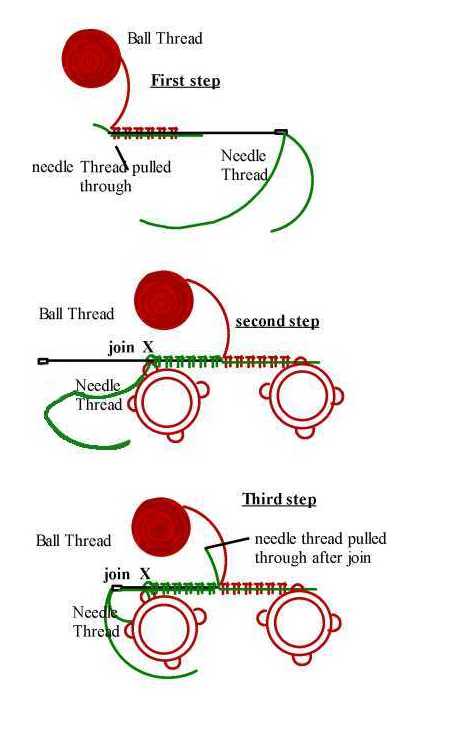
The difference is that you have to do a join before the stitches of the second half of the split, The join being made would be in the same place as for the normal chain. see the diagrams |
||||||||||||||||||||||||||||||||||||||||||||||||||||||||||||||
![]() |
||||||||||||||||||||||||||||||||||||||||||||||||||||||||||||||
| TUTORIALS | ||||||||||||||||||||||||||||||||||||||||||||||||||||||||||||||
| HOME | ||||||||||||||||||||||||||||||||||||||||||||||||||||||||||||||
| PREVIOUS | ||||||||||||||||||||||||||||||||||||||||||||||||||||||||||||||
| NEXT | ||||||||||||||||||||||||||||||||||||||||||||||||||||||||||||||